What is this book?
This is the on-line textbook used at the University of Denver for the first-quarter Introduction to Programming 1 course (COMP 1351).
This book is written to teach programming in python, and relies on dudraw, a simple in-house graphics package that extends Princeton's stddraw.
Instructions on software installation can be found in the first chapter.
The official location for this book is Introduction to Programming 1.
(Copyright © 2023 by Faan Tone Liu and Mohammed Albow)
Getting started
In this first chapter you will download required software, write your first python program, and see an introduction to functions (a programming technique for breaking code into logical parts). You'll also begin using a simple graphics packing called dudraw, for drawing images with a python program.
Installation
Development Environment
In order to be able to write and execute Python programs, we will have you install two different pieces of software on your computer:
Python:
This is the Python interpreter (or Python executable). This is the software that will actually read your Python code, and tell the computer how to execute it.
This is usually bundled with an extra piece of software (written in Python!) called 'pip'. Pip is a package manager that is used to install and manage extra Python packages and libraries. It gives you easy access to more powerful tools that aren't necessarily included with Python from the get-go.
The interpreter is technically the only software you need to write and execute Python programs (and it is the most important!), but to make our lives easier we will also install...
Visual Studio Code:
This is a code editor called Visual Studio Code (VSCode) -- not to be confused with Visual Studio, another Microsoft product.
Any Python program that you write will simply be a text file, but with a filename that ends in ".py" (instead of ".txt", or ".doc" for example). Because of this, you can use any simple text editor to write the code if you want (for example Notepad.exe on Windows, or TextEdit.app on Mac -- but not Microsoft Word!).
Nowadays though, many programmers will use a special text editor that makes writing code easier by adding helpful tools like syntax highlighting, autocomplete suggestions, and executing/debugging programs - all from within the text editor!
VSCode is one of these -- it's just a special text editor with helpful features for working with code. A neat bonus is that, while we will be using it for Python exclusively in this class, VSCode also works with most other popular programming languages!
- Side-note: When enough features are bundled together in a code editor, and especially when that editor is specifically targeted towards one particular programming language, it is often called an IDE (Integrated Development Environment). VSCode is like our IDE in this case, although it doesn't have all the features that a true IDE might have - but that's okay, we won't need them for now.
VSCode will also give us the ability to collaboratively write code together in real-time on separate computers!
Python Installation and Setup
Visit the following page to download the latest official Python installer for your operating system:
https://www.python.org/downloads/
The latest Python version will appear as 3.xx.xx, where xx is some version number.
Once you've downloaded the installer (.pkg for MacOS, or .exe for Windows) you can run it simply by double-clicking it.
For the most part, the installation process should be self-explanatory and you can just click through without changing any settings, though there is one extra consideration depending on your operating system:
Windows:
- When the installation begins, on the first screen you should see a checkbox at the bottom for the option to "add Python to PATH". Make sure that box IS CHECKED (you DO want to add the Python executable to your system PATH!), before continuing with installation.
MacOS:
- After the installation is complete, go to your Applications folder and find the Python folder inside (probably named "Python 3.xx"). The installer program may even have opened this folder for you automatically. Inside that folder there should be a file named "Update Shell Profile.command". Double-click on that file to add the Python executable to your system PATH. Some windows may be opened during this process. It's fine to close them.
- You may be asked if you want to move the "Python" Installer to the Trash. You may say yes to this, since the installation is complete.
Visual Studio Code Installation and Setup
Download and Install Instructions:
Visit to the following page to download the official VSCode installer (on Windows you can also install it through the Microsoft App Store): https://code.visualstudio.com/
You'll want to download the latest "Stable" build (which should be the default option for the download button). Continue through the default installation (no need to change any settings).
Then follow the instructions based on your operating system:
Windows:
- Double click on .exe file, accept the license agreement then click next.
- Leave the default destination location unchanged and click next
- Leave the "Select Start Menu Folder" location unchanged and click Next
- Check "Create a desktop icon", leaving the rest of the selections as-is, and click next.
- Finally, click "Install", and "Finish", and the program will open.
MacOS:
- Double-click to unzip, then drag the file "Visual Studio Code" into the "Applications" folder on your mac. You can then drag it again, from the applications folder, to the dock to create a shortcut.
Setup VSCode:
Once installation is done and before you open VSCode, create a new folder on Desktop or Documents named "COMP1351".
Open VSCode and do the following:
- Optionally, go through any initial setup that it walks you through (choosing a theme, etc) or skip all of that for now.
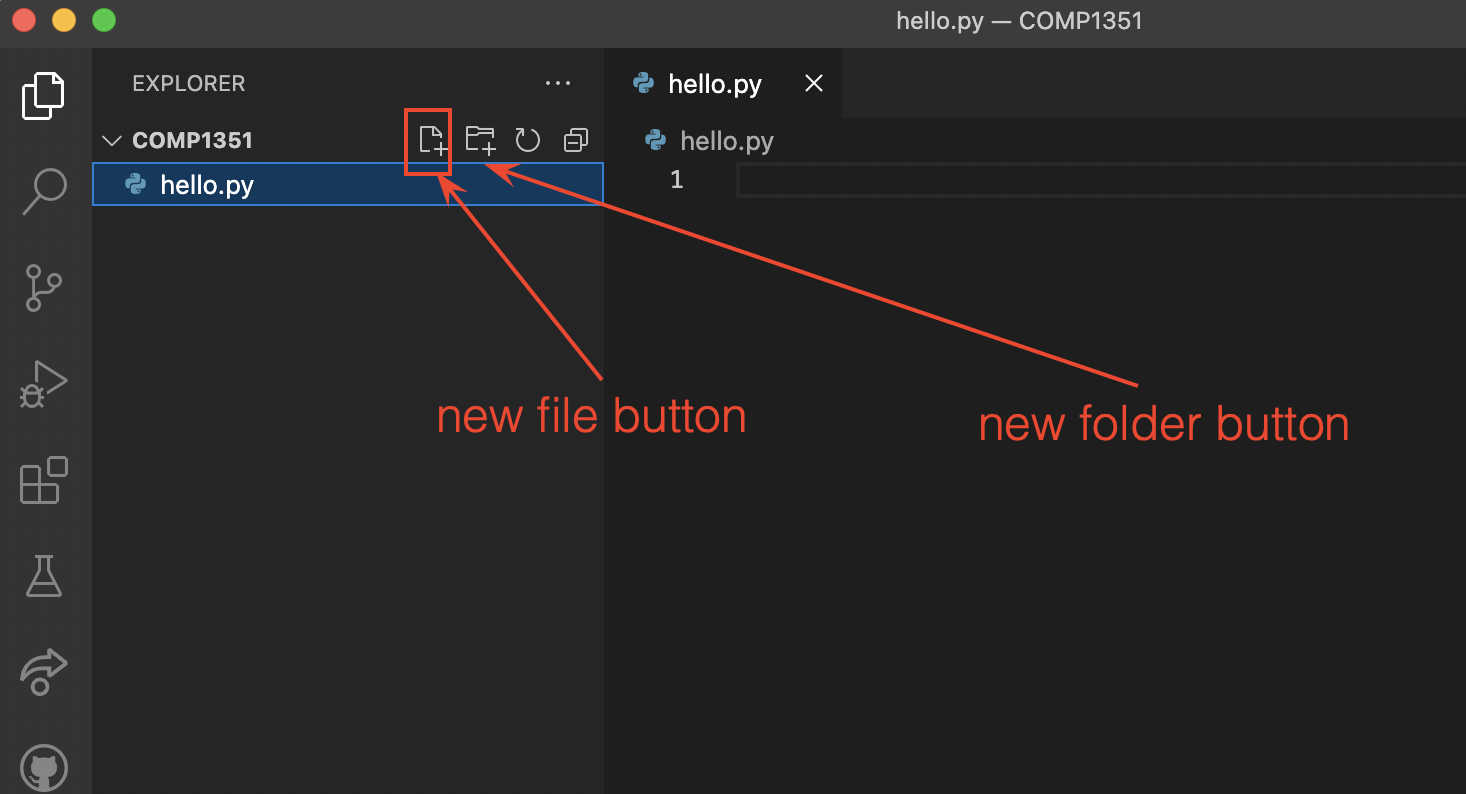
- When VSCode opens you will see the explorer pane on the left (see picture below). Click on Open Folder and navigate to your "COMP1351" folder. Depending on where you saved your COMP1351 folder, and your operating system, at this point you might get a security popup asking you if "you trust the author of the files in this folder" so click yes
- Create a new text file (File -> New Text File) or by clicking the "new file" button (see picture below). Name the file "hello.py" then press return. A new file will be created as in the picture below. Once you've created the file, you may see a popup in the lower-right corner of VSCode asking if you want to install the "Recommended Python (see "Extension" notes below - you can install them now or in a moment).
- Copy/paste the following Python code into that text file:
print("Hello world!")
print("This is my first Python program!")
- Save that file (File -> Save, or Command-S on a Mac and Control-S on Windows).
- Extensions.
- If you have not already installed them, then install them now.
- This will probably take you to another window in VSCode showing the extension info.
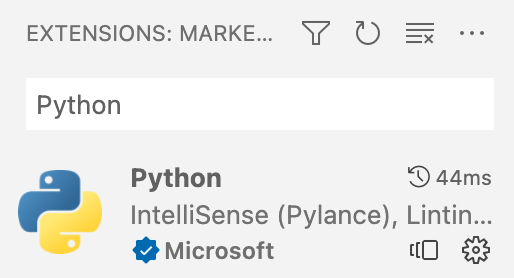
- If you didn't get the recommended extensions popup, or have problems starting the installation, you can go to the Extensions tab on the left-hand panel and manually search for the official Microsoft "Python" extension:
- After you're done installing the Python extension, go back your code by selecting the tab at the top with the filename you chose.
- In the bottom-right, you should see a part of the info bar that says "Python" and a version number next to it:
 Make sure that version number matches the Python version you installed (for example 3.10.6). If it doesn't, click on the version number and then select the Python executable that you installed earlier.
 - You should also now see in the upper-right corner a triangular "play" button. Go ahead and click it to run your Python file!
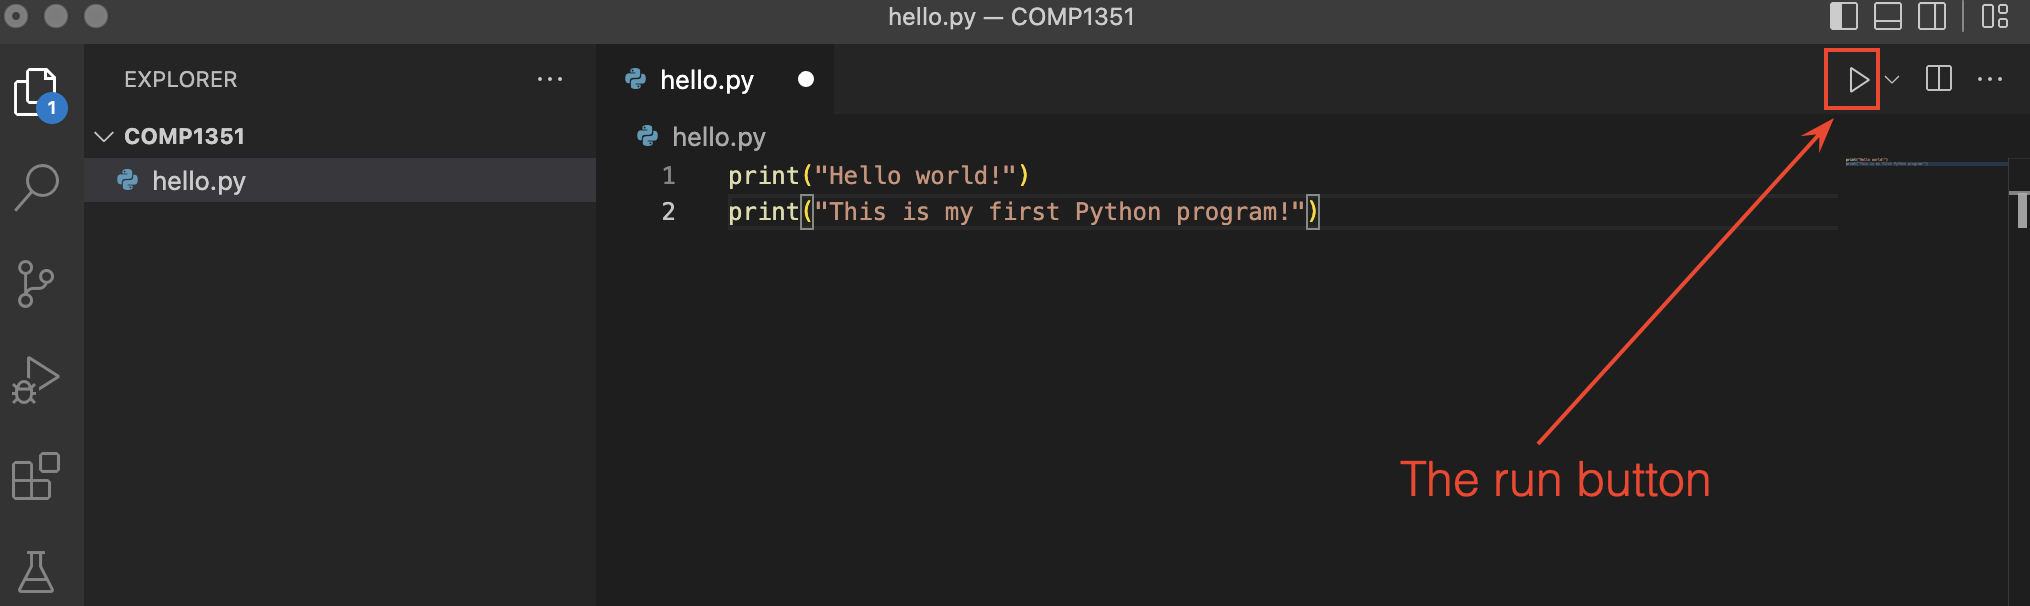
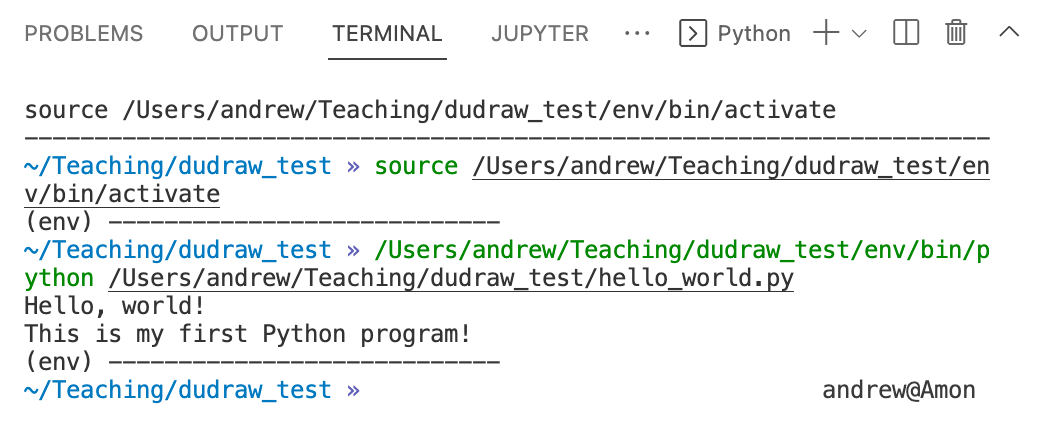
- If everything is working, you should see a console come up at the bottom of your window, and at the end of the text in that console you should see the text "Hello world!" and "This is my first Python program!" (probably among other things).
Final Setup
If you've gotten this far, congratulations! You have a working Python and VSCode installation! There just two more things to do before you're ready to go for this class:
Live Share Collaboration:
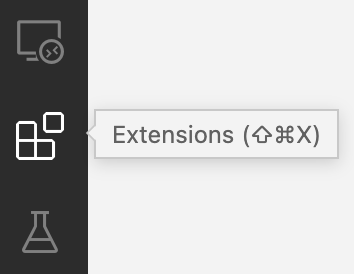
- Go to the Extensions tab of VSCode (the icon on the left that looks like a 2x2 grid with a square popped out).
- From there search for the "Live Share" extension. It will have an official Microsoft check-mark logo attached to it, so you know which one is the correct one.
- Install it!
- Now in the bottom-left of your VSCode window, you should see a "Live Share" button. You'll use this later in class to collaboratively write code with your group!
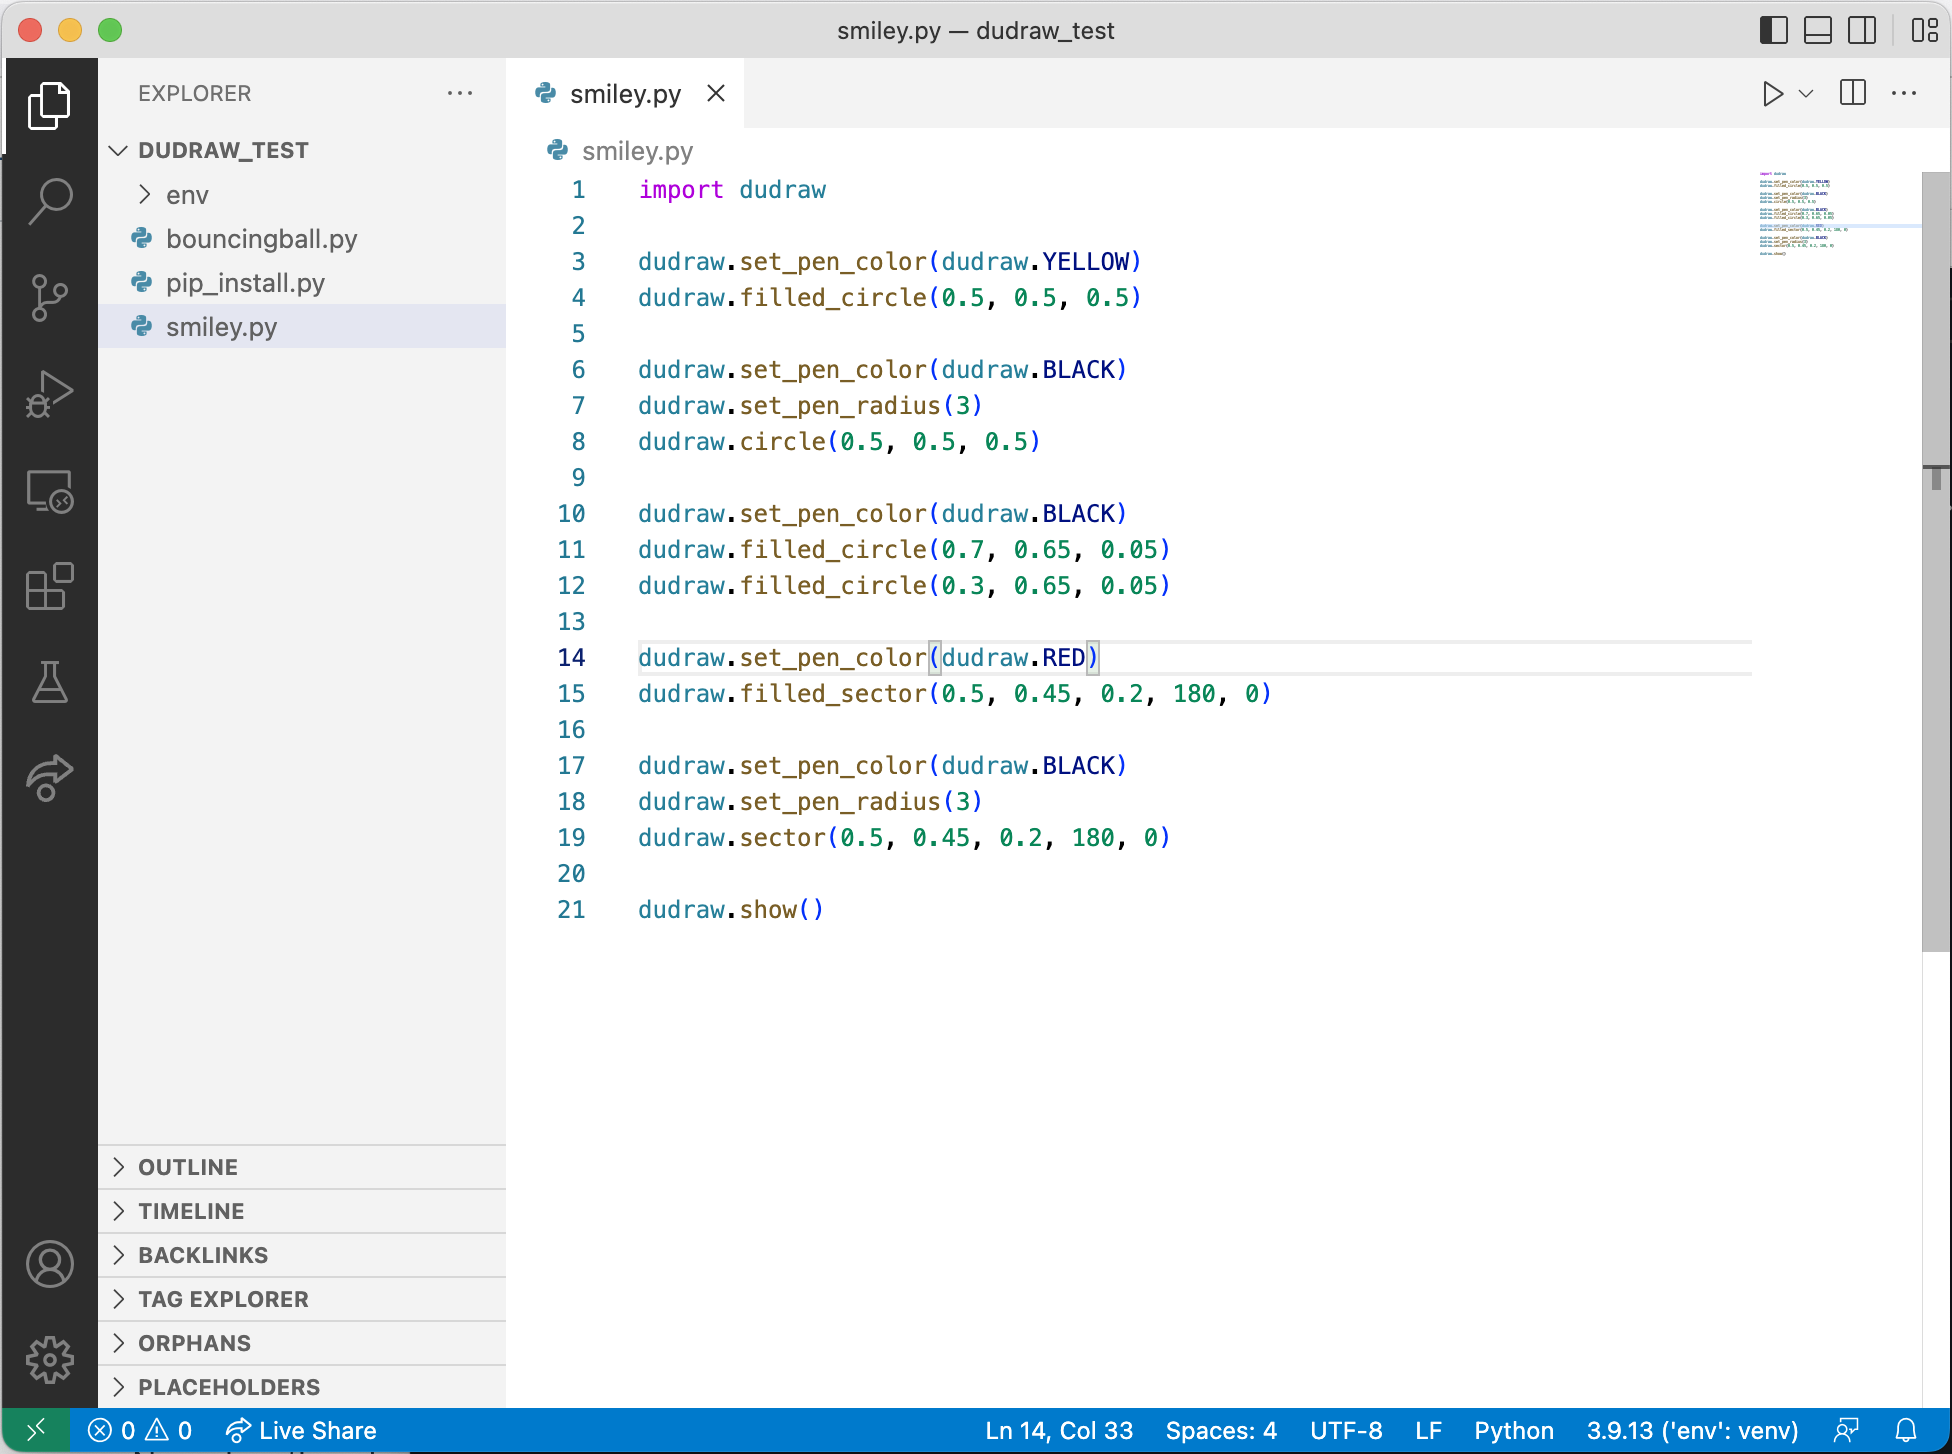
dudraw Graphics Library:
The dudraw graphics library is a software package written at DU, based on the original stddraw package written at Princeton. It is a simple package that will allow us to draw images and create animations in our Python programs. Here's how to install it:
- Make a new Python file (File -> New File... -> Python).
- Copy/paste the following code into the file:
import sys
import subprocess
subprocess.check_call([sys.executable, "-m", "pip", "install", "dudraw"])
import dudraw
dudraw.set_canvas_size(400,400)
dudraw.filled_circle(0.5, 0.5, 0.25)
dudraw.show(10000)
- Save the file somewhere (again, with a ".py" ending, maybe "dudraw_test.py").
- And then run it (again using the triangular "run" button).
- If everything goes well, you should see a window appear with a black circle in it. It will close itself after 10 seconds. That's it!
If something went wrong in any of the steps above, try the videos in the preclass assignment. If those don't help, then please contact your instructor before the first class to get help with setting up.
Your first Python program
It is traditional in Computer Science for your first program in any language to output the phrase "Hello, world!" to the console. This is a way of checking that your IDE (Integrated Development Environment) is working completely. In Python, the bare-bones "Hello, world!" program is just one line. Our version will be longer, to illustrate some other important programming practices.
In the VSCode application, open the browswer window and create a new file called hello.py. It's important that the name you choose ends with .py, so that your IDE knows to interpret your file as a Python program. Paste the following:
"""
First Python program, that outputs "Hello, world!"
File Name: hello.py
Date:
Course: COMP1351
Assignment: first Python program
Collaborators: 1351 Instructors
Internet Sources: None
"""

def main():
    # Here's the guts of the program, just one line:
    print("Hello, world!")

# Run the program:
if __name__ == '__main__':
    main()
Key points to notice and remember:
- Use the
print()function to output to the console. Put the text you want to output inside of the parentheses. Text in python (called a string literal) is enclosed either within double quotes ("text") or single quotes ('text'). - Comments in a computer program are lines that Python itself ignores. Comments are there for the benefit of humans (including your future self) reading your program. There are two kinds of comments in python: block comments and in-line comments.
- You can see that the first 9 lines of this program is a block comment, since it is enclosed between lines of three double-quotes. Every python program that you turn in this quarter will start with a block comment giving your name, the purpose of the program, the name of the file it is stored in, the date, the course it is for, the assignment it is fulfilling, your collaborators, and any internet sources you used.
- An inline comment starts with a
#-sign. Anything on the line after a#is a comment that Python ignores. Placing in-line comments in your code to explain your thought process while writing the code is an essential part of writing good code. Write the comments either before or during the coding process, not after. - The lines
define the main function of the program. This function has one comment, and one line of executable code.def main(): # Here's the guts of the program, just one line: print("Hello, world!") - At the end of the program, the lines
have the effect of calling (also called invoking or executing) the main function. Notice that the definition of the function itself (if __name__ == '__main__': main()def main()) has the lineprint("Hello, world!"). But that line doesn't get executed until themain()function itself is called.
Introduction to dudraw
What can you do with dudraw?
The python package dudraw is a minimal graphics library developed for teaching a beginning python programming class. Its starting point was stddraw, developed at Princeton University (see Elements of Programming in Python). At the University of Denver we modified and enhanced that package to produce dudraw.
The dudraw package has graphics primitives for drawing points, lines, circles and ellipses, squares and rectangles, triangles, quadrilaterals, polygons, circular and elliptical sectors, annuli and text. You can set the color you want the objects to be, and the width of points, lines and outlines.
You can find out about key-clicks and mouse presses from the user, and respond to them within your program. You can clear the background or use an image from a file as your background. You can save the image you produce to a file.
The dudraw package is a paint-style graphics package. In other words, you draw graphical objects, but they cannot be moved or deleted after being drawn.
How do I get access to dudraw?
First make sure that you have followed all the installation steps on the Python, VSCode, and dudraw Installation page. If you've successfully completed these steps then start your python program with the line
import dudraw
and you will be able to call any of the functions in dudraw.
If you were unable to install dudraw with the normal installation instructions, please reach out to a teacher or TA for help and they will have you attempt to install dudraw using the command line for your operating system and issuing a command like:
pip install dudraw
Again, please ask for help if you're having trouble installing dudraw.
How do I use dudraw?
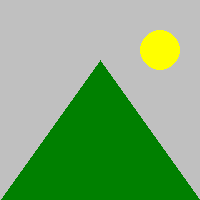
Begin by creating a canvas of a specified size (in pixels), then issue graphics commands. When you are done, call the show()function and a window will appear with the image you have created. The parameter to the show() function is the number of milliseconds to display the image. Unless you set the scale, the default scale is from 0 to 1 on the x-axis and 0 to 1 on the y-axis. Here's a simple program, and the image it produces.
import dudraw
# open a square window, parameters are width and height, in pixels
dudraw.set_canvas_size(200,200)
# fill the canvas with the given color
dudraw.clear(dudraw.LIGHT_GRAY)
# once the pen color is set, that is the color used until it is changed again
dudraw.set_pen_color(dudraw.DARK_GREEN)
# draw a triangle with vertices (0, 0), (1, 0) and (0.5, 0.7)
dudraw.filled_triangle(0, 0, 1, 0, 0.5, 0.7)
dudraw.set_pen_color(dudraw.YELLOW)
# Draw a circle with center at (0.8, 0.75), with a radius of 0.1
dudraw.filled_circle(0.8, 0.75, 0.1)
# Display the canvas
dudraw.show(10000) # display the result for 10 seconds
How do I get more colors?
This is a list of the colors pre-defined in dudraw:
dudraw.WHITE
dudraw.BLACK
dudraw.RED
dudraw.GREEN
dudraw.BLUE
dudraw.CYAN
dudraw.MAGENTA
dudraw.YELLOW
dudraw.DARK_RED
dudraw.DARK_GREEN
dudraw.DARK_BLUE
dudraw.GRAY
dudraw.LIGHT_GRAY
dudraw.ORANGE
dudraw.VIOLET
dudraw.PINK
dudraw.BOOK_BLUE
dudraw.BOOK_LIGHT_BLUE
dudraw.BOOK_RED
To create colors of your own, first note that a color on a computer monitor can be defined by an intensity for red light, green light and blue light, each of which is an integer value from 0 to 255. Colors on a compter monitor are additive like light, rather than subtractive like paint. For example, to create yellow light, you add together green light and red light. So the brightest yellow is defined by red = 255, green = 255, blue = 0. You can use many different programs to experiment with choosing colors. On many browsers, if you do an internet search on "color picker" one will show up. Or there are many free ones available on websites, for example here: color picker website. For example, here's a nice plum color, with values r = 140, g = 40, b = 160:

Here's a way to make your background this color, or to set your pen color to this color:
dudraw.clear_rgb(140, 40, 160) # draw a plum-colored background
dudraw.set_pen_color_rgb(140, 40,160) # set the color for future shapes
May I see some other shapes?
The code below shows some examples of lines and basic shapes that are affected by the pen radius.
#---------------------------------------------
# demonstration of some basic shapes in dudraw
#---------------------------------------------
import dudraw
# open a 600x200 pixel canvas, and set the scale to one unit per pixel
dudraw.set_canvas_size(600,200)
dudraw.set_x_scale(0,600)
dudraw.set_y_scale(0,200)
dudraw.clear(dudraw.LIGHT_GRAY)
# draw a vertical line, from (10,10) to (10,100)
dudraw.line(10, 10, 10, 190)
# change the color, and change the width of the pen to 4 units (which is 4 pixels in this example).
dudraw.set_pen_color(dudraw.VIOLET)
dudraw.set_pen_width(4)
dudraw.line(30, 10, 30, 190)
# make a green rectangle with a thick outline
dudraw.set_pen_color(dudraw.DARK_GREEN)
dudraw.set_pen_width(10)
dudraw.rectangle(100, 100, 50, 90) # center at (100,100), half-width=50, half-height = 90
# ellipse with thin red outline
dudraw.set_pen_color(dudraw.RED)
dudraw.set_pen_width(1)
dudraw.ellipse(200, 100, 30, 90) # center at (200, 100), half-width = 30, half-height = 90
# Blue quadrilateral
dudraw.set_pen_color(dudraw.DARK_BLUE)
dudraw.set_pen_width(3)
# The four vertices are (250, 10), (250, 190), (300,190), (275, 10)
dudraw.quadrilateral(250, 10, 250, 190, 300, 190, 275, 10)
# Sector, notice that the color and width were not changed, so the values remain as before
# The center is at (350, 100). The radius is 50. The last two parameters give the starting and
# ending angles, in degrees. Angles are measured as typical in mathematics,
# counter-clockwise starting at the positive x-axis
dudraw.sector(350, 100, 50, 30, 330)
# points: size is controlled by the pen width, parameters are just the location of the point
dudraw.set_pen_color(dudraw.CYAN)
dudraw.set_pen_width(10)
dudraw.point(450, 150)
dudraw.point(500, 150)
# elliptical arc: give the center point, the radius in the x-direction, the radius in
# the y-direction, and the start/stop angles.
# Angles are measured as typical in mathematics, counter-clockwise starting at the positive x-axis
dudraw.set_pen_color(dudraw.PINK)
dudraw.elliptical_arc(475, 150, 50, 100, 200, 340)
dudraw.show(10000) # display the result for 10 seconds
These are not the only shapes affected by the pen width setting. Others include dudraw.circle(), dudraw.square(), dudraw.polygon(), dudraw.triangle(), dudraw.arc(), dudraw.elliptical_sector(), and dudraw.annulus().
There are also dudraw primitives that produce filled regions rather than outlines, and these are not affected by the pen width. Here's a program with some examples of filled regions.
#----------------------------------------------------
# demonstration of some basic filled shapes in dudraw
#----------------------------------------------------
import dudraw
# open a 600x200 pixel canvas, and set the scale to one unit per pixel
dudraw.set_canvas_size(600,200)
dudraw.set_x_scale(0,600)
dudraw.set_y_scale(0,200)
dudraw.clear(dudraw.LIGHT_GRAY)
# draw a vertical line, from (10,10) to (10,100)
dudraw.line(10, 10, 10, 190)
# change the color, and change the width of the pen to 4 units (which is 4 pixels in this example).
dudraw.set_pen_color(dudraw.VIOLET)
dudraw.set_pen_width(4)
dudraw.line(30, 10, 30, 190)
# make a green filled rectangle with a thick outline
dudraw.set_pen_color(dudraw.DARK_GREEN)
dudraw.filled_rectangle(100, 100, 50, 90) # center at (100,100), half-width=50, half-height = 90
# red ellipse
dudraw.set_pen_color(dudraw.RED)
dudraw.filled_ellipse(200, 100, 30, 90) # center at (200, 100), half-width = 30, half-height = 90
# filled Blue quadrilateral
dudraw.set_pen_color(dudraw.DARK_BLUE)
# The four vertices are (250, 10), (250, 190), (300,190), (275, 10)
dudraw.filled_quadrilateral(250, 10, 250, 190, 300, 190, 275, 10)
# Sector, notice that the color was not changed, this sector is also dark blue.
# The center is at (350, 100). The radius is 50. The last two parameters give the starting and
# ending angles, in degrees. Angles are measured as typical in mathematics,
# counter-clockwise starting at the positive x-axis
dudraw.filled_sector(350, 100, 50, 30, 330)
# points: size is controlled by the pen width, parameters are just the location of the point
# The points are left in this drawing you so can compare to the images of unfilled regions
dudraw.set_pen_color(dudraw.CYAN)
dudraw.set_pen_width(10)
dudraw.point(450, 150)
dudraw.point(500, 150)
# filled elliptical sector: give the center point, the radius in the x-direction, the radius in
# the y-direction, and the start/stop angles.
# Angles are measured as typical in mathematics, counter-clockwise starting at the positive x-axis
dudraw.set_pen_color(dudraw.PINK)
dudraw.filled_elliptical_sector(475, 150, 50, 100, 200, 340)
dudraw.show(10000) # display the result for 10 seconds
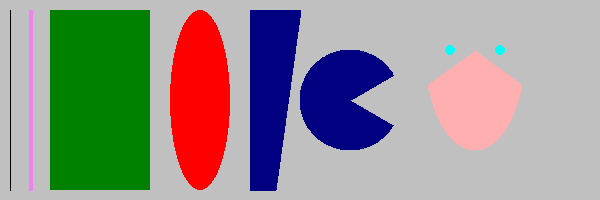
These are not the only filled shapes. Other examples include dudraw.filled_triangle(), dudraw.filled_circle(), dudraw.filled_polygon(), and dudraw.filled_annulus().
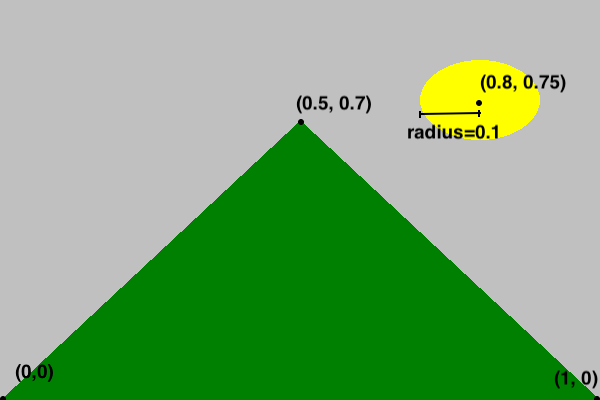
How do I change the scale?
By default, the scale in a dudraw canvas is [0, 1] x [0, 1], even if the size of the canvas itself is not square. For example, the code below produces the image shown. (The image is annotated to show the coordinates of a few points)
import dudraw
dudraw.set_canvas_size(600,400)
dudraw.clear(dudraw.LIGHT_GRAY)
dudraw.set_pen_color(dudraw.DARK_GREEN)
dudraw.filled_triangle(0, 0, 1, 0, 0.5, 0.7) # green triangle mountain
dudraw.set_pen_color(dudraw.YELLOW)
dudraw.filled_circle(0.8, 0.75, 0.1) # yellow circle sun
dudraw.show(10000) # display the result for 10 seconds
But sometimes you might prefer to set the scale to match the pixels, or some other scaling. This is often useful if the canvas is not square. Here's the code to produce a nearly identical drawing, with the scale on the x-axis and y-axis set to be different from each other, and to have one unit be the size of one pixel. The canvas was created with a width of 600 pixels and a height of 400 pixels. The x-scale is set to go from 0 to 600, while the y-scale is set to go from 0 to 400. Notice that each graphics primitive was modified to reflect the change of scale. The image below is annoted to show how the scale on the axes works.
import dudraw
dudraw.set_canvas_size(600, 400)
dudraw.set_x_scale(0, 600)
dudraw.set_y_scale(0, 400)
dudraw.clear(dudraw.LIGHT_GRAY)
dudraw.set_pen_color(dudraw.DARK_GREEN)
dudraw.filled_triangle(0, 0, 600, 0, 300, 280) # green triangle mountain
dudraw.set_pen_color(dudraw.YELLOW)
dudraw.filled_circle(480, 300, 40) # yellow circle sun
dudraw.show(10000) # display the result for 10 seconds
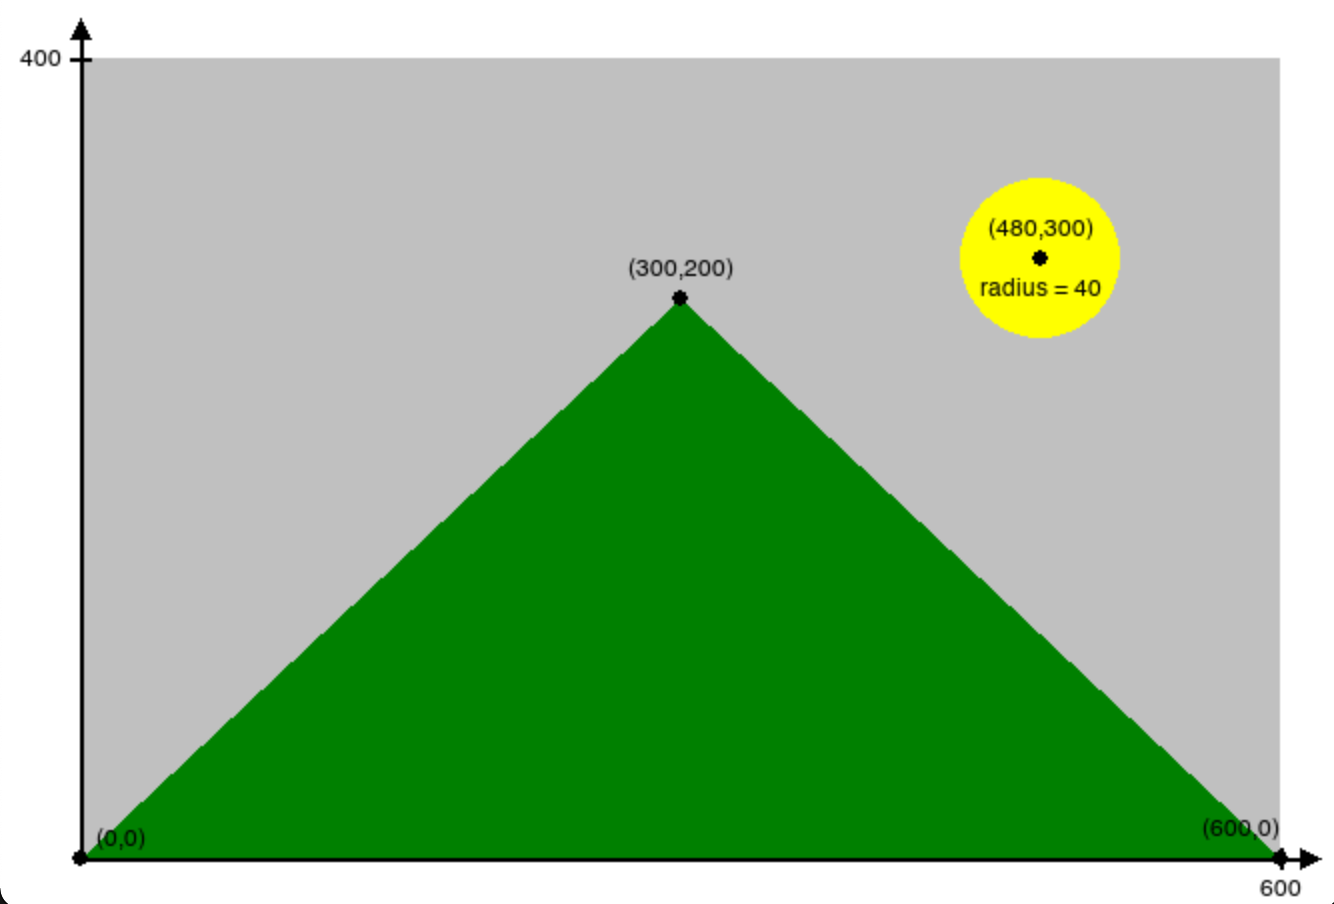
When you create a drawing, the first thing you should do is decide on your scale, since that is the basis for all of the numbers in each shape you draw.
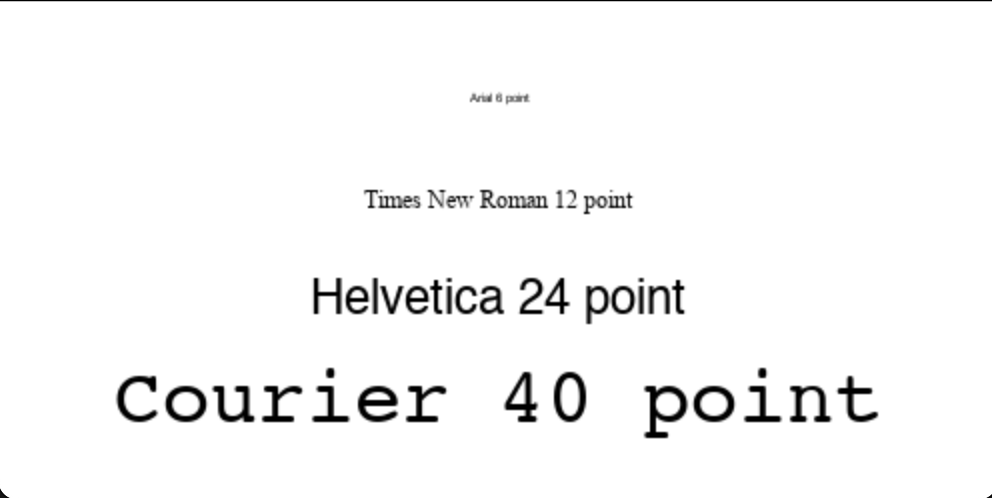
How do I change the font and the size of text?
To change the font, use the method dudraw.set_font_family("FontName").
To change the size of the font, use dudraw.set_font_size(size).
The size is in points. The default font family is Helvetica, and the default size is 12 points Here is demo code and the resulting image:
import dudraw
dudraw.set_canvas_size(500,250)
dudraw.set_font_family("Courier")
dudraw.set_font_size(40)
dudraw.text(0.5, .2, "Courier 40 point")
dudraw.set_font_family("Helvetica")
dudraw.set_font_size(24)
dudraw.text(0.5,0.4, "Helvetica 24 point")
dudraw.set_font_family("Times New Roman")
dudraw.set_font_size(12)
dudraw.text(0.5, 0.6, "Times New Roman 12 point")
dudraw.set_font_family("Arial")
dudraw.set_font_size(6)
dudraw.text(0.5, 0.8, "Arial 6 point")
dudraw.show(10000) # display the result for 10 seconds
How do I save my image in a file?
Use the dudraw.save() function to output .jpg files.
Here's an example of a program that draws a very simple picture, and saves the output to a .jpg file:
#-----------------------------------
# demo of saving to a file in dudraw
#-----------------------------------
import dudraw
# draw a red circle on a field of white
dudraw.set_canvas_size(300,300)
dudraw.set_pen_color(dudraw.RED)
dudraw.filled_circle(0.5, 0.5, 0.25)
dudraw.save("red_circle.jpg")
Notice that this program does not have a call to dudraw.show(). This means that, although the image is saved to the file, a window displaying the image is never opened, and the image is not displayed to the screen.
How do I get official details on all of the functions?
See here for the official documentation:
https://cs.du.edu/~intropython/dudraw/
And here for the source code:
https://git.cs.du.edu/dudraw/dudraw
User-defined functions in python
Most programming languages give you a way to separate a block of code from the main program. This is useful to
- provide organization to your program by chunking it into blocks that perform specific tasks, and
- allow you to reuse a block of code rather than repeat it.
Creating user-defined functions
This is the syntax for creating a user-defined function:
def function_name() -> None:
# Code block for the function
Key points:
- The keyword
defsignals the beginning of a function definition. - The empty pair of parentheses
()indicates that this function does not take any parameters. Function parameters are explained in a later section. - The
-> Noneindicates that the function does not return any values. Function return values are explained in a later section. - Defining functions is not completely new to you - you have defined the function
main()in every program you have written. - When you define a function, note that the code in the function is not executed. The code within the function is executed only when you call the function.
- Think of the function definition as a recipe, telling python exactly what to do when another part of the program calls the function.
- To call a function (i.e., to run its code): at the point where you want it to run, write the name of the funtion, with parentheses.
Example:
Here is the definition of a function called greet_user(). It asks the user their name, then says hello, using their name:
def greet_user() -> None:
name = input("What is your name? ")
print("Hello,", name)
In the above code, nothing is executed. The lines of code within the function only get executed when the function is called. Consider the following program that defines and uses (calls) the function greet_user():
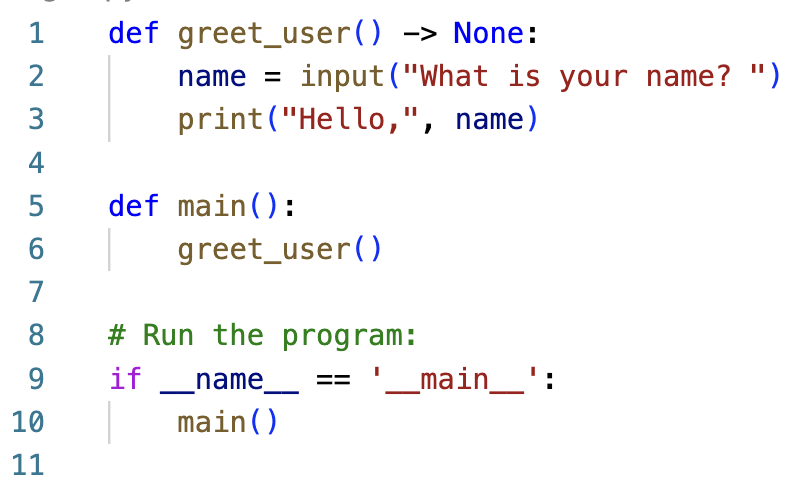
In the above code, lines 1-3 are the definition of the greet_user() function. Those lines define what you want python to do whenever greet_user() is called. On line 6, the greet_user() function is called. So when python executes line 6, it puts main() on hold, jumps to line 1, and executes the contents of the greet_user() function. That's the moment that the user is asked for their name, and the greeting is output. After that completes, the running of the program reverts back to line 6 in main() and continues from there.
Commenting functions
In this course, we will have a standard for commenting every function. After the def line, put a block comment explaining the purpose of the function. This special block comment is called a docstring. When we learn about parameters and return values, we will add additional information into these docstrings.
Example:
def greet_user() -> None:
"""
First example of a user-defined function. Ask user for their name, then
output "Hello, ", followed by their name
"""
name = input("What is your name? ")
print("Hello,", name)
Putting it all together
The following code shows a program that defines and uses several functions. Each of these functions defines how to draw a part of the final image. The definition of each function has been collapsed - you can't see the contents. This is actually helpful, because while looking at the program from the highest level, the details are distracting. Notice that in main() we can easily see the overall task of the program from the four function calls. If the details of drawing each shape were placed into one long main() function, the higher-level organization of the program would be lost, mired in the details. This demonstrates the importance of using functions to break down code into bite-sized chunks.
| Code | Image produced |
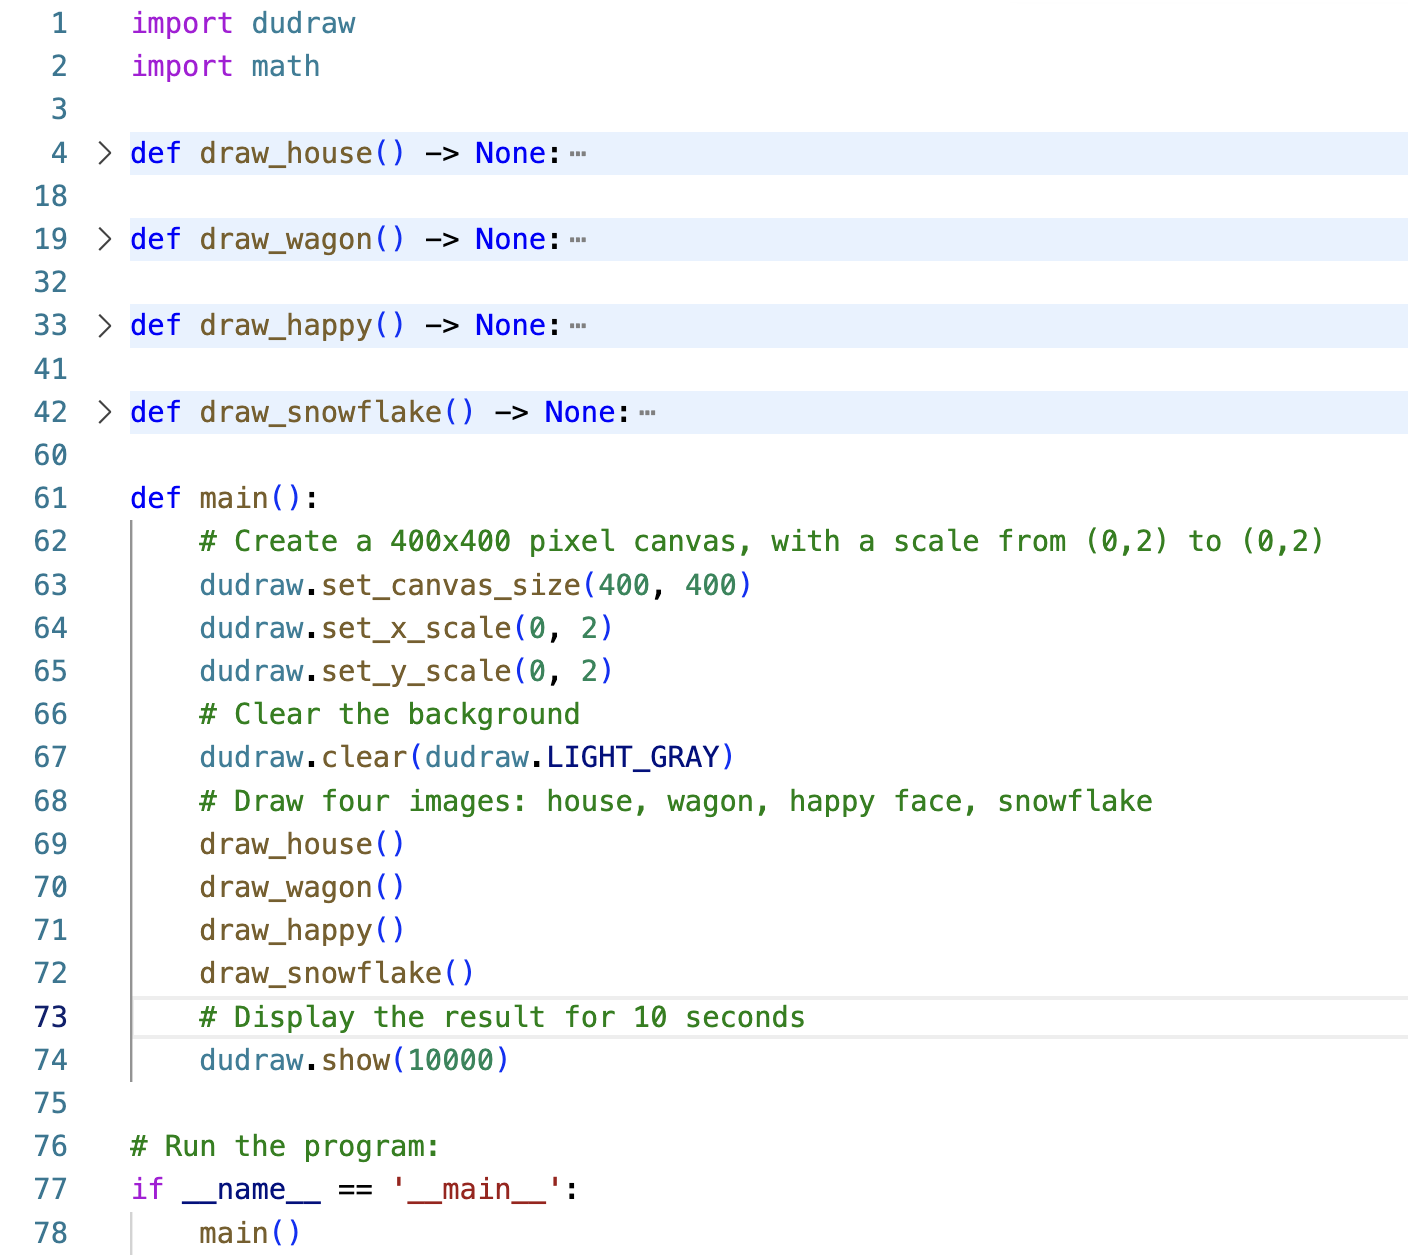
|
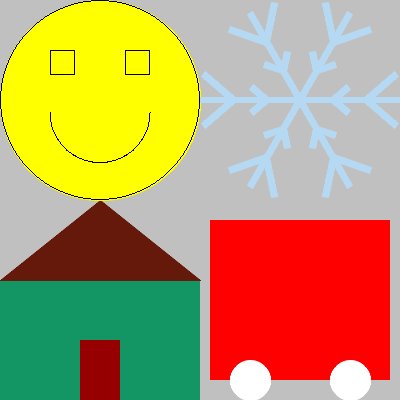
|
Variables
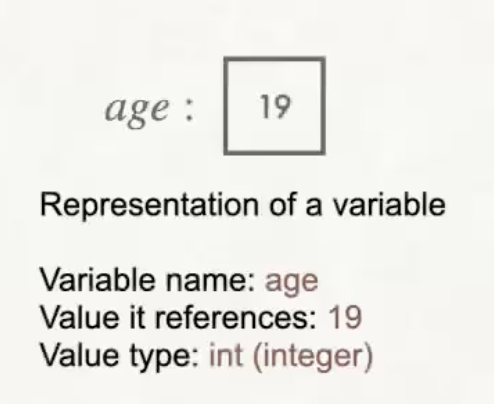
A first important idea in programming in python is variables. Don't be confused by the name "variable" - it is not at all like an unknown value in mathematics. Instead, the purpose of a variable is to have a named place in memory to store information you are using within your program. This chapter covers how to create and use variables.
Variables in python
- The purpose of a variable is to store information within a program while it is running.
- A variable is a named storage location in computer memory. Use the name to access the value.
- To store a value in a variable, use the
=operator (called the assignment operator). - An
=sign in Python is nothing like an equal sign in mathematics. Think of it more like an arrow going from right to left. The expression on the right is evaluated and then stored in the variable named on the left. - For example, the line of code
hourly_wage = 16.75stores the value 16.75 in the variable calledhourly_wage - You can change the value of a variable with another assignment statement, such as
hourly_wage = 17.25 - Every value has a type (
intfor integers,floatfor decimals,strfor text). In python, when you store a value in a variable (with=), that variable then automatically has a type. For example, after the above assignment,hourly_wageis of typefloat.
Rules and conventions for naming variables in python
- The first character must be a letter or an underscore. For now, stick to letters for the first character.
- The remaining characters must be letters, numbers or underscores.
- No spaces are allowed in variable names.
- Legal examples:
_pressure,pull,x_y,r2d2 - Invalid examples, these are NOT legal variable names:
4th_dimension,%profit,x*y,four(4),repo man - In python, it's a conventiion to use snake case to name variables. This means that we use all lower-case letters and we separate words in the variable name with underscores. Examples include
age,x_coordinate,hourly_wage,user_password - If the value stored in a variable is a true constant (in other words, its value will never change throughout the program), then we use all capital letters:
COURSE_ENROLLMENT_LIMIT,MAX_PASSWORD_ATTEMPTS. - For high quality code, it is crucial that you give descriptive names for variables. The variable names must help the reader of your program understand your intention.
Typical way we visualize variables
We usually draw variables by putting the value in a box, and labelling the box with the name of the variable:
Types of variables
Each variable has a name, a value, and a type. Types are necessary because different kinds of data are stored differently within the computer's memory. For now, we will learn three different types, for storing signed (positive or negative) whole numbers, signed decimals, and text.
| Type | Description | Examples | |
|---|---|---|---|
| Numerical type | int | Signed integer that stores whole numbers (no decimal) | 0, 7, -5 |
| Numerical type | float | Signed decimal value | 0.5, 20.0, -18.2, 2.5e3 = 2.5x10^3 |
| String type (Text) | str | Any number of characters surrounded by "" or '' | "Hello", 'world', '9' |
Creating a variable with an assignment operator
A variable is created or declared when we assign a value to it using the assignment operator =. In python, the code looks like this:
variable_name = <value>.
Examples:
# The next line stores an int value of 200 in the variable named age
age = 200
# The next line stores a float value of 7.5 in the variable named height
height = 7.5
# The next line stores a string (text) value of 'Chewbacca' in the variable named name
name = 'Chewbacca'
Notice that the left hand side of an assignment must be a variable name. Non-example:
# The following line is an error, don't do this!
7.5 = height
After creating a variable, you can change the value stored in a variable with another assignment operator at any time. This is called reassignment.
age = 201
Finding out the type of a variable or value
The type() function in python will return the type of either a variable or a value. Here are examples that show how to use it:
x = 5
print(type(x))
print(type("Wow!"))
print(type(3.14159))
The output of the above code will be:
<class 'int'>
<class 'str'>
<class 'float'>
Casting (changing the type) of a variable or value
You can change the type of a value (called “casting”) using the int(), float() and str() functions. For example:
int(23.7)(truncates the float value 23.7 to the int value 23. This is different from rounding - the decimal part is discarded, regardless of whether it is larger or smaller than 0.5.float(23)(outputting the result will give 23.0 rather than 23)str(23)(converts the integer23to the text"23")int("23")(converts the string"23"into a numerical integer value23)float("23")(converts the string"23"into a numerical decimal value23.0)int("23.5")results in an errorfloat("hello")results in an error
Doing arithmetic in python
Here are the basic arithmetic operators in python. In these examples, assume
x = 11
y = 4
| Operator | Description | Syntax | Output (x=11, y=4) |
|---|---|---|---|
+ | Addition | x+y | 15 |
* | Multiplication | x*y | 44 |
- | Subtraction | x-y | 7 |
/ | Decimal division (type is a float) | x/y | 2.75 |
// | Integer division (result of division is truncated, giving an int) | x//y | 2 |
% | Modulus (remainder when first operand is divided by the second) | x%y | 3 |
** | Exponentiation (raises the first to the power of the second ) | x**y | 14641 |
An example of a use of the modulus operator is to determine if an integer is even or odd. Note that if x is an integer, then x%2 takes the value 0 or 1. So x % 2 == 0 is True when x is even and False when x is odd.
Another example of integer division and modulus: When we divide 3 by 4, we get a quotient of 0 and a remainder of 3. So 3//4 results in 0 and 3%4 results in 3.
Warning note: In python, ^ is not an exponent!
Order of operations
The order of operations in python is similar to the order you are familiar with in math: parentheses, then exponentiation, then multiplication/division/modulus in order from left to right, then addition/subtraction in order from left to right.
Outputting information from the program to the user
In python, use the print() function to output information to the user.
Here is a run-of-the-mill print statement:
print("Hello, World!")
When you run this line of code, the following is output to the console:
Hello, World!
The following two lines show that when you have two print statements, they get executed in order.
print("Hello")
print("World")
The output shows that each print statement automatically takes you to the next line on the console.
Hello
World
You can put two or more strings in a print() statement, separated by commas. Usually, one or more of these string values comes from a variable. Note that the comma inside the quotes is part of the output, while the commas between strings are part of the syntax of the print() statement:
username = "Sam"
print("Hello,", username, "!")
The output shows that a space automatically is inserted between each parameter:
Hello, Sam !
Another way to build strings for output is to use the + operator for concatenation. Concatenation means putting two strings together by tacking the second one onto the end of the first one.
print("Hello," + username + "!")
The output below shows that when concatenating strings, a space does not automatically get inserted:
HelloSam!
Here are ways to put a space between two different strings:
print("Hello", username)
print("Hello " + username)
Use \n to insert a new line in the middle of a string:
print("Hello\nWorld")
Here's the output:
Hello
World
The backslash symbol \ in \n is called an escape character. It tells python that the letter following the backslash should be interpreted together with the \ as a pair with special meaning. Other examples include
\tfor tab,\"and\'to put a double quote or single quote into a string literal, and\\to insert a backslash.
For example, see if you can write a print() statement to produce the following tricky output:
"\n" is a newline,
while "\'" is a single quote.
Answer:
print("\"\\n\" is a newline,\nwhile \"\\\'\" is a single quote.")
A third way in python to combine multiple strings together and to include variable values within a string is a formatted string literal, commonly called an f-string. Create an f-string by prefixing the string with an f, then include any variable values within a pair of curly braces {}. For example:
print(f"Hello, {username}!")
outputs
Hello, Sam!
With f-strings, you can have rich control over the formatting. For example
import math
print(f"pi to 5 decimal places is {math.pi:.5f}, and e to 3 decimal places is {math.e:.3f}.")
outputs
pi to 5 decimal places is 3.14159, and e to 3 decimal places is 2.718.
Here's an online tutorial if you want to investigate more capabilities of f-strings: https://builtin.com/data-science/python-f-string
Finally, it sometimes causes us problems that a call to print() automatically includes a newline at the end of the output. Occasionally we want to suppress that. We do this by specifying in a second parameter to print() that the end should be an empty string "" rather than the default "\n". Here's an example showing how two calls to print() can output on a single line of the console:
print("Hello, world! ", end="")
print("It's a beautiful day! ")
Output:
Hello, world! It's a beautiful day!
Getting input from the user into the program
Use the input() function to ask the user of your program for a value. For example:
username = input("Enter your name: ")
print("Hello,", username)
Notice that the parameter within the parentheses of the input() function is the string that you want to display to the user as a message. That message, called a prompt, is output to the console when the input() line is executed. In other words, you don't need a separate print() statement. Make sure the prompt clearly communicates to the user what information you are asking them to enter. Once they type the value and hit the <return> key,
the input() function returns the value they entered. In the above example, the user's response is stored in a variable called username.
Here's a sample run of the above program:
Enter your name: Sam
Hello, Sam
Note that the input() function always returns a string (of type str). To clarify,
username = input("Enter your name: ")
print(type(username))
will output
<class 'str'>
But often we want the user to input a numerical value rather than a string (text) value. In this case we must cast the result to convert it to a numerical type. This is mandatory any time you want to do arithmetic with the number the user enters. For example:
user_age = input("Enter your age: ")
user_age = int(user_age)
print(f"Next year you will be {user_age + 1}.")
Sample run of the above program:
Enter your age: 19
Next year you will be 20.
Note that the casting can actually be done on the same line as the input. The input() function returns a string, which we can immediately cast using the int() function. The two lines below behave identically to the three lines of code just above.
user_age = int(input("Enter your age: "))
print(f"Next year you will be {user_age + 1}.")
Putting it all together
Here's a full sample program:
"""
Demo of creating and using variables and user input
File Name: variables_and_user_input.py
Date:
Course: COMP1351
Assignment: Preclass Assignment 2
Collaborators: 1351 Instructors
Internet Sources: None
"""
def main():
print("Program that computes number of miles from steps walked")
# Find out step count from user
step_count = int(input("How many steps did you walk today? "))
# On average there are 2250 steps per mile
num_of_miles = step_count/2250
# Report result to user
print(f"You walked {num_of_miles:.2f} miles today.")
# Run the program:
if __name__ == '__main__':
    main()
Sample run from the above program:
Program that computes number of miles from steps walked
How many steps did you walk today? 10000
You walked 4.44 miles today.
Generating random numbers
Often when programming we would like to use random numbers. For example, if we want to put a circle on a dudraw canvas at a random location, then for the (x, y) location we would use two random numbers of type float, chosen between 0 and 1. Or perhaps we want to write a program to play a guessing game where the user has to guess a number from 1 to 100, so we would need to generate an integer in that range.
Note that on a computer, there is no such thing as a true random number, since the processes on a computer are deterministic. However, randomness can be simulated using complex mathematical functions. Numbers generated this way are called pseudorandom numbers.
Generating random float values
Begin by importing the random package. Then use the random() function from that package to generate a (pseudo)random float in the interval [0,1). For example:
import random
def main():
print(random.random())
# Run the program:
if __name__ == '__main__':
main()
gives the following possible output (of course when you run it, a different number will be generated, since the number produced is random).
0.9654798677156062
A note about import: it is possible to import just a single function from a package rather than the entire package. If you do this, then you can refer to the function by its name function_name, rather than package_name.function_name. The following code is functionally identical to the example above:
from random import random
def main():
print(random())
# Run the program:
if __name__ == '__main__':
main()
Generating float values within an interval
Use the random.uniform() function if you want a random float from the interval different than [0,1). For example,
import random
def main():
print(random.uniform(2, 5))
# Run the program:
if __name__ == '__main__':
main()
outputs a random decimal number in the range [2, 5), such as
2.7178618144891766
Generating random int values within a range
One way to generate random integer values is to use the randint() function from the random package. The parameters are the lower bound and the upper bound you want for the integers. Unlike other functions in python, the stop value is included in the possible outcomes. For example:
print(random.randint(2, 5))
will output one of 2, 3, 4, or 5.
An alternate method for generating random numbers within a range
You can use random.random() to generate a random float in the range [0,1), then multiply by a number to scale it. For example, the expression 10*random.random() will generate a random float in the range [0, 10). You can then shift the interval by adding a number. For example, the expression 2 + 10 * random.random() generates a random float in the range [2, 12).
More generally, the number that is added represents the left edge of the interval, while the scaling factor represents the length of the interval. To generates a random float in the range [a, b), you can use the expression a + (b - a) * random.random().
To generate a random int value in a specific range, we use the same multiplication and addition technique, followed by casting the result to an integer. For example, int(5 * random.random()) generates a random integer 0, 1, 2, 3 or 4. Notice that before casting, 5 * random.random() generates a number in the range [0, 5). Since 5 is not included in the interval, when we cast to an int, it will not be one of the possible outcomes. As another example, to generate a random int from the integers 6, 7, 8, 9, Note that there are 4 possibilities, beginning with 6. So we can generate random ints in that range with the expression int(6 + 4 * random.random())
More generally, the expression int(a + n * random.random()) will generate a random int in a range of n possible integer outputs, starting with a.
Putting it all together
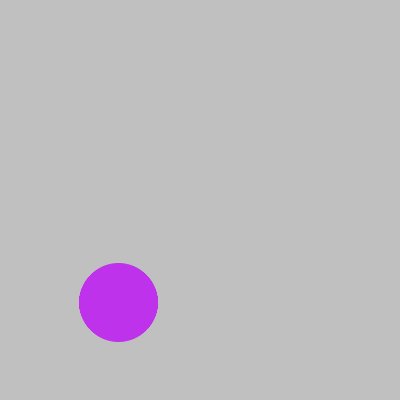
The example below creates a 400x400 pixel dudraw canvas, with the default [0, 1]x[0, 1] scale. It then draws a circle at a random location with a radius from 0.05 to 0.1 and with a random color. A possible output image is shown.
import random
import dudraw
def main():
# Set up the canvas, 400x400 pixels
dudraw.set_canvas_size(400,400)
# Background light gray
dudraw.clear(dudraw.LIGHT_GRAY)
# Pick two random values from the interval [0,1]
# for the center of the circle.
x_center = random.random()
y_center = random.random()
# Random from 0.05 up to 0.1 for the radius
radius = random.uniform(0.05, 0.1)
# three values from 0-255 (inclusive) for the rgb color
red = random.randint(0,255)
green = random.randint(0,255)
blue = random.randint(0,255)
# Set pen color then draw the circle
dudraw.set_pen_color_rgb(red, green, blue)
dudraw.filled_circle(x_center, y_center, radius)
# Display the result for 10 seconds
dudraw.show(10000)
# Run the program:
if __name__ == '__main__':
main()
Possible output drawing:
What is control flow?
Programs often need to take one action in certain cases, and different actions in different cases. Also, programs often need to repeat actions multiple times. These two ideas are called control flow.
Conditional statements (or branches) allow us to make choices about which lines of code to execute based on the values of variables. In python, we will learn if, if-else, and if-ladder statements.
Iterative statements (or loops) allow us to repeat lines of code either a specific number of times, or based on the value of a variable, or based on the contents of stored data. In python we will learn for-loop statements and while-loop statements.
This chapter covers writing conditional statements (branches) to control the flow of your program. The following chapter covers writing iterative statements (loops).
Boolean variables
In order to control the flow of a program, we will need a new type of value and variable called a boolean. In python the name of the type is bool. Boolean variables can only have two possible values: True or False.
Boolean variables are used much like other variables in python. For example, when creating an animated (moving) drawing in dudraw, we may want a variable called is_moving to keep track of whether one of our objects is continuing to move. Here is some code that would create and access that variable:
| Code | Output |
|---|---|
|
|
Relational operators
Relational operators can be used to compare two values to produce a boolean (True or False) result.
| Relational operator | What it does | Example (x=4, y=8) |
|---|---|---|
== | True if the two sides are equal, False otherwise | x==y→False |
!= | True if the two sides are not equal, False otherwise | x!=y→True |
> | True if the left side is greater than the right side, False otherwise | x>y→False |
< | True if the left side is less than the right side, False otherwise | x<y→True |
>= | True if the left side is greater than or equal to the right side, False otherwise | x>=y→False |
<= | True if the left side is less than or equal to the right side, False otherwise | x<=y→True |
Boolean Expressions
A Boolean expression is an expression that evaluates to either True or False.
Examples: Suppose the following code has executed:
x = 5
y = 3
z = 10
g = 2
Evaluate the following boolean expressions:
| Boolean expression... | ...evaluates to: |
|---|---|
x * g == z | True |
2 + y > z | False |
x - z >= g | False |
x * g <= z | True |
Logical Operators
Logical operators are used to construct more complicated boolean expressions from simpler boolean expressions.
The three logical operators we will use in python are not, and, and or.
| Logical operator | What it does |
Example ( |
|
|
Negate the value - meaning a |
|
|
|
"I completed homework and read a book", evaluates to |
|
|
|
"I completed homework or read a book" evaluates as |
|
Note that in the English language, sometimes people use the word "or" to mean one or the other but not both. That is an alternate meaning that in Computer Science and mathematics is called exclusive or. But in programming and in mathematics, or always means one or the other or both.
Precedence of Logical Operators
The order of precedence for logical operators is
not, thenand, thenor.
Just like in arithmetic, the order of precedence can be overridden with parentheses.
Sometimes people forget whether and or or has higher precedence. So you are urged to use parentheses in logical expressions even if they are not required, to avoid ambiguity and to improve the clarity of your code to others who read it.
Examples: Suppose the following code has executed:
x = 5
y = 3
z = 10
g = 2
Evaluate the following boolean expressions:
| Boolean expression... | ...evaluates to: |
|---|---|
x * g == z or not (x * x < y) | True |
(2 * y < z and z <= g) or x != 5 | False |
not (x == 7) | True |
Note: In the above examples, none of the parentheses are required, but they improve readability of the code.
Note: In the last example not (x == 7) is equivalent to x != 7 .
Conditional statements (also called branch statements)
In python, conditional statements include if statements, if-else statements, and if-else ladders.
If statements
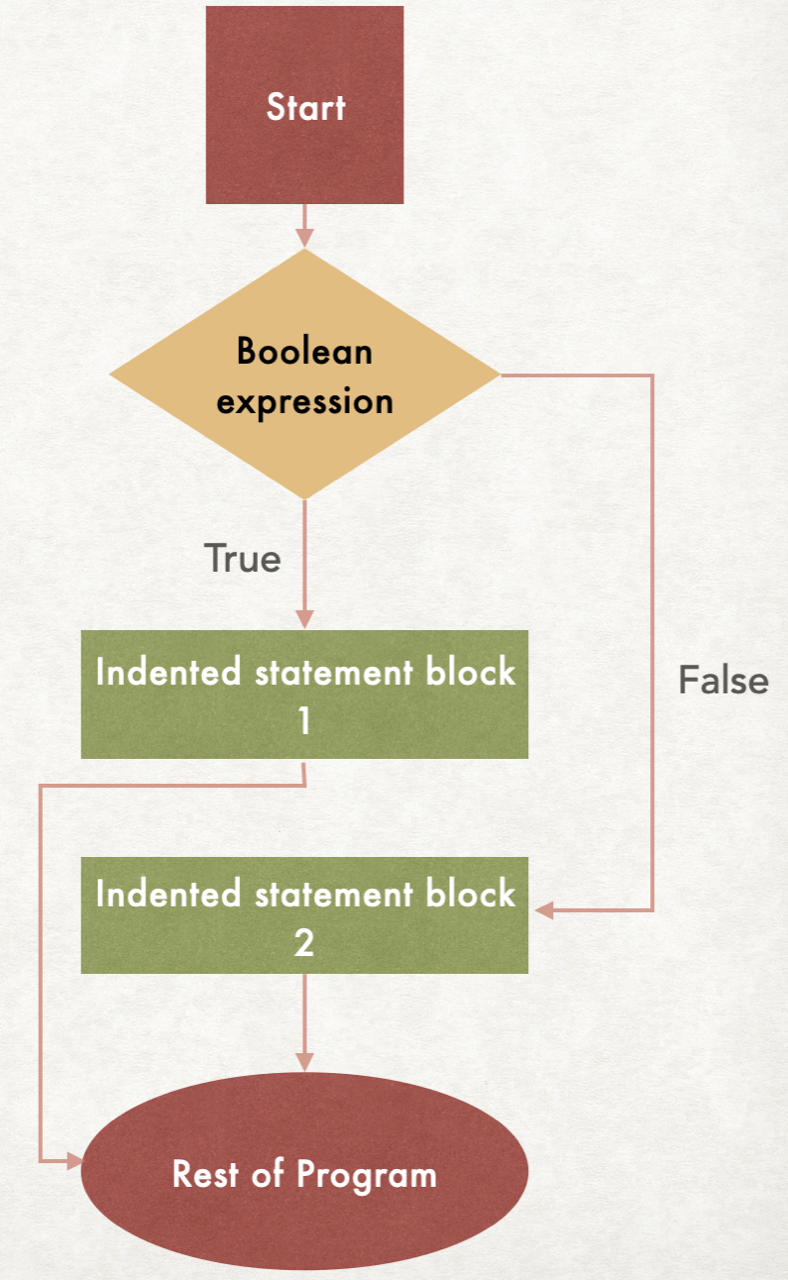
The syntax of an if statement is:
if <condition>:
# Indented statement block
# Rest of program
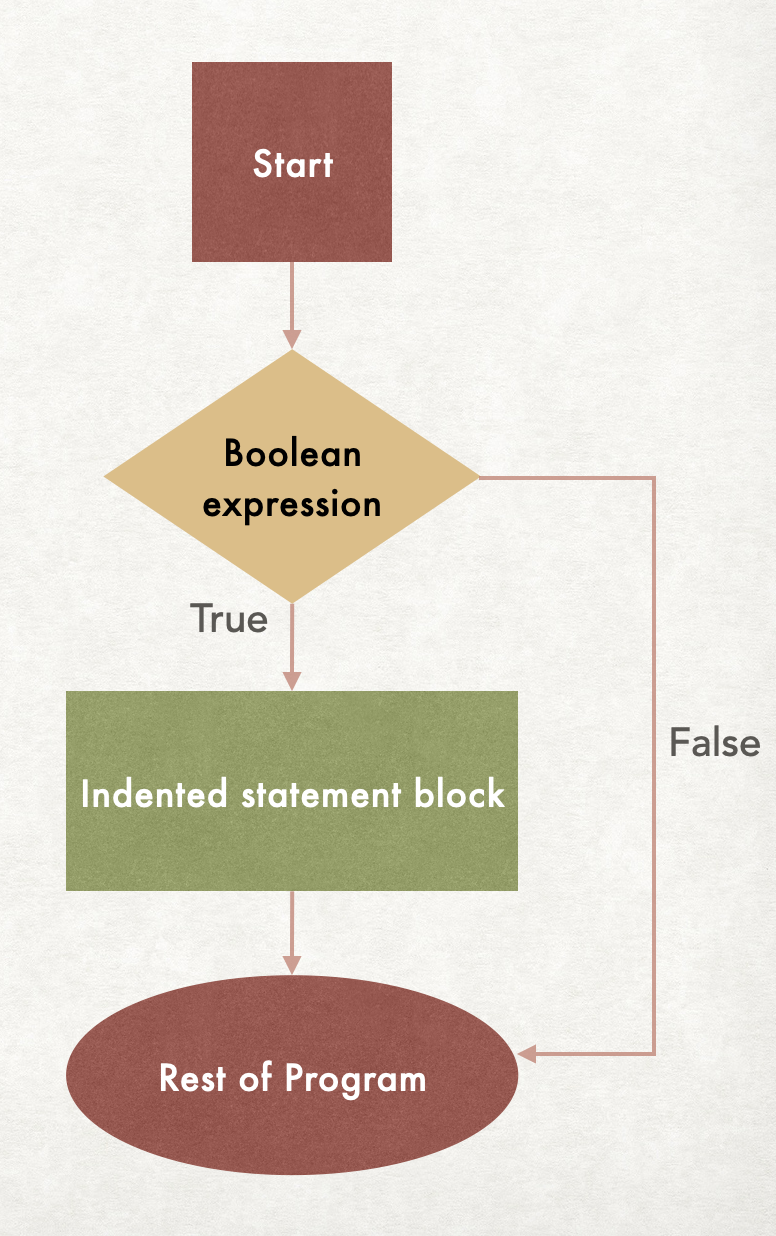
The condition is a boolean expression (in other words, it is True or False). The indented code block is executed if the condition evaluates to True, otherwise it is skipped. So the if statement controls whether or not that block of code runs. The indentation is extremely important - the indentation tells python which lines to skip if the condition is False.
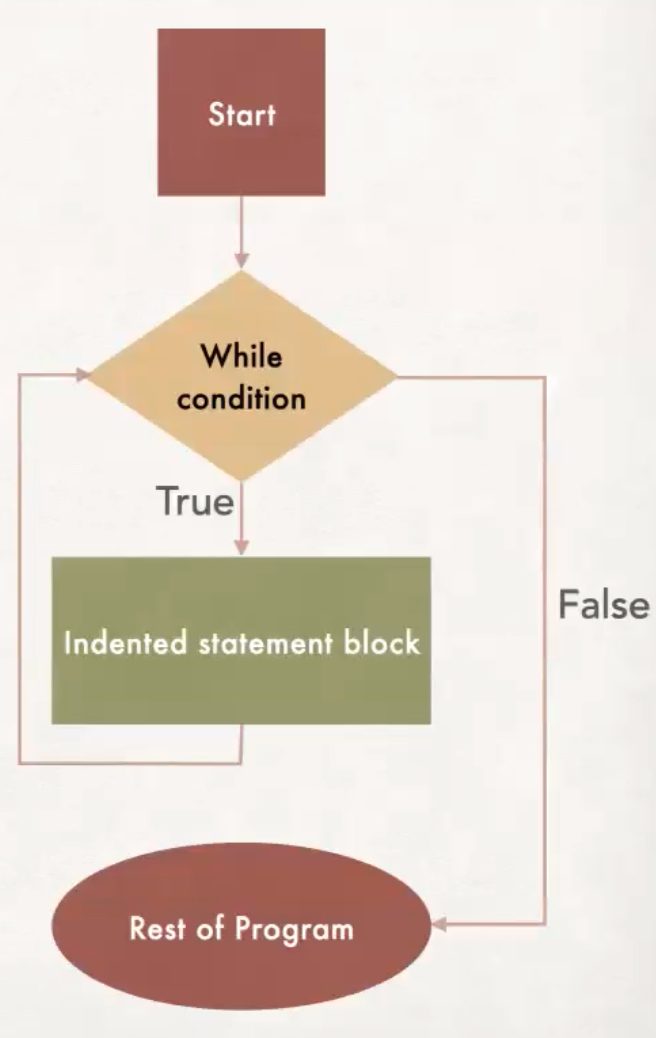
This flowchart shows visually that the indented block of code is executed if the boolean expression is True, and is skipped if the boolean expression is False.
Examples of if-statements:
Trace the following code blocks and confirm the outputs.
| Code | Output | Notes |
|
|
|
|
|
|
|
|
|
If-else statements
An if-else statement gives the program an alternative block of code to execute if the condition in the if statement is False. The if-else statement will execute one (and only one) of the two code blocks
The syntax of an if-else statement is:
if <condition>:
# Indented statement block 1
else:
# Indented statement block 2
# Rest of program
The condition is a boolean expression (in other words, it is True or False). The indented code block 1 is executed if the condition evaluates to True, otherwise the indented code block 2 is executed. Thus we control which block of code to execute based on the True/False value of the condition.
This flowchart shows visually the path through an if-else statement:
Trace through the following examples of if-else-statements, and confirm the outputs.
| Code | Output | Notes |
|
|
Since |
|
|
This time |
Notice that in the above code, only one of "A" and "B" can be output, since one lies in the if block and the other lies in the else block. It is not possible for both to be output.
If-else ladder statements
We use an if-else ladder if there are more than two options - it allows for multiple branches. It will execute one block for each of many possible outcomes.
Here is the syntax for an if-else ladder:
if <condition_1>:
# Indented statement block 1
elif <condition_2>:
# Indented statement block 2
elif <condition_3>:
# Indented statement block 3
...
elif <condition_k>:
# Indented statement block k
else:
# Indented statement block
# Rest of program
Each of the conditions is a boolean expression (True or False). If the outcome of one of the conditions is True, then the associated indented statement block will get executed. Once that block is executed, the rest of the if-else ladder is skipped, so no further conditions are checked. This means that no more than one of the blocks will be executed.
Note that the last else block is optional. If the else block is omitted, and if none of the previous blocks gets executed, then no code at all in the if-else ladder will run.
Here is a flowchart for the if-else ladder:

Trace through the following examples of an if-else ladder and confirm the output:
| Code | Output | Notes |
|
|
The first condition The second condition No further conditions are checked - the rest of the code is skipped. |
|
|
The first condition The second condition The third and final condition Nothing is output! Notice that the same issue occurs if This code could benefit from a final |
|
|
The first condition This drops us into the |
Putting it all together
Here's a complete sample program demonstrating if-else ladders:
"""
A simple program to demonstrate an if-else ladder
Author: COMP 1351 Instructor
File Name: conditional_demo.py
Course: Comp 1351
Assignment: Preview of conditional statements
Collaborators: 1351 Instructors
Internet Sources: None
"""
"""
What to wear in Colorado based on temperature (integer degrees)
Winter jacket if it is less than 25 degrees
Light to medium coat if it is 25 to 44 degrees
Fleece if it is 45 and above, and less than 65 degrees
No jacket needed above 65 degrees
"""
def main():
# Find out the temperature:
temperature = int(input("What is the temperature today? "))
# Give user clothing recommendation based on temperature:
if temperature < 25:
print("You should wear a winter jacket.")
elif temperature >= 25 and temperature < 45:
print("You should wear a medium or light coat.")
elif temperature >= 45 and temperature < 65:
print("You should wear a fleece.")
else:
print("You do not need to wear a jacket.")
# Run the program:
if __name__ == '__main__':
main()
Key points:
-
The
elseblock guarantees that the program will give output no matter what the user enters. -
The program only accepts integer input. Entering a decimal value will result in a
ValueError. We will learn later how to respond to errors on user input. -
It's a common student error to create a boolean expression like this:
temperature >= 25 and <= 45. Both sides of theandoperator must be fully-formed boolean expressions. So it must saytemperature >= 25 and temperature <= 45. -
By the time we reach the line
elif temperature >=25 and temperature < 45we can already be sure that the temperature is greater than or equal to 25. For it if were not, then we would have executed the first indented block in theif, and skipped the rest of theif-elseladder. Thus, a simpler and still correct version of this ladder is:if temperature < 25: print("You should wear a winter jacket.") elif temperature < 45: print("You should wear a medium or light coat.") elif temperature < 65: print("You should wear a fleece.") else: print("You do not need to wear a jacket.")
Nested conditional statements
Recall that an ordinary if-else statement has this syntax:
if <condition>:
# Indented statement block
else:
# Indented statement block
It is possible for the indented statement blocks themselves to include another if or if-else statement. This is called nesting, and it is both useful and common. Nesting might look like this (another if/else within the outer if block):
if <condition 1>:
if <condition 2>:
# Indented statement block
else:
# Indented statement block
else:
# Indented statement block
or like this (another if/else within each of the outer if and the outer else blocks):
if <condition 1>:
if <condition 2>:
# Indented statement block
else:
# Indented statement block
else:
if <condition 3>:
# Indented statement block
else:
# Indented statement block
or even like this: (an if/else within the outer if, then another if/else within the inner if)
if <condition 1>:
if <condition 2>:
if <condition 3>:
# Indented statement block
else:
# Indented statement block
else:
# Indented statement block
else:
# Indented statement block
Notice that the last two cases each have three if conditions, but they are very different from each other. The last one has three levels of nesting, while the previous one has only two levels. In python, we always pay close attention to the indentation, because it tells us which inner block is part of which outer block. That placement controls the logical flow of the program. An inner block only gets executed if the condition for its outer block evaluates to True.
Examples of nested conditionals
| Code | Output | Notes |
|
|
The condition for the outer |
|
|
The condition for the outer |
|
|
The condition for the outer |
|
|
The condition for the outer |
Exercise: For the last code block in the above examples, can you come up with initial values for x, y, and z so that the output is D E? Can you come up with initial values for x, y, and z so that the output is A F?
Putting it all together
The code below on the left checks if the user can vote in an upcoming election. It checks that the user is a US citizen, is 18 or over, and has registered to vote. The flowchart on the right shows the flow of control through the program, as it checks the three conditions.
| Code | Flowchart |
|
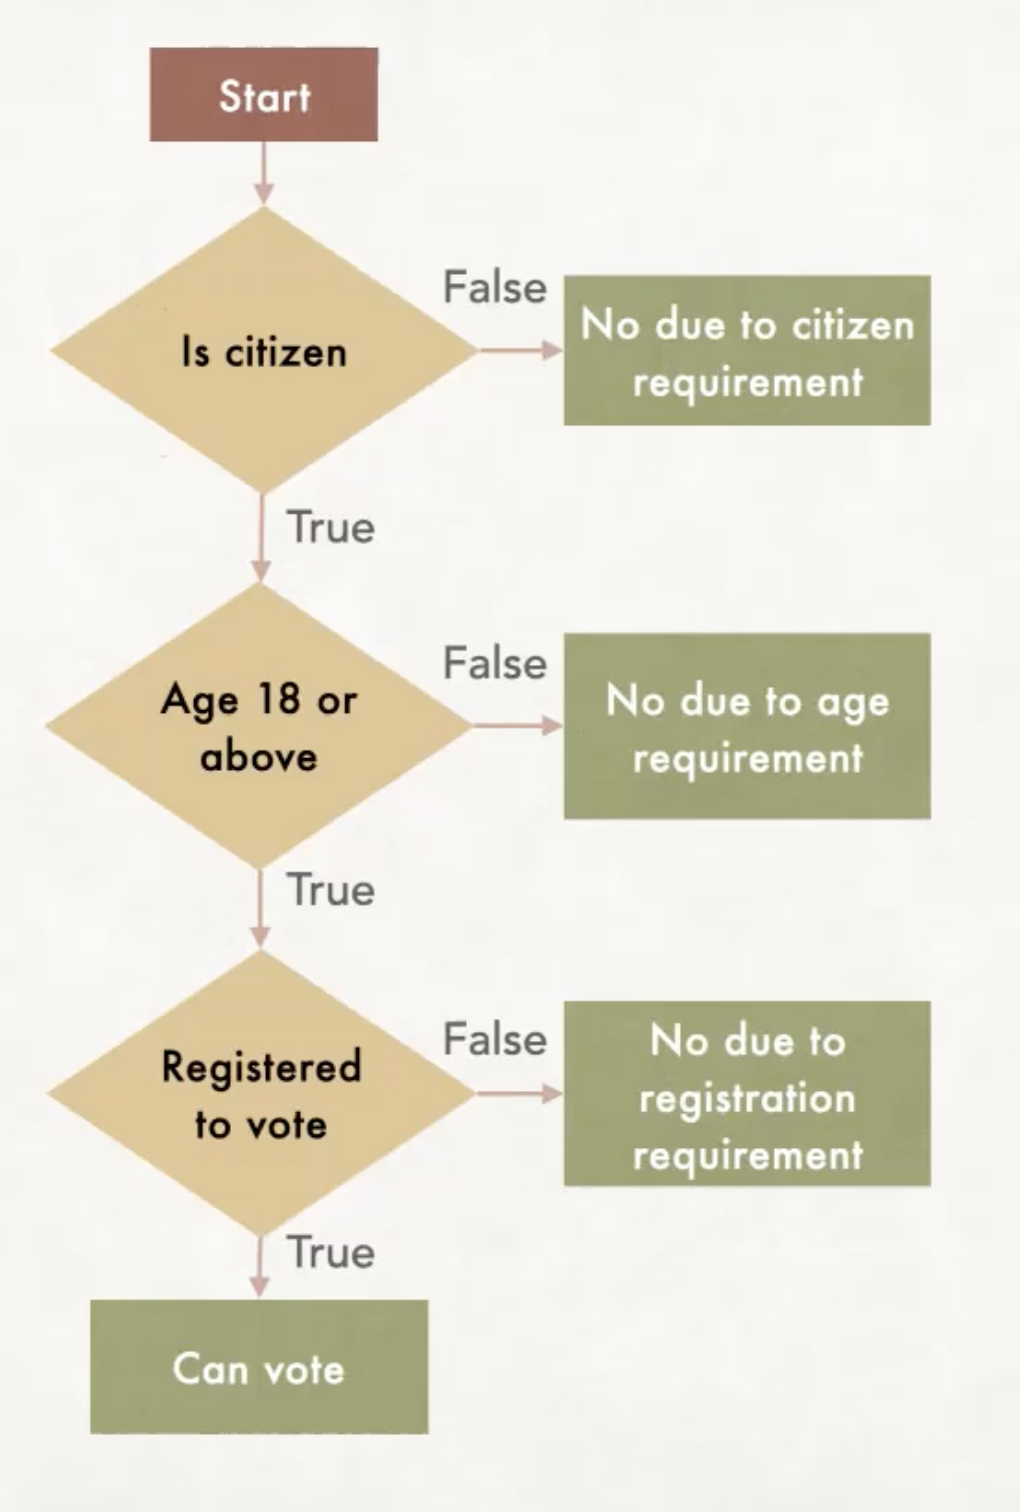
|
Key points:
- Notice that this program has three levels of nesting.
- Notice that if the user enters
Nto the first question, then no further questions are asked. Similarly, if they are too young, they are not asked the last question. This is accomplished using the structure of theif-elsenesting. - The indentation is vital. Look at the code above and carefully notice how each
iflines up directly above theelsethat pairs with it. - Copy/paste the above program into VSCode and run it. To test completely, you have to try all possible combinations of inputs, so that every possible line of code in the program gets tested. This means running the program multiple times and entering multiple possibilities at each input line. For example, what happens if the user enters
Pinstead ofYorN? Why?
Control flow - iteration
This chapter concerns control flow with iterative structures, also known as loops. This allows you to write programs that execute tasks repeatedly. You'll learn about for-loops, while-loops, and nesting control structures with loops. This means nesting conditional statements within loops, nesting loops within conditional statements, or nesting loops within loops.
You'll also learn to apply and practice these ideas by creating animations using dudraw.
for-loops in python
The for-loop structure in python is an example of an iterative statement. Iterative structures allow you to repeat blocks of code multiple times rather than retyping the lines of code themselves multiple times.
Syntax of an index-based for-loop
To repeat a block of code a specific number of times, we can use the following syntax:
for i in range(<number>):
# indented block of code
Example: output "Hello, world!" 5 times, then output "Done with greetings."
| Without loops |
With a |
|
|
Key points:
- When programming, we always want to avoid repeating a line or block of code. Not duplicating saves us time when coding. But it also helps us later if we find there is an error or if we decide to make a change. Ideally, we want to make fixes and changes in only one place.
- The indentation is very important. Any lines indented after the
forline get repeated. When the indentation reverts to the same level as theforline, those lines are not repeated, and are executed only once. - The
iis just the name of a variable. In this kind offor-loop designed to simply repeat a block of code a specific number of times, the variable counts which iteration (repeat) we are on. In this situation, it is traditional to call the variablei,j, ork, though you may give it any legal variable name that helps the user understand that it is the iteration variable.
The parameter passed to the range() function can be a variable.
Example: Ask the user how many greetings they want, then output "Hello, world!" that many times, then output "Done with greetings."
| Without loops |
With a |
|
|
Graphical example: draw 50 small squares at random locations on the screen.
| Code | Image created |
|
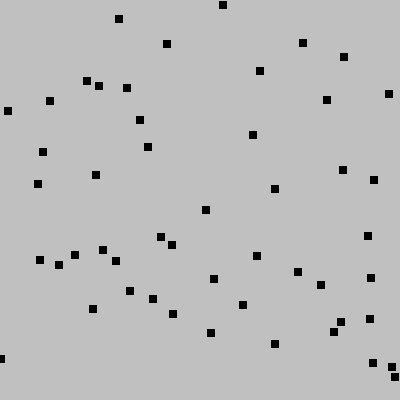
|
|
|
|
|
Using the loop variable within the body of the loop
In the for-statement
for i in range(N):
# body of loop
range(N) produces a sequence of integers from 0 through N-1, a total of N integers. The first time through the loop, he loop variable i takes the value 0,then it takes the value 1 the second time, etc., until in the final iteration of the loop, i takes the value N-1. Often we make use of the value of i itself, since it is effectively counting which iteration of the loop we are currently executing. Note that you can use any legal variable name for the loop variable
Here's a simplest example, with the corresponding output. Notice that we print(i+1) instead of print(i) because we want to output 1 2 3 4 5, and i takes the values 0 1 2 3 4.
| Code | Output |
|
|
Variations on the range() function
range(N) always starts the loop variable at 0 and ends at N-1. However, you can specify a different integer start value.
range(start, stop) produces a sequence of integers beginning with start and ending one less than stop. Note that the value for stop is never included in the sequence. When you are writing a for-loop, you can double-check yourself by confirmng that stop-start gives the total number of integers in the sequence.
Example: range(1, 6) produces the sequence 1, 2, 3, 4, 5.
The range() function also allows you to control the step size. This means you can change the sequence so it increases by something other than 1 from one number to the next.
range(start, stop, step)
- start: (optional) is the first value of the sequence
- stop: the sequence stops on the term before this value is reached
- step: (optional) integer value giving the increment from one number to the next
Example: range(3, 10, 2) produces the sequence 3, 5, 7, 9.
Example: range(-2, 13, 3) produces the sequence -2, 1, 4, 7, 10.
Example: range(10, 7, -1) produces the sequence 10, 9, 8.
Example: range(6, 1, 2) produces an empty sequence, since the step value is positive, and the start value is greater than the stop value. If this range were used in a for-loop, then the loop block would never execute.
Loops and conditional statements can be nested
for-loops can be nested within conditional statements, and conditional statements can be nested within loops.
for-loops within conditional statements
Here is the structure of a for-loop nested within an if-statement:
if <condition>:
for i in range(...):
# indented code block
In this case, the loop executes if the condition evaluates to True, otherwise it is skipped.
Another possibility is for-loops nested within an if-else statement:
if <condition>:
for i in range(...):
# indented code block
else <condition>:
for i in range(...):
# indented code block
Examples: Trace the following code examples, confirming the output.
| Code | Output | Notes |
|
|
The condition |
|
|
The condition |
Conditional statements within for-loops
Here is the structure of an if statement nested within a for-loop:
for i in range(...):
if <condition>:
# indented code block
In this case, the condition is checked newly on each iteration of the loop. In some of the iterations it may evaluate True, and then in others it may be False. The check is done independently each time. The indented code block only executes on the iterations where the condition comes out to be True.
Of course, inside the for-loop we may instead have an if-else statement or an if-else ladder.
Examples: trace the following code examples, confirming the output.
| Code | Output | Notes |
|
|
Each time through the loop, the variable |
Putting it all together
Here's a complete program that uses an if-else statement nested within a for-loop. Carefully trace the program and predict the image that results. You can run the code to test if you were correct.
"""
Produce a drawing of randomly-placed circles in two colors
Mystery output: Trace the code to find out. Run it to check.
Author: COMP 1351 Instructor
Date:
File: two_colors.py
Course: COMP 1351
Assignment: Preview assignment for for-loops
Collaborators: 1351 Instructors
Internet Sources: None
"""
import dudraw
from random import random
dudraw.set_canvas_size(500, 500)
dudraw.clear(dudraw.LIGHT_GRAY)
for i in range(10000):
# generate random x and y locations:
x = random()
y = random()
# set color based on position
if y > 0.5:
# Magenta is a hot-pink color
dudraw.set_pen_color(dudraw.MAGENTA)
else:
# Cyan is a turquoise color
dudraw.set_pen_color(dudraw.CYAN)
# draw the circle at the randomly-chosen location:
dudraw.filled_circle(x, y, 0.01)
# outline the circle with a black edge:
dudraw.set_pen_color(dudraw.BLACK)
dudraw.circle(x, y, 0.01)
# display the final image until the window is closed
dudraw.show(float('inf'))
Why we need while loops
Note that for-loops of the form
for i in range(N):
# indented block of code
repeat a block of code for a set number of iterations. But there are many cases when the number of repetitions is not known ahead of time. For each of the following examples, you must use a while-loop, not a for-loop, because the number of repetitions is not known when the loop begins.
- Prompt a user to enter a password, asking repeatedly until they get it correct. You don't know in advance how many times it will take.
- Create an animation that continues until the user enters a
qto quit. The animation must continue until they choose to quit, and until then the animation must continue an unknown number of frames. - Write a game for two players who take turns. You don't know in advance how many turns it will take for someone to win.
Syntax of a while statement:
while <condition>:
# indented block of code
# rest of program
The <condition> is a boolean expression. If it evalutes to True, then the indented block of code is executed, and the program returns to the while statement to check the condition again. This repeats until the condition evaluates to False, when the loop stops executing, and the program continues on the next line.
Here is the flowchart that shows visually the path of execution through a while-loop:
Example
The following program repeatedly asks the user "What is the answer to life, the universe and everything?", until the user correctly answers "42".
life_meaning = input("What is the answer to life, the universe and everything? ")
while life_meaning != "42":
life_meaning = input("What is the answer to life, the universe and everything? ")
print("Correct!")
Here is a sample run of the program:
What is the answer to life, the universe and everything? string cheese
What is the answer to life, the universe and everything? zoroastrian dualism
What is the answer to life, the universe and everything? photobombing giraffe
What is the answer to life, the universe and everything? 42
Correct!
Should I use a for-loop or a while-loop?
Though it is not always a good idea, it is actually possible to use a while-loop instead of a for-loop. The two code blocks shown below behave the same, each of them outputting the integers from 0 to 9:
|
|
|
|
|
Although the above code snippets show that it is possible to replace a for-loop with a while-loop, this is not advised. Instead, use the following guidelines to determine which type of loop to use:
- Use a
while-loop when the number of iterations is unknown before the loop completes. - Use a
for-loop when before you know how many iterations you need befor the loop starts executing. - It's still better to use a
for-loop if the number of iterations is unknown while you are writing the program, but is determined during the program before the loop is executed (in other words,for i in range(variable)), since in this case the value is known by the time the loop begins.
Putting it all together
Example 1
Here's an example of a full program that uses a while-loop. It simulates rolling a six-sided die, to see how many rolls it takes to roll a 6. Note that a for-loop is not possible here, since we do not know how many rolls of the die it will take until we finally roll a 6.
| Code | Sample output |
|
|
Example 2:
In the following example, we improve a program from a previous section. This time, we will check that each of the user's inputs is valid. If not, we use a while-loop to continue asking them the question until they enter something sensible.
"""
A simple program that determines user eligibiity to vote
Author: COMP 1351 Instructor
Filename: voting.py
Date:
Course: COMP 1351
Assignment: Preview of nested conditional statements
Collaborators: 1351 Instructors
Internet Sources: None
"""
# Check citizenship requirement
is_citizen = input("Are you a US citizen? (Enter Y or N) ")
# Continue to ask for input until they enter either Y or N
while is_citizen != 'Y' and is_citizen != 'N':
is_citizen = input("Invalid input. Are you a US citizen? (Enter Y or N) ")
if is_citizen == 'Y':
# Check age requirement
age = int(input("How old are you? "))
# Continue to ask for input until they enter a non-negative age.
while age < 0:
age = int(input("Invalid age. How old are you? "))
if age >= 18:
# Check registration requirement
is_registered = input("Are you registered to vote? (Enter Y or N) ")
# Continue to ask for input until they enter either Y or N
while is_registered != 'Y' and is_registered != 'N':
is_registered = input("Invalid input. Are you registered to vote? (Enter Y or N) ")
if is_registered == 'Y':
print("You can go ahead and vote.")
else:
# Cannot vote because unregistered
print("You must be registered to vote.")
else:
# Cannot vote due to age
print("You must be 18 years or older to vote.")
else:
# cannot vote due to citizenship
print("You must be a US citizen to vote.")
Animations using dudraw
Animations are usually created with while-loops. The following template shows what usually goes in the body of the loop:
- clear the background
- redraw the next frame of the animation
- call
dudraw.show(wait_time)
When you pass a parameter to dudraw.show(), the program pauses for the given wait_time``, which is a float` value giving the time in milliseconds.
Here is sample code that animates a circle appearing to move from the lower left corner of the canvas to the upper right corner:
| Code | Animation |
|
How do I find out if the user clicked the mouse?
Here are three dudraw methods for handling mouse interaction (see documentation for other options)
dudraw.mouse_clicked()dudraw.mouse_x()dudraw.mouse_y()
The function dudraw.mouse_clicked() returns a boolean, True if there is an unprocessed mouse click. It is typically used within an animation loop.
You can find out the position of the mouse (regardless of whether the mouse is pressed) by calling dudraw.mouse_x() and dudraw.mouse_y(). Each returns a float with the current position of the mouse. The position of the mouse is given relative to the scale that has been set. Here's a sample program showing mouse interaction. Each time the mouse is clicked, a small circle is drawn on the canvas at the current mouse position. This program does not repeatedly clear the screen in the animation loop, so the circles drawn remain there as further circles are added.
| Code | Animation |
|
How do I find out if the user typed a key?
As with mouse clicks, polling for a key click typically happens within an animation loop. Use the function dudraw.next_key(), which will return a string containing the next most-recently entered key. If no key has been pressed, the function returns an empty string. As an example, the following code is a modification of the mouse interaction code, with the added feature of terminating (quitting) the program when the 'q' key is typed:
""" Demo showing how to detect key presses
This happens within an animation loop,
by calling dudraw.next_key()
File Name: detect_key_presses.py
Author: COMP 1351 instructor
Date:
Course: COMP 1351
Assignment: Notes on animation, key presses
Collaborators: COMP 1351 instructors
Internet Source: None
"""
import dudraw
def main():
dudraw.set_canvas_size(500,500)
done = False
# animation loop
while not done:
# when mouse is clicked, draw a circle of radius 0.02 at the mouse location
if dudraw.mouse_clicked():
dudraw.filled_circle(dudraw.mouse_x(), dudraw.mouse_y(), 0.02)
# pause for one 20th of a second
dudraw.show(50)
# detect key presses, look for 'q' to quit program
if dudraw.next_key()=='q':
done = True
# Run the program:
if __name__ == '__main__':
main()
In the above example, if you would like to accept either an upper-case or lower-case letter, here is one option for checking the condition:
# find out the next key pressed
key = dudraw.next_key()
# then check to see if it is either a lowercase q or an uppercase Q
if key == 'q' or key == 'Q':
done = True
Here is another option for allowing either uppercase or lowercase:
# Get the value of the next key and immediately convert it to lowercase
# If an uppercase 'Q' is entered, it is converted to a lowercase 'q'
# before we check
if dudraw.next_key().lower() == 'q'
done = True
The above option uses a string method called lower() which converts a string to lower case. We will learn more about string manipulation in a later section.
Please note the following two common errors in using the dudraw.next_key() function:
- In the following INCORRECT CODE, note that on each side of the
or, we need a full boolean expression# This code is incorrect! # The following line is wrong! if dudraw.next_key() == 'q' or 'Q' done = True - The error in the INCORRECT CODE below is a little subtle. Here the function
dudraw.next_key()is mistakenly invoked twice. If aQis entered, that key click is processed in the first call todudraw.next_key(). You can think of it as being used up. So on the second call todudraw.next_key(), theQis gone, and there are no key presses left to check. The result is that aqwill quit the program, but aQwill not.# This code is incorrect! if dudraw.next_key() == 'q' or dudraw.next_key() == 'Q' done = True
A first example of a nested for-loop
Imagine that you want to produce the following output to the console:
*****
*****
*****
*****
*****
*****
*****
Although the following simple solution works, it is disappointing becasue of its inflexibility.
print("*****")
print("*****")
print("*****")
print("*****")
print("*****")
print("*****")
print("*****")
If we want to change the number of rows and columns depending on user input, the above strategy won't work.
Our first attempt will be to write a flexible code block to output just one row of stars:
# output one row of 5 stars
for j in range(5):
print("*", end = "")
print()
Notice that one * is output at a time within the loop, and the newline is suppressed. At the end of the loop, a print() statement moves the output to the next line.
Next we need to repeat that block of code 7 times. This is done with a simple for-loop, but realize that the block of code within that for-loop is itself a for-loop. This is how nesting of for-loops is a natural solution.
# output 7 rows of 5 stars:
for i in range(7):
for j in range(5):
print("*", end = "")
print()
Notice that the inner and outer for loops each have their own variable, and these must have different names so that their incrementing does not interfere with each other. Here the outer loop variable is i and the inner loop variable is j, but of course you are free to name them as you please. Ideally, their names will give us information about their meaning within the program. Note that j changes throughout the output of one row, so it identifies which column we are outputting. On the other hand, i changes with each new row of our output. So the names given below improve the documentation of the program:
# output 7 rows of 5 stars:
for row in range(7):
for column in range(5):
print("*", end = "")
print()
Now that our code is written more generally, we can find out from the user how many rows and columns they want, and remove the hard-coded fixed numbers:
num_rows = int(input("How many rows of stars do you want? "))
num_columns = int(input("How many columns of stars do you want? "))
for row in range(num_rows):
for column in range(num_columns):
print("*", end = "")
print()
Tracing nested for-loops
Tracing a nested for-loop requires care and patience. It should be done with a piece of paper, writing down updates to the values of every variable. In the previous example, we start by storing the user's values in the variables num_rows and num_columns. To give a concrete example, let's suppose the user enters 3 for num_rows and 4 for num_columns. Moving to the outer for-loop, we prepare the list of possible values for the variable row: 0, 1, 2. So the variable row starts with the value 0. Now we proceed to the inner for-loop block. It is important to realize that this entire loops runs completely through while the value for row sticks with the value 0. The variable column will take values in the sequence 0, 1, 2, 3 (since num_columns is 4), and for each of those values, a single * will be output. Then finally a newline from the print() statement it output, taking us to the next line. This completes the first line of output to the console. We return to the outer for-loop, and update the value of row to 1. Then the inner block is repeated, with column taking the values 0, 1, 2, then 3. For each new value of column, a * is output, resulting in ****. Again a newline from the print() statement takes us to the next line, followed by a return to the outer for-loop, where row is updated to its final value of 2. The entire inner for loop is executed again, producing a third line **** of output. We return to the outer for-loop one last time to discover that row has stepped through each of its possible values. So the segment of code is complete. Note that the following is the order of the values taken by the variables row and column:
row: 0, column: 0
row: 0, column: 1
row: 0, column: 2
row: 0, column: 3
row: 1, column: 0
row: 1, column: 1
row: 1, column: 2
row: 1, column: 3
row: 2, column: 0
row: 2, column: 1
row: 2, column: 2
row: 2, column: 3
Using the outer loop variable within the inner loop
Suppose we want to output the following pattern to the console:
*
**
***
****
*****
The loops are similar to what we saw in the previous square grid example, however, this time the number of stars in each row depends on which row we are on. The outer loop variable tells us which row we are on, so we can use this value to control how many stars are output in the inner loop.
# Output 5 rows of stars
for row in range(5):
# increase the number of stars on each row
for column in range(row+1):
print("*", end = "")
print()
In the code above, note that for the iterations of the outer loop, the variable row takes the values 0, 1, 2, 3, 4. But we want 1, 2, 3, 4, 5 stars for each of those rows. Thus we execute the inner for-loop row + 1 times. Alternately, we could have the variable row takes the values 1, 2, 3, 4, 5, so that its value matches the number of stars we want:
# Output 5 rows of stars, the variable row takes the values 1, 2, 3, 4, 5
for row in range(1, 6):
# The variable row tells us which row we are on, and
# matches the number of stars needed for that row
for column in range(row):
print("*", end = "")
print()
A graphical example of nested for-loops
In this example we will create a drawing with a 5x5 grid of circles. This is most easily done with a nested for loop.
As a first try, see how the following code snippet produces just one row of five circles. Within the loop the x-position of the center of the circle is updated, so that each time through the loop, the next circle is draw, with its center shifted to the right.
# This loop loop steps through the columns, so the
# x position changes, producing 5 circles
for column in range(5):
dudraw.circle(x_center, y_center, radius)
x_center += 2 * radius
To produce a 5x5 grid of circles, we need to repeat the above block of code 5 times. Thus the code above becomes the inner block of a loop, resulting in a nested block of for statements. After each row has been completed (i.e., after the inner for-loop but inside the outer for-loop), we update the y-center so that the next row of circles is higher up in the image. We also must reset the x-center back to the left side of the image.
import dudraw
# We will draw a 5 by 5 grid of circles
# Each circle takes 100 pixels
dudraw.set_canvas_size(500,500)
dudraw.clear(dudraw.LIGHT_GRAY)
# Each circle takes 1/5 of canvas. The radius is 1/2 of that
radius = (1/5)/2
# The first circle has its center one radius from the edge
x_center = radius
y_center = radius
# The outer for-loop steps through each of the *5 rows*
# of the grid of circles.
for row in range(5):
# The inner loop steps through the columns, so the
# x position changes
for column in range(5):
dudraw.circle(x_center, y_center, radius)
x_center += 2 * radius
# We are done with drawing this row of circles
# So reset the x position back to the left side
x_center = radius
# and increase y so we draw the next row higher up
y_center += 2 * radius
# display until user closes the window
dudraw.show(float('inf'))

Trace the code carefully, either by hand or by running the debugger, and confirm that an entire row is drawn before moving to the next higher row. This order of drawing the circles is determined because the outer block updates the row number, while the inner block updates the column number. We take this into account in the code by updating the x_center within the inner for-loop. By restructuring the for-loops, the circles can actually be drawn in a different order. The code below draws an entire column (from bottom up) before traversing to the next column. Note that the renaming of the variable is not what effected this change. Instead, it was the updating of y-center in the middle of the inner for-loop. Then, inside the outer loop but outside of the inner loop, the value of y-center is reset to the lower edge and x-center is increased to move to the next column to the right.
# Each circle takes 1/5 of canvas. The radius is 1/2 of that
radius = (1/5)/2
# The first circle has its center one radius from the edge
x_center = radius
y_center = radius
# The outer for-loop steps through each of the *5 columns*
# of the grid of circles.
for column in range(5):
# The inner loop steps through the row within
# the current column, so the y position changes
for row in range(5):
dudraw.circle(x_center, y_center, radius)
y_center += 2 * radius
# We are done with drawing this column of circles
# So reset the y position back to the bottom
y_center = radius
# increase x so we draw the next column further right
x_center += 2 * radius
Another strategy for determining the center points
Instead of incrementing the x-center and y-center variables within the loops to compute the new position of each circle, this position can be determined with a mathematical formula based on the current row and column. Here the values for the center of the circle are computed each time through the loop, and so we do not need to increment them as we traverse the loop.
This strategy has the advantage of a more compact implementation, though some people find the formula for computing the center more difficult. Note that drawing circles to the canvas differs from drawing *'s to the console, because outputing to the console naturally goes from the top down, but when drawing graphics on an x-y plane, the y values increase from the bottom upwards.
# Each circle takes 1/5 of canvas. The radius is 1/2 of that
diameter = 1/5
radius = diameter/2
# The outer for-loop steps through each of the *5 rows*
# of the grid of circles.
for row in range(5):
# The inner loop steps through the columns
for column in range(5):
# The x_center and y_center are each computed
# independently, based on which column and row
# we are currently drawing. Note that the x-center
# is determined by the column and the y-center is
# determined by the row
x_center = radius + column*diameter
y_center = radius + row*diameter
dudraw.circle(x_center, y_center, radius)
Using the outer loop variable within the inner loop
The image shown below that we want to produce now is a similar grid of circles, but this time the number of circles varies depending on which row we are on. Notice that the rows are created from bottom to top. The code to produce this image is very similar to the original 5x5 grid of circles. The only difference is that the end point of the inner loop (the range() used for the inner for-loop), depends on which row we are on. For row 0 we need 1 circle, for row 1 we need 2 circles, for row 2 we need 3 circles, and so on. Thus the number of circles for each row is given by the formula row + 1. So the only change to the code is to change the inner for-loop to repeat in range(row + 1) rather than just 5 times.
import dudraw
# We will draw a 5 by 5 grid of circles
# Each circle takes 100 pixels
dudraw.set_canvas_size(500,500)
dudraw.clear(dudraw.LIGHT_GRAY)
# Each circle takes 1/5 of the canvas, and the radius is 1/2 of that
radius = (1/5)/2
# The first circle has its center a distance of one radius from the edge
x_center = radius
y_center = radius
# The outer for-loop steps through each of the *5 rows*
# of the grid of circles.
for row in range(5):
# The inner loop steps through the columns, so the
# x position changes. The inner loops stops at
# row + 1, so the number of circles increases
# at each higher row.
for column in range(row+1):
dudraw.circle(x_center, y_center, radius)
x_center += 2 * radius
# We are done with drawing this row of circles
# So reset the x position back to the left side
x_center = radius
# and increment the y value so we draw the next row
y_center += 2 * radius
# display until user closes the window
dudraw.show(float('inf'))

The order of the combination of variables during execution
In the code above, the outer loop runs through all possibilities for rows. The name of the variable row helps us keep track of this. The inner loop runs through all possibilities for columns, and the variable name column used in the inner loop reflects this. Since rows are incremented in the outside loop, an entire row is completed by looping through every possible column option for that row before moving on to the next row. Tracing through the loop shows that the range values of the pair row and column occur in the following order:
row: 0, column: 0
row: 1, column: 0
row: 1, column: 1
row: 2, column: 0
row: 2, column: 1
row: 2, column: 2
row: 3, column: 0
row: 3, column: 1
row: 3, column: 2
row: 3, column: 3
row: 4, column: 0
row: 4, column: 1
row: 4, column: 2
row: 4, column: 3
row: 4, column: 4
The image below shows the order that the corresponding circles are drawn:
More on functions
This chapter revists functions, a key concept in any high-level programming language. We'll begin by reviewing the first introductory section on functions, then learn how to define functions that take parameters, and functions that return values.
User-defined functions in python
Most programming languages give you a way to separate a block of code from the main program. This is useful to
- provide organization to your program by chunking it into blocks that perform specific tasks, and
- allow you to reuse a block of code rather than repeat it.
Creating user-defined functions
This is the syntax for creating a user-defined function:
def function_name() -> None:
    # Code block for the function
Key points:
- The keyword
defsignals the beginning of a function definition. - The empty pair of parentheses
()indicates that this function does not take any parameters. Function parameters are explained in a later section. - The
-> Noneindicates that the function does not return any values. Function return values are explained in a later section. - Defining functions is not completely new to you - you have defined the function
main()in every program you have written. - When you define a function, note that the code in the function is not executed. The code within the function is executed only when you call the function.
- Think of the function definition as a recipe, telling python exactly what to do when another part of the program calls the function.
- To call a function (i.e., to run its code): at the point where you want it to run, write the name of the funtion, with parentheses.
Example:
Here is the definition of a function called greet_user(). It asks the user their name, then says hello, using their name:
def greet_user() -> None:
    name = input("What is your name? ")
    print("Hello,", name)
In the above code, nothing is executed. The lines of code within the function only get executed when the function is called. Consider the following program that defines and uses (calls) the function greet_user():
In the above code, lines 1-3 are the definition of the greet_user() function. Those lines define what you want python to do whenever greet_user() is called. On line 6, the greet_user() function is called. So when python executes line 6, it puts main() on hold, jumps to line 1, and executes the contents of the greet_user() function. That's the moment that the user is asked for their name, and the greeting is output. After that completes, the running of the program reverts back to line 6 in main() and continues from there.
Commenting functions
In this course, we will have a standard for commenting every function. After the def line, put a block comment explaining the purpose of the function. This special block comment is called a docstring. When we learn about parameters and return values, we will add additional information into these docstrings.
Example:
def greet_user() -> None:
    """
    First example of a user-defined function. Ask user for their name, then
    output "Hello, ", followed by their name
    """
    name = input("What is your name? ")
    print("Hello,", name)
Putting it all together
The following code shows a program that defines and uses several functions. Each of these functions defines how to draw a part of the final image. The definition of each function has been collapsed - you can't see the contents. This is actually helpful, because while looking at the program from the highest level, the details are distracting. Notice that in main() we can easily see the overall task of the program from the four function calls. If the details of drawing each shape were placed into one long main() function, the higher-level organization of the program would be lost, mired in the details. This demonstrates the importance of using functions to break down code into bite-sized chunks.
| Code | Image produced |
|
|
|
Functions that take parameters
You're already familiar with calling functions that take input values (parameters). For example:
# The `print()` function accepts a parameter - the string to output to the console
print("Hello!")

# The dudraw ellipse function takes four parameters
# x-location of center, y-location of center, half-width, and half-height
dudraw.line(0, 0, 1, 0.5)
Notice that when you call (i.e., use) a function that has parameters, you put those values within the parentheses of the function call. These values are also called arguments. You must pass the correct number of arguments (i.e., the number of values the defined function is expecting), and they must be passed in the correct order.
We will now learn how to create user-defined functions that accept parameters. Just like variables, the parameters each have a name (that name can be accessed only within the function definition). Here is the template:
def function_name(parameter1_name: parameter1_type, parameter2_name: parameter2_type,...) -> None:
    # Code defining the function
Example 1: In the program below, the simple function greet_user() outputs "Hello, world!" to the console multiple times. The parameter to the function determines how many times the line is output. The parameter gives a way of passing information (the number of greetings to output) from the line that calls the function to the function itself.
| Code | Output |
|
|
Example 2: Here we see the definition of a simple function that takes two parameters: the number of greetings to output, and the name of the user.
| Code | Output |
|
|
In this course, we will have a standard for commenting functions. After the def line, put a block comment (a docstring) explaining the purpose of the function as well as any parameters and what their purpose is. For example:
def greet_user(num_greetings: int, name: str) -> None:
    """ Give greetings to the user, including their name
        parameters:
            num_greetings: number of repetitions of greeting (type: int)
            name: username, to be included in greeting (type: str)
        return: None
    """
    for i in range(num_greetings):
        print(f"Hello, {name}")
Creating drawings that you can scale and shift
The code below creates an image of a house that fills a [0, 1] x [0, 1] square. The canvas itself is set to a scale of [0, 5] x [0, 5], so the house appears in the lower left corner. Examine the code carefully, since we will modify it to show how to shift and scale each shape in the drawing.
| Code for the original drawing | Image |
|
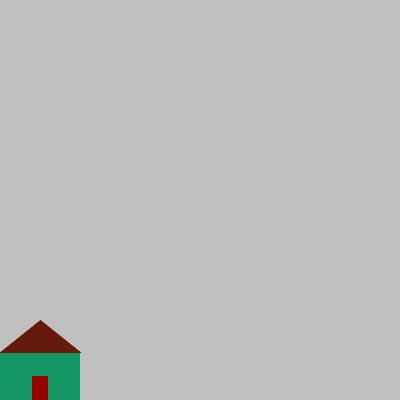
|
Shifting (translating) images
Recall from algebra that to translate a point in the Cartesian plane to the right or left, we add or subtract from the x value, and to translate a point up or down, we add or subtract from the y value. We can use this idea to shift our house by modifying all of the (x, y) values. Below is the original program, modified so that the image is shifted 2 units to the right and 3 units up. All x values have been replaced by 2+x and all y values have been replaced by 3+y. Notice that only the numbers representing positions have been changed - no values representing sizes have been modified. The image on the right is still 1x1 in size, and still lies in a [0, 5] x [0, 5] canvas, but its lower left corner has been translated.
| Code for the image shifted by `(2, 3)` | Image |
|
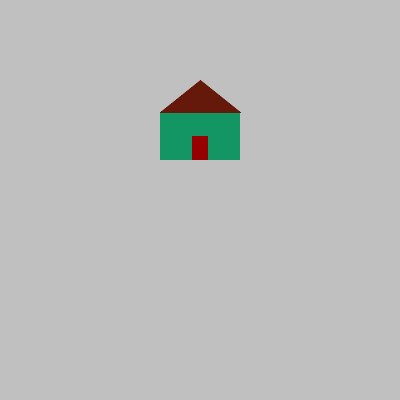
|
The above code would be much more flexible if we modified the draw_house() function to accept two parameters that give the x-shift and y-shift of the image. That way we could easily draw several houses, shifted to various locations with very small changes to the code. This strategy is demonstrated below, with multiple houses drawn at various locations. The changes made include
- In the
draw_house()function, change the shift from(2, 3)to generic values of(x_shift, y_shift) - Make the
draw_house()function accept two parametersx_shiftandy_shiftfor the generic shift values. These values are both specified to befloatvalues. - In the
main()function, add several calls todraw_house(_, _), with a variety of values for the shift.
| Code for image shifted by variable shift values | Image |
|

|
Scaling (stretching or compressing) images
This time we will modify the original code so that the image is scaled. If the scale factor is more than 1, then the image is stretched, while a scale factor of less than 1 results in a compression. Recall that to stretch/compress an x value, we multiply it by the scale factor. Geometrically, this results in every point being stretched away from the y-axis. Similarly, to stretch/compress a y-value, we multiply it by our other chosen scale factor, which stretches the point away from the x-axis. We can use this idea to change the size of our house. Below is the original program, modified so that the image is stretched a factor of 4 in the x direction and a factor of 2 in the y-direction. All of x values have been replaced by 4*x and all y values have been replaced by 2*y. Notice that numbers representing sizes (height and width) also must be scaled. The image on the right is now 4x2 in size, and its lower left corner still lies at the origin.
| Code for the image scaled 4 horizontally and 2 vertically | Image |
|
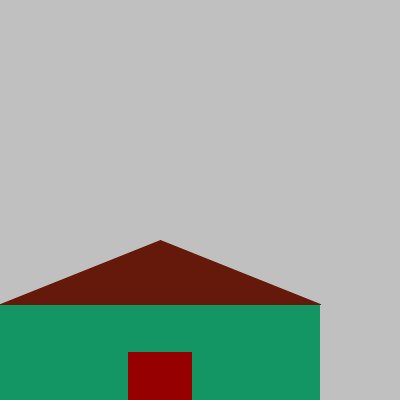
|
It shouldn't surprise you that our next step will be to modify the draw_house() function to accept two parameters for the x-scaling factor and the y-scaling factor. This makes our function flexible, so that the caller can determine the scaled size. As before, the changes made include
- In the
draw_house()function, change the scaling from4in thexdirection and2in theydirection to generic values ofx_scaleandy_scale. - Make the
draw_house()function accept two parametersx_scaleandy_scalefor the generic scaling values. These values are both specified to befloatvalues. - In the
main()function, add a call todraw_house(_, _), with a chosen values for the size.
| Code for the image scaled by variable scaling factors | Image |
|

|
Putting it all together
In the final example, we modify the code for draw_house() to allow for both shift values and scale values to set by the caller. This means our function will have four parameters:
x_shifty_shiftx_scaley_scale
Summary of changes made to each value in an image:
- Every original
xposposition will be replaced byx_shift + x_scale*xpos - Every original
yposposition will be replaced byy_shift + y_scale*ypos - Every original
x_sizesize will be replaced byx_scale*x_size - Every original
y_sizesize will be replaced byy_scale*y_size
Notice that positions are scaled and shifted. Sizes, however, are just scaled and not shifted.
| Code for the image scaled by variable scaling factors | Image |
|
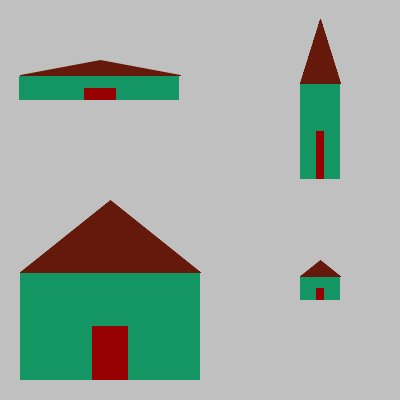
|
Review of functions
Recall that a function definition is a collection of code statements grouped together that perform a specific task.
Every function has a name that can be used to call the function. We also use the terms invoke, or execute to mean run the lines of code that appear within the function definition.
You can think of the function definition as a recipe for how to perform a task. When the function is invoked, then the task is actually performed.
Recall also that functions may take input values (called parameters) that modify or control how the function runs.
Why use functions?
There are two main reasons that functions are useful in programming:
-
Reusability
Often we need to use the same code multiple times. One solution is to copy/paste the code to reuse it. One downside of that strategy is that it makes our programs much longer. But an even worse downside is that if we make a modification, we need to find and make that same change in every place we copied the code to. Functions instead allow us to efficiently invoke the same code whenever needed without making multiple copies.
-
Abstraction
Once a function has been written and tested, we don't need to know how it works anymore. We only need to remember its name, purpose, parameters, and return value. For example, when you use the
dudraw.circle()function, you can just use it without bothering your mind with the distraction of how that function creates the circle. This allows us to build functions from functions already written, and this allows us to produce very complicated software much more easily. -
Code organization and readability
Organizing your code into a sequence of function calls allows you to focus at any time while you are programming on just the task at hand. It also makes it far easier for others to read your code and understand it.
A function can return a value
A function can also return a result. You can choose the type of the returned value. If no value is returned, then the return type is None.
For example, the print function, as in
print("Hello!")
takes a parameter (the input to the function is "Hello"), but it does not return a value.
But the input() function does return a value. The return type is str. When the function is invoked, when it is done executing it returns a value. You may do whatever is useful with that return value. In the example below the value returned by the input() function is stored in the variable name:
name = input("Enter your name")
Another example is the random() function, which returns a float. We may choose to store the value that is returned in a variable. Or we may choose to pass that return value as a parameter to another function:
# Store the return value in a variable:
x_position = random()
# Pass the return value to the print function:
print(random())
User-defined functions that return values
When you define a function, you only need to do so once. Once defined, however, a function may be invoked many times. You can think of a function as an opaque box that performs work with optional inputs and an optional output.
The syntax is:
def function_name(optional parameters) -> return type:
    # Indented code block
    # Optional return statement
    # (Leave off the return statement if the function returns `None`)
Example:
Here's a function that takes a float parameter named temp_f that represents a temperature in Fahrenheit (think of temp_f as an input value to the function). The function then computes the conversion of the temperature to Celsius. The converted value temp_c of type float is returned (think of temp_c as an output value from the function).
def celsius(temp_f: float) -> float:
    # compute the conversion from fahrenheit to celsius
    temp_c = (temp_f - 32) * 5 / 9
    return temp_c
In the example above, think of the parameter temp_f as a local variable of the celsius() function. That variable can only be accessed within the scope of the function. When the function completes execution, the variable temp_f is destroyed and can no longer be accessed. On the last line of the function, the return statement has the effect of sending the value temp_c back to the line that invoked the function. Here is a sample of how the celsius() function might be invoked:
    user_temp_f = float(input("Please enter the temperature in Fahrenheit: "))
    user_temp_c = celsius(user_temp_f)
    print(f"{user_temp_f} degrees Fahrenheit is {user_temp_c:.1f} degrees Celsius")
The first line gets a float Fahrenheit temperature from the user.
The second line calls (invokes) the celsius() function. The value of the variable user_temp_f is passed as the parameter to the celsius() function. Within the celsius() function, that value is stored in the temp_f variable and the result is computed. Then the celsius() function returns the float value result. Back in the main code block, the return value from celsius() is stored in the user_temp_c variable.
The last line gives full formatted output to the user.
Note that celsius(user_temp_f) is actually an expression, with a value (the return value) and a type (float). This means we can put celsius(user_temp_f) in our code anywhere that we can validly put any expression. For example:
print(celsius(user_temp_f))
In the above line of code, celsius(user_temp_f) is an expression whose value is whatever the celsius function returns. That value is passed in turn as a parameter to the print() function! This might remind you of function composition in algebra. A more sophisticated example of this is shown below, a compression of the previous example from three lines of code into two:
user_temp_f = float(input("Please enter the temperature in Fahrenheit: "))
print(f"{user_temp_f} degrees Fahrenheit is {celsius(user_temp_f):.1f} degrees Celsius")
Boolean functions
Note that a function may return a value of type bool. These are called boolean functions, and just as before, the return value can be used as an expression. For example:
# Return True if the first digit of the number is even,
# otherwise return False
def first_digit_even(number: int) -> bool:
    # Keep dividing by 10 until the number is less than 10
    while number >= 10:
        number = number // 10

    # Now we have a one-digit number. See if that digit is even
    return number%2 == 0
The while-loop repeatedly divides by 10 using integer division (shifting the number to the right), until only one digit remains. That digit is the first digit of the original number. Then on the last line, the expression number%2==0 evaluates to True if that first digit is even, and False if that first digit is odd. The True or False value gets returned.
Here's an example of a code snippet that uses the function:
user_num = int(input("Enter an integer: "))
if first_digit_even(user_num):
    print(f"The first digit of {user_num} is even.")
else:
    print(f"The first digit of {user_num} is odd.")
Putting it all together
The following example code defines and uses a boolean function is_prime() that determines whether or not an integer is prime.
A prime number is an integer bigger than 1 that is divisible only by 1 and itself.
def is_prime(number: int) -> bool:
    """
    A function that determines whether or not a number is prime
    parameters:
        number: a positive integer greater than 1 (type: int)
    return:
        True if number is prime, False otherwise (type: bool)
    """

    # tester is a possible factor. Start at 2 and we will increase it
    tester = 2

    while tester < number:
        if number % tester == 0:
            # We now know that tester divides number, so
            # we know the answer - number is not prime!
            # The function teriminates, returning False
            return False
        else:
            tester += 1

    # We only reach this line if no return False above every occurred.
    # This means that the number has no factors and thus it is prime
    return True

def main():
    # The user inputs an integer and we determine if it is prime
    num = int(input("Enter an integer to test for primality: "))
    if is_prime(num):
        print(f"{num} is prime")
    else:
        print(f"{num} is not prime")

# Run the program:
if __name__ == '__main__':
    main()
Key points:
- The input for this function is an integer bigger than 1 (our program would be improved if we checked for this condition).
- The output is a boolean (
Trueifnumberis prime,Falseotherwise). - It's helpful for boolean functions to have names that reflect that they return a
True/Falseresult. Here,is_prime()reads like a question that has a yes/no answer. When we call the function, the lineif is_prime(23):makes sense when we read it. - A function should only perform one task. Here, the job is to determine whether or not the number is prime. The function does not output the result to the console. The function just returns the result to the line that invoked it. It's up to the caller to interact with the user. This philosophy makes for more flexible and reusable functions.
- Within the loop of the
is_prime()function, we can only returnFalse, neverTrue. Because only by completing the entire loop can we know thatnumberhas no factors (other than1and itself). Thereturn Truecan thus only happen after the loop has completed. - The program could be made to run more efficiently by stopping the loop when
testerreaches the square root ofnumber.
By placing the code to determine whether a number is prime into a separate function, we can now re-use it in multiple ways. For example, here is a new main() function that outputs all primes less than 1000:
def main():
    # Output all primes less than 1000, testing each number one by one
    for i in range(2, 1000):
        if is_prime(i):
            # output the number if it is prime:
            print(i, end = " ")
    # Move output to a new line
    print()
You should notice how simple it was to create this new program. The is_prime() function did not need to be rewritten or even thought about.
Here is yet another example. This time we will build another layer on top of the is_prime() function by creating a function called next_prime() to give the next prime larger than a specific integer. Notice that next_prime() itself uses is_prime(), so its job is made straightforward and easy to understand. By the use of these two functions, the interface with the user in main() is also very straightforward. This organization and structure makes code easier to read and understand, easier to fix if it has an error, and easier to enhance or modify if we choose to later. Notice that the contents of is_prime() are not shown here, since that function is identical to before.
def is_prime(number: int) -> bool:
    # contents not shown - it's unchanged from before!

def next_prime(number: int) -> int:
    """
    Return the first prime greater than or equal to number
    parameters:
        number: input value for which we need to return the next prime (type: int)
    return:
        a prime value greater than or equal to number (type: int)
    """
    # start from number, and increment until we find the next prime
    while not is_prime(number):
        number += 1
    # The loop has terminated, so the current value of number must be the next prime.
    return number


def main():
    n = int(input("Give me a number and I will tell you the next prime: "))
    print(f"The next prime is {next_prime(n)}")

# Run the program:
if __name__ == '__main__':
    main()
Python lists and tuples
Lists are a built-in data structure in python. Lists are used to store multiple values that are accessed with a single variable name. Tuples are also used to store grouped data, but with some key differences in their use and syntax.
Typically the values stored in a list are all of the same type, though python does allow for different types to be stored within the same list. This chapter contains details on creating lists, accessing individual elements in a list, and modifying lists with list methods. The last section is on tuples, and includes key differences between the two types of data structures.
Python lists
Lists are a built-in data structure in python. Lists are used to store multiple values that are accessed with a single variable name.
Typically the values stored in a list are all of the same type, though python does allow for different types to be stored within the same list. This chapter contains details on creating lists, accessing individual elements in a list, and modifying lists using list methods.
Creating lists
One way to create a list is to use a list literal. For example, instead of creating five separate variables to store 5 quiz scores, we can assign them to a list variable by putting the comma-separated values within square brackets, like this:
scores = [92, 87, 93, 81, 91]
Here is a visual model for how to think of a list and its contents:

Some people prefer to visualize a list and its contents vertically:
In practice list literals are not the most common way to create lists, since it is not often that we know in advance the exact contents of a list. Another way to create a list is to start with an empty list, then use the list append() method to add elements to the end of the list. For example:
scores = []
scores.append(92)
scores.append(87)
scores.append(93)
scores.append(81)
scores.append(91)
Here's a more realistic example that uses the append() method, taking the values from the user:
scores = []
for i in range(5):
    next_score = int(input('Enter score: '))
    scores.append(next_score)
Accessing elements of a list
A list is an ordered sequence of variables. The positions are numbered starting at 0. We call the position number an index. Put the index in square brackets next to the variable name to access the value stored at that position.
For example, the line of code
print(scores[3])
will output 81 to the console. Note that the number 3 in the square brackets refers to the index (the position) of a value in the list, while scores[3] refers to the value stored at that position.
You can visualize the contents together with the index values and the syntax to access the contents like this:

Lists are mutable (changeable), so we can modify the contents of a list using an index. For example,
scores[3] = 85
will change the value stored at index 3 from an 81 to an 85. Note: accessing or modifying a list element using an invalid index results in an IndexError.
Tools for working with lists
The line
print(scores)
will output all contents of the list to the console, separated by commas and surrounded by square brackets:
[92, 87, 93, 81, 91]
The len() function returns the number of items currently stored in the list. For the above example, len(scores) returns 5.
Valid index values go from 0 to len(your_list)-1. The first value stored in a list is your_list[0] and the last value is your_list[len(your_list)-1].
Traversing lists using loops: index-based versus content-based loops
First let's create a list. The code below demonstrates getting input from the user and storing it in a list:
# Simple loop getting input from the user and storing it into a list
# Start by creating an empty list called names
names = []
# Get the name of the first friend
friend = input('Input names of your friends. Enter "done" to terminate :' )
# Keep getting names until they enter "done"
while friend != 'done':
    names.append(friend)
    friend = input('Next name: ')

# Output all of the names entered:
print(names)
Now let's see two ways to traverse a list and examine every element. We will refer to the first method below as an index-based loop. An index-based loop is just a for-loop in which the loop variable will iterate over all possible index values in the list. The code below outputs the names of all of the elements in the list names using an index-based loop:
print("The names of your friends are:")
# Traverse the list by accessing the contents at each possible index
# The valid index values in the list go from 0 through len(list)-1:
for i in range(len(names)):
    print(names[i])
A possible output from the above code is:
The names of your friends are:
Phoebe
Rachel
Monica
Python offers a second type of for-loop to traverse a list, which we will refer to as a content-based loop. Not all higher-level languages have this feature. The idea is to iterate over the contents of the list without having to access them using the index. Here is a sample code snippet that implements a content-based loop:
print("The names of your friends are:")
# Traverse the list by accessing each of the values it stores
for friend in names:
    print(friend)
In the above code, the variable friend traverses through the contents stored in each list position. You do not need to worry about index values in this style of loop. The variable friend will automatically iterate over each of the values stored in the list.
A possible output from the above code is:
The names of your friends are:
Ross
Chandler
Joey
In the above code, the variable names is a list, whose contents might be ["Ross", "Chandler", "Joey"], visualized like this:

Note that in the index-based loop, the loop variable i iterates over the index values, so it takes the values 0, 1 and 2. In the content-based loop, on the other hand, the loop variable friend iterates over the contents of the list, and takes the values "Ross", "Chandler", "Joey". Finally, notice that in the index-based loop, we access the value stored in the list with names[i], whereas in the content-based loop, the loop variable friends itself already contains the value stored in the list.
Negative index values
In python, you can use negative index values as a way of accessing list elements starting at the end. The last element of a list always has index len(list_name)-1. But in python, you can alternately refer to the last element as index -1. The second to last element can be referred to with index -2, and so on. This diagram shows an example of this:

In the above example, note that scores[-1] evaluates to 91, and scores[-2] evaluates to 81.
The expressions scores[-1] and scores[len(scores)-1] refer to the same location in memory. Similarly, scores[-2] and scores[3] also refer to the same location in memory.
Slicing lists
Slicing gives a way to extract a sublist from a list. By putting a start index and a stop index separated by a colon in square brackets, we create a new list that includes the contents between those index values. A typical slice is of the form list_name[start_index, stop_index]. Note that the stop index itself is not included in the slice. For example, from the list shown above, the expression scores[0:3] results in the list [92, 87, 93], built from the values stored at indices 0, 1, 2. If the start index is omitted, the start index is assumed to be 0. For example, scores[:3] is the same slice as scores[0:3].
The slice scores[1:5] might look confusing at first, since the list is too short to have an index 5. However, recall that the stop index of a slice is not itself included in the sublist, so the index values used are 1, 2, 3, 4, to produce the sublist [87, 93, 81, 91]. If you omit the stop index, its default is len(your_list), meaning that the slice goes to the end of the list, including its last element. Thus scores[1:5] in this example is equivalent to scores[1:]
A slice can be used to extract a range from a list while skipping elements. More generally, list_name[start_index, stop_index, step] begins at start_index, ends before reaching stop_index, and uses step to increment the index count. For example, in the list shown above, the slice scores[0:5:2] starts at index 0, increasing the index by 2 at each step, and ending before index 5. So the index values 0, 2, 4 are used and the list generated is [92, 93, 91].
Negative values can be used for the step, allowing us to traverse backwards through the list. For example, in the list shown above, the slice scores[4:0:-2] uses the index values 4, 2 and produces the list [91, 93]. Note that the index 0 element is not included. To include it, use scores[4::-2] to produce the list [91, 93, 92].
A special case can be used to produce a complete list in reverse order, using list_name[::-1].
List membership
You can determine whether a value is in a list or not using the in and not in operators. For example
93 in scoresevalutes toTrue, since93is the value stored inscores[2].- On the other hand,
93 not in scoresevaluates toFalse. 20 in scoresevaluates toFalse, since none of the values in the list equal20.- On the other hand,
20 not in scoresevalutes toTrue.
Choosing random elements from a list
If you want to choose a random element from an existing list, one option is to choose a random integer as the index value, ranging from 0 to len(your_list)-1. Then that random index can be used to access the list. For example, here we output a random element from the list ["eenie", "meenie", "miney", "mo"]
import random
words = ["eenie", "meenie", "miney", "mo"]
# produce a random integer from 0 to the last index, len(words)-1
# (recall that randint includes its upper limit)
index = random.randint(0, len(words)-1)
print(words[index])
However, there is an easier way to generate a random element from a list. The random package has a function called choice() that can take a list as a parameter, and will return a randomly-chosen element from the list. You don't have to worry about index values - the random.choice() function does that for you. Here's an example of its use:
import random
words = ["eenie", "meenie", "miney", "mo"]
# produces a value, randomly selected from the list contents
print(random.choice(words))
Putting it all together
Here's sample code showing definition of a list, accessing a list, modifying a list element, list slices, and list membership.
month_names = ['January', 'February', 'March', 'April',
               'May', 'June', 'July', 'August',
               'September', 'October',  'November', 'December']

print(month_names) # output the entire list
print(len(month_names)) # should output 12
# Index 0 is the first month, January
print(month_names[0]) # index 0 is the first month, outputs January
print(month_names[4]) # index 4 is the 5th month, outputs May
print(month_names[11]) # index 11 is 12th month, outputs December
print(month_names[-1]) # index -1 means the last month, outputs December
# Create a new list with first 6 months (index 0, 1, 2, 3, 4, 5)
first_half = month_names[0:6]
print(first_half) # note that this is a list
# Create a new list with the last 6 months (index 6, 7, 8, 9, 10, 11)
second_half = month_names[6:]
print(second_half)
# I'm calling Sept/Oct/Nov autumn, these are index 8, 9, 10
autumn = month_names[8:11]
print(autumn)
# Change the value stored at index 9:
month_names[9] = 'Octobrrr'
print(month_names)
print('December' in autumn) # should be False
print('Triember' not in month_names) # should be True
Output of program:
['January', 'February', 'March', 'April', 'May', 'June', 'July', 'August', 'September', 'October', 'November', 'December']
12
January
May
December
December
['January', 'February', 'March', 'April', 'May', 'June']
['July', 'August', 'September', 'October', 'November', 'December']
['September', 'October', 'November']
['January', 'February', 'March', 'April', 'May', 'June', 'July', 'August', 'September', 'Octobrrr', 'November', 'December']
False
True
Practicing creating and traversing lists (index-based and content-based loops)
Here is a code snippet showing the creation of a list, and then a content-based traversal through the list, followed by an index-based traversal through the same list:
from random import random
# Defining a constant LIST_LENGTH makes for more flexible and clear code
LIST_LENGTH = 6
# Generate a list of 6 random numbers
randos = []
for i in range(LIST_LENGTH):
    randos.append(random())

# content-based loop that iterates over all of the
# previously-generated random numbers, and outputs them
# to 5 decimal places.
# The variable randos is the entire list itself.
# The variable rando takes each value stored in the
# list, one by one as the loop iterates over the list.
for rando in randos:
    print(f"{rando:.5f}")

# index-based loop that iterates over all of the valid
# index values for the previously-generated list of
# random numbers. The variable i takes the values
# 0, 1, 2, 3, 4, 5
# It's better programming practice to use len(your_list)
# rather than a hard-coded number. The variable i stores
# which element we are on. We output i+1 so that the
# user sees counting from 1-6 rather than 0-5.
# The expression randos[i] gives the value
# of the random number stored at that index in the list.
for i in range(len(randos)):
    print(f"random number {i+1}: {randos[i]:.5f}")
A possible output is:
0.05184
0.17759
0.30319
0.83254
0.61733
0.75492
random number 1: 0.05184
random number 2: 0.17759
random number 3: 0.30319
random number 4: 0.83254
random number 5: 0.61733
random number 6: 0.75492
What is a list method?
In python, lists come with many built-in methods that allow us to search, count, and modify lists. A list method is a special kind of function that is executed on a specific list. You've already seen one example of a list method, namely append(). Recall that the syntax for using the append() method is your_list.append().
For example:
cats_1 = []
cats_2 = []
# append "Tabby" to the cats_1 list:
cats_1.append("Tabby")
# append "Mochi" to the cats_2 list:
cats_2.append("Mochi")
In this section we will see several additional methods that apply to lists. Execute each these methods with the syntax your_list.method_name(). We will learn just a subset of the available list methods. The full list can be found at Python list documentation by w3schools or Offical python documentation on list methods. Here are the list methods you'll learn:
- the
count()andindex()methods for counting and searching - the
insert()andextend()methods for adding elements - the
pop()andremove()methods and thedelkeyword for removing elements - the
reverse()andsort()methods and thesorted()function for rearranging elements
Here are the details on using these methods.
-
count(x)->intThe call
your_list.count(x)takes as a parameter the item to search for. It returns anintwhich gives the number of times that value appears in the list. Here are some example calls tocount()with the corresponding return values:values = [81, 59, 42, 65, 72, 42, 42, 81] values.count(42) # returns 3, since 42 appears 3 times in the list values.count(23) # returns 0, since 23 does not appear in the list -
index(x)->intThe call
your_list.index(x)searches for the valuexinyour_list. It then returns anintwhich is the index of the first time that value appears in the list. One down side of theindex()method is thatxmust be in the list - if it isn't then aValueErrorresults. Here are some calls toindex()and the corresponding return values:values = [81, 59, 42, 65, 72, 42, 42, 81] values.index(72) # returns 4, since 72 appears at index 4 values.index(42) # returns 2, since 42 first appears at index 2 values.index(90) # results in a ValueError -
insert(i: int, x)->NoneThe call
your_list.insert(i, x)adds to the list by insertng the valuexat indexi. The indexishould be a valid index for the new value, and the new value will be inserted before the item at that index. See below how the contents of the list evolves after several calls toinsert():values = [59, 42, 72, 42, 42] values.insert(0, 81) # list is now [81, 59, 42, 72, 42, 42] values.insert(3, 65) # list is now [81, 59, 42, 65, 72, 42, 42] values.insert(7, 21) # list is now [81, 59, 42, 65, 72, 42, 42, 21]Note that
your_list.insert(0, x)inserts at the front ofyour_list, andyour_list.insert(len(a), x)is equivalent toyour_list.append(x). -
extend(another_list)->NoneThe call
your_list.extend(another_list)appends each element inanother_listto the end ofyour_list. Note thatanother_listis not modified. For example:values = [81, 59, 42, 65, 72] values_2 = [42, 42, 21] # extend the list values by appending all of values_2 at its end values.extend(values_2) print(values) # outputs [81, 59, 42, 65, 72, 42, 42, 21] print(values_2) # outputs [42, 42, 21], note values_2 is unchangedNotice that in the call
values.extend(values_2), the listvaluesis changed, butvalues_2, passsed as a parameter, is not modified! -
pop()->List_typeThe call
your_list.pop()removes the last element of a list. It returns the value that was stored there. You can alternately pass an integer parameter (pop(index)->List_type), which will remove and return the value stored at the index. The program crashes with anIndexErrorif an invalid index is passed. The following example shows how to callpop()and looks at the values that are returned.values = [81, 59, 42, 65, 72, 42, 42, 21] # Last element 21 is removed from list, saved in variable 'removed': removed = values.pop() print(values) # outputs [81, 59, 42, 65, 72, 42, 42] print(removed) # outputs 21, the value that was popped # Removes the element at index 3 (65) and saves it: removed = values.pop(3) print(values) # outputs [81, 59, 42, 72, 42, 42] print(removed) # outputs 65, the value that was just popped values.pop(59) # Program crashes with an IndexError, pop index out of rangeNotice that
your_list.pop()is identical toyour_list.pop(len(your_list)-1) -
remove(x)->NoneThe call
your_list.remove(x)removes the first occurrence of the valuexfrom the list. Notice that it differs from thepop()method because you pass the value of the item you want to remove, rather than passing the index. If the valuexis not in the list, then the program crashes with aValueError. So check for membership ofxin the list prior to callingremove().values = [81, 59, 42, 65, 72, 42, 42, 21] values.remove(42) # removes the FIRST occurrence of 42 from the list print(values) # outputs [81, 59, 65, 72, 42, 42, 21] if 2023 in values: # evaluates to False, avoiding a ValueError on the next line values.remove(2023) values.remove(1000) # program crashes with ValueError -
The
delkeywordThis technique for removing elements from a list uses a keyword (
del) rather than a method. It works similarly topop(), except that it does not return the deleted values, and it can be used more generally to delete a slice of a list.values = [10, 20, 30, 40, 50, 60, 70] del values[2] # removes 30 from the list print(values) # outputs [10, 20, 40, 50, 60, 70] del values[1:4] # removes items at index 1, 2 and 3 print(values) # outputs [10, 60, 70] del values[10] # program crashes with an IndexError -
reverse()->NoneThe call
your_list.reverse()modifies the list by reversing the order of the elements.values = [3, 1, 4, 2, 8] values.reverse() print(values) # outputs [8, 2, 4, 1, 3]If you want to access the list in reverse order, but not change the list itself, this can be done with a slice.
values = [3, 1, 4, 2, 8]
print(values[::-1])  # outputs [8, 2, 4, 1, 3]
print(values)   # outputs [3, 1, 4, 2, 8], values itself is unchanged
Since the slice
values[::-1]has its stop index and start index missing, we use the default values. The slice includes the entire list, but the step value of-1means the list will be traversed in reverse order. Notice that the slice just traverses the list in a different order - the contents of the list itself have not been altered. -
sort()->NoneThe call
your_list.sort()modifies the list by sorting the elements from smallest to largest. If you pass an optionalreverse=Trueas a parameter, then the list is sorted in descending order.values = [3, 1, 4, 2, 8] # sort the list in increasing order # The contents of the list itself are modified! values.sort() print(values) # outputs [1, 2, 3, 4, 8] # Next sort the list in decreasing order # The contents of the list itself are modified! values.sort(reverse=True) print(values) # outputs [8, 4, 3, 2, 1] -
sorted(some_list)->listThe
sorted()function is not a method. Methods are called with the syntaxyour_list.method_name(). But unlike the methods described in this section,sorted()is a function that you pass your list to as a parameter. It does not modify your list! Instead, it builds a new list whose contents are your original list, but sorted. Passing a second parameterreverse=Trueproduces a new list that is sorted in descending order.values = [3, 1, 4, 2, 8] # produce a sorted copy of the list # The contents of the list itself are NOT modified! sorted_ascending = sorted(values) print(sorted_ascending) # outputs [1, 2, 3, 4, 8] print(values) # outputs [3, 1, 4, 2, 8], values has NOT been modified # produce a sorted copy of the list, descending order # The contents of the list itself are NOT modified! sorted_descending = sorted(values, reverse=True) print(sorted_descending) # outputs [8, 4, 3, 2, 1] print(values) # outputs [3, 1, 4, 2, 8], values has NOT been modified
Functions can take lists as parameters, or can return lists
Recall the syntax for defining a function:
def function_name(optional parameters)->return type:
    # Indented code block
    # Optional return statement
Recall that we have seen parameter types and return types such as None, float, str, or int. What is new in this section is to define functions that takes parameters that are lists, or whose return type is a list.
Here's a template for the definition of a function that takes a list of ints as a parameter:
def foo(some_list: list[int])->None:
    # code block
Here is a template for the definition of a function that returns a list of strs:
def bar()->list[str]
    # code block
    return a_list_of_strings
Putting it all together
The program below demonstrates taking a list as a parameter to a function, and returning a list from a function. The first function checks to see if a list has only positive values. The second function extracts all of the nonpositive values from a list, returning a new list with just the nonpositive values.
The main program creates a list of random numbers. Then it checks to see if they are all positive. If so, it outputs them. Otherwise, it outputs the list of numbers that weren't positive.
from random import random

def is_all_positive(some_list: list[float])->bool:
    """
    Determines if every element in the given list is positive

    parameters:
        some_list : a list of float values (type: list[float])
    return:
        True if all values are positive and False otherwise (type: bool)
    """
    for element in some_list:
        # As soon as you find a nonpositive number, return False
        if element <= 0:
            return False

    # If we make it this far, then they are all positive
    return True

def get_all_nonpositives(some_list: list[float])->list[float]:
    """
    Build a new list containing all nonpositive values from some_list

    parameters:
        some_list : a list of float values (type: list[float])
    return:
        A new list containing nonpositive float values (type: list[float])
    """
    nonpositives = []

    # iterate over all elements, append each negative one to the new list
    for element in some_list:
        if element < 0:
            nonpositives.append(element)

    return nonpositives

def main():
    # start with an empty list
    a_list = []

    # Make a list of 5 random floats between -100 and 100
    for i in range(5):
        # random() gives a float in [0, 1)
        # random()*200 gives a float in [0, 200)
        # random() * 200 - 100 gives a float in [-100, 100)
        a_list.append(random() * 200 - 100)

    # If they all came out positive, show the list
    if is_all_positive(a_list):
        print(f"The list is all positive: {a_list}")
    # If they weren't all positives, output the ones that aren't:
    else:
        nonpositives = get_all_nonpositives(a_list)
        print(f"Here are the {len(nonpositives)} nonpositive elements: {nonpositives}")


# Run the program:
if __name__ == '__main__':
    main()
Immutable versus mutable types
The types str, float, int, bool are all immutable. The list type is the first type you have seen that is mutable.
The value of an immutable type cannot be changed. This may sound wrong to you, since you have been changing the values of variables since the first day of programming. However, in python when we assign a value to a variable, we are technically not changing the value. Instead we are actually assigning to the variable a new value with a new memory address. The old value in its old memory address is not changed - it just becomes irrelevant to this variable. Each snippet of code below is accompanied by a memory diagram that shows what is happening behind the scenes:
| Code | Memory diagram |
|
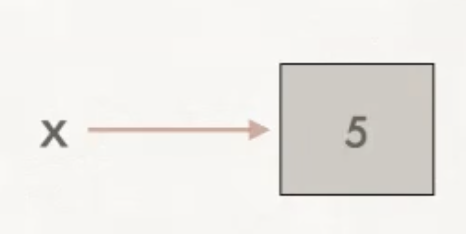
|
|
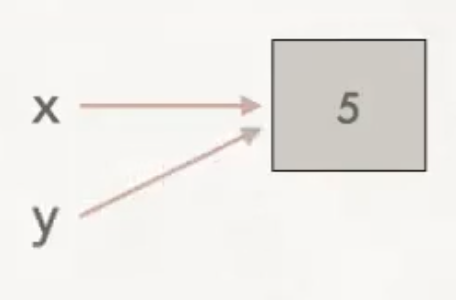
|
|
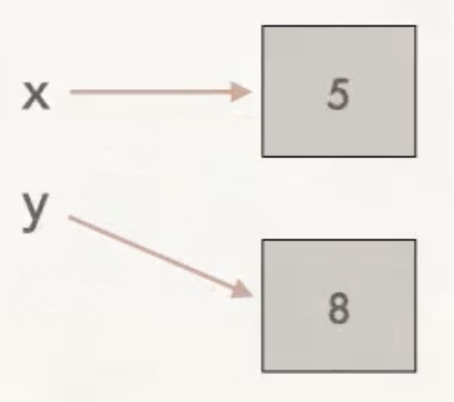
|
In the last example above, if we output the contents of x and y, the values will be different. With immutable types, changing the value of one variable will not change the value that another variable refers to.
On the other hand, the contents of mutable types like list can change. This means that if you have more than one variable assigned to the same list, any of those variables can modify the list. And any changes made are visible regardless of which variable accesses the list afterwards. For example:
| Code | Memory diagram |
|
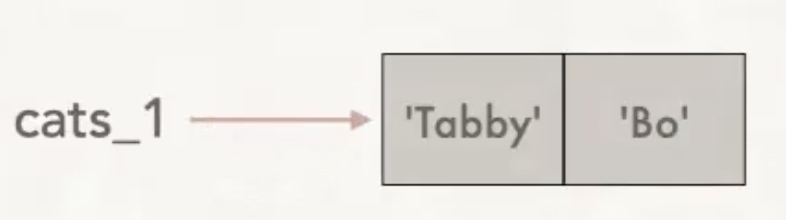
|
|
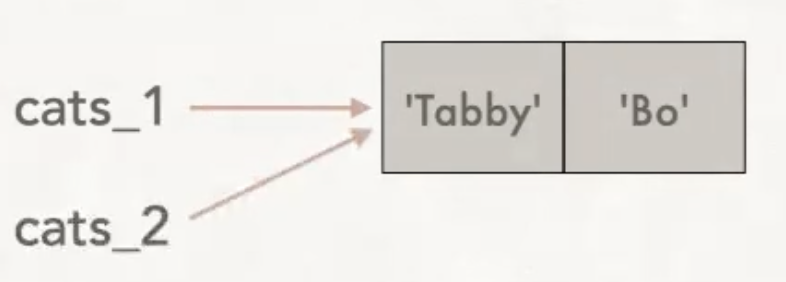
|
|

|
Here, if we output cats_1 and cats_2, the contents are the same, both are ['Tabby', 'Bo', 'Mochi']. The list itself has changed, and this change is the reflected in any variable that refers to the same mutable list. It's important to stay aware of which types are mutable and which types are immutable. Without that, you may have unintentional side-effects to your variables that cause bugs.
Mutable types and functions
When lists are passed to functions, the same mutable behavior applies. For example, trace the following code by hand starting in main().
def foo(a: list[int])->None:
a.append(3)
def main():
b = [1, 2]
foo(b)
print(b)
The function foo() is called, and the list b is passed to it. Within foo(), the list a refers to the same memory location as does the variable b from main(). In other words, there is only one list, and both b and a have access to it. Here is the memory diagram immediately after the value 3 is appended to the list:
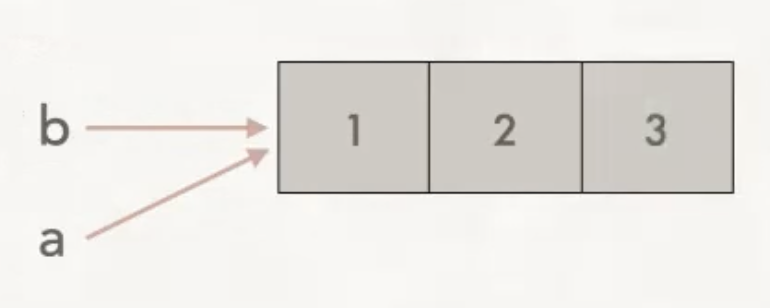
When we exit the function foo() and return to main(), the variable a ceases to exist. The memory now looks like this:
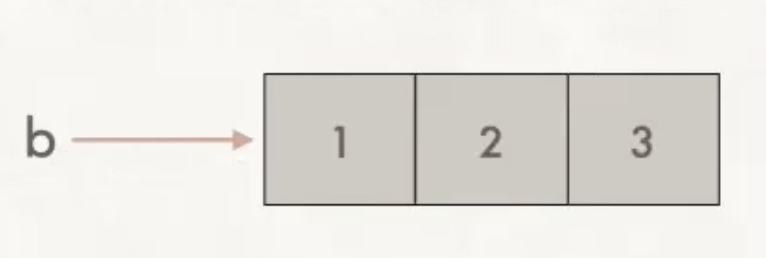
The contents of the list b have been altered by the function foo(). The output is [1, 2, 3].
Reassigning a new list to a variable
The following shows a slightly different situation, in which we reassign a new list to a variable. In this case, we have made the two variables point to two different lists. So here, changing one list does not modify the other.
cats_1 = ['Tabby', 'Bo']
cats_2 = cats_1
cats_2 = ['Mochi']
Here's the memory diagram at the end of execution of the above code block:
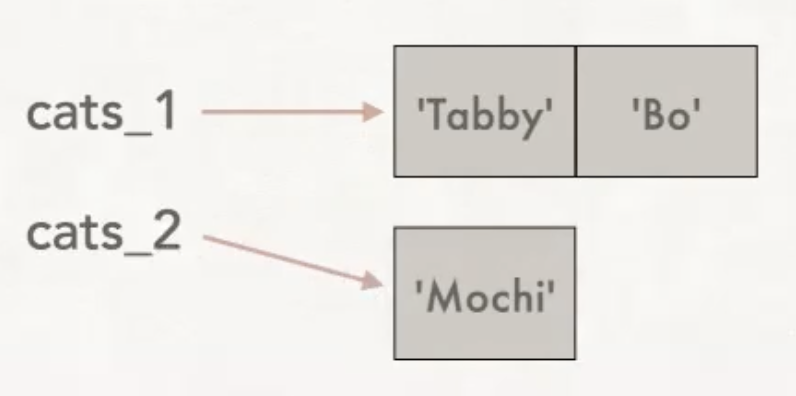
In this situation, changes to the contents of either list will not alter the list that the other variable refers to.
What is a python tuple?
In python, a tuple gives a way to tie together two or more values into one container.
You may pronounce it "tupple" or "toople". The idea comes from having an ordered pair of values (a double), or a triple of values, a quadruple, quintuple, etc. You may package as many values together as makes sense for your application.
The elements in a tuple may be of the same type, or not. Use a tuple when there is some natural underlying concept that ties the values in your tuple together - this makes it easier for others to understand your code. The values being put together in the tuple should be inextricably connected, and they should be values that we want to access in conjunction.
The syntax is to place the comma-separated values within a pair of parentheses, as in jane_birthday = (11, 4, 2004). Here (11, 4, 2004) is a tuple.
Tuples are immutable. The values within the tuple cannot be changed once the tuple has been created.
Example 1 - coordinates in the x-y plane
An ordered pair gives a location in the x-y plane. So each point in the x-y plane can be stored in a tuple.
| Code | Geometry we are modeling |
|
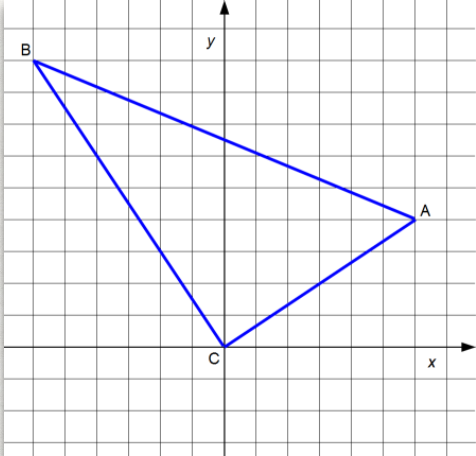
|
Accessing individual values within a tuple
Much like with lists, we can access individual elements within a tuple using an index within square brackets. For example, using the tuples defined in the previous example,
print(vertex_b[1])
will output 9 (the second coordinate of vertex B).
You can unpack elements from a tuple into individual variables:
(b_x, b_y) = vertex_b
The value of b_x will be -6 and the value of b_y will be 9.
While you can examine an individual value in a tuple using square brackets, note that you cannot modify individual elements of a tuple, since tuples are immutable.
vertex_b = (-6, 9)
x = vertex_b[0] # valid line of code
vertex_b[0] = -3  # not allowed, since tuples are immutable, crashes with a TypeError
Example 2 - GPS coordinates
GPS locations specify a position on earth. They have two values that represent latitude and longitude. The pair of latitude/longitude values can conveniently be stored in a tuple.
du_ecs_building = (39.6743, -104.9615)
# ECS is 39.6743° N of the equator and
# 104.9615° W of the prime meridian.
# The value of du_ecs_building[0] is 39.6743
# The value of du_ecs_building[1] is -104.9615

taj_mahal = (27.1751, 78.0421)
machu_picchu = (-13.1631, 72.5450)
denali_peak = (63.1148, -151.1926)

print(f"The Taj Mahal is located at latitude {taj_mahal[0]}, longitude {taj_mahal[1]}")
Output:
The Taj Mahal is located at latitude 27.1751, longitude 78.0421
Example 3 - dimensions of a 3D object
A rectangular box has a length, a width, and a height. These dimensions can be stored together in a tuple. The code below also demonstrates how to pass a tuple to a function, including how to define the type of the parameter. The function can access the individual values within the tuple. In main() below, two tuples are defined. Then the volume() function is called with each of them, and the value is output, rounded to two decimal places.
|

|
Example 4 - playing cards
A playing card represents two pieces of information - the card suit and the card value. These are logically paired together in a tuple:
|
|
|

|
Notice that in this final example we are combining lists and tuples to create a list of tuples. This is called a compound data structure. Compound data structures are commonly used and essential in python.
Putting it all together
The code below contains a function that creates a random playing card. A random element from the list of all possible card suits is chosen, as well as a random element from the list of all possible card values. These are each randomly chosen using the random.choice() function. The two are put together into a tuple, which is returned to the caller. While it may feel that the function is returning two values, in fact it is only returning one: a tuple with two elements.
import random

# Here are the constant full lists for all possible card suits
# and all possible card values
SUITS = ["Spades", "Hearts", "Diamonds", "Clubs"]
VALUES = ["Ace", "2", "3", "4", "5", "6", "7", "8", "9",
          "10", "Jack", "Queen", "King"]

# Create a random card by randomly choosing from the list of all
# possible card suits and all possible card values. Then combine
# into a tuple and return it. Notice the type hinting for the
# function return type
def random_card()->tuple[str, str]:
    random_suit = random.choice(SUITS)
    random_value = random.choice(VALUES)
    return (random_value, random_suit)

def main():
    # random_card() returns a tuple
    card = random_card()
    print(card) # outputs "(7, diamonds)", for example

main()
Differences and similarities between tuple and list
In python, tuples and lists have these things in common:
- They are ordered.
- You can access individual elements using an index in square brackets
- You can iterate through the individual elements in order (either with an index-based loop or a content-based loop).
- They can be sliced.
But tuples and lists differ in the following ways:
- Define a
listusing[], and define atupleusing() tuples are immutable, whilelists are mutable.- You can change the value in a list with an assignment like
your_list[2]=4.7. You can't change individual elements in a tuple, since tuples are immutable.
Use a list (and not a tuple) in this situation:
- Use a
listwhen you expect the contents of your data to change while running the program. Tuples are immutable, so once atupleis created, you can neither change the values of the elements nor add/remove elements without creating a newtuple.
Use a tuple when:
- Use a
tuplewhen you need your data to be immutable (e.g., we’ll see later that keys for dictionaries must be immutable). - Use a
tuplewhen you want a function to return two values. You can put the two values into atupleand return just thetuple. - If your data is sure not to change during running of the program, using a
tuplecan avoid a bug created by your program accidentally modifying the contents. - When it’s possible to use either a
listor atuple, it’s more common to use atuplefor heterogenous data types (the elements within thetupleare of varying types), and to use alistfor homogeneous data types (all the elements of thelistare of the same type). - It is more efficient (runs faster) to iterate through a
tuplethan alist. So if your program is running too slowly, switching to atupleif possible could improve performance.
You've already used strings in python programming quite a bit to store text data. This chapter will cover more in-depth use of python strings.
Python strings (type str) - review
You've already learned quite a bit about strings. Here's a summary review:
- In python the string type (
str) is used for storing text. - You can define strings by enclosing them within either double-quotes or single-quotes.
- You can get text input from the user with the
input()function, which returns astr.name = input("What is your name? ") print(type(name))) # outputs <class `str'> - You can combine strings for output in multiple ways, such as
-
Pass multiple expressions to
print(), separated by commas. In the output, a space is automatically inserted between the strings.name = input('What is your name? ') print('Hello', name, ', I am glad to meet you!')Sample output:
What is your name? Buttercup
Hello Buttercup , I am glad to meet you!
Notice the unfortunate extra space before the comma!
-
Concatenate using the
+operator. This means joining together two strings, one following the other. It gives us complete control over the spaces - you must include any needed spaces.name = input("What is your name? ") print("Hello " + name + ", I'm glad to meet you!")Sample output:
What is your name? Fezzik
Hello Fezzik, I'm glad to meet you!
Notice that the code above uses double quotes rather than single quotes for each of the strings. This was an intentional choice. The text
"I'm glad to meet you"has an apostrophe in it, which is the same character as a single quote. If we try to define that string using a single quote, then python assumes we are ending the string when we reach the single quote. The problem is solved by using double-quotes. -
Use an
f-string (formatted string) to define a string that includes the value of expression(s). Put each expression with a pair of curly braces{}name = input("What is your name? ") print(f"Hello {name}, I'm glad to meet you!")Sample output:
What is your name? Vizzini
Hello Vizzini, I'm glad to meet you!
-
- A backslash (
\) denotes a special character. This is called escaping. Examples include\n(new line),\t(tab),\\(backslash),\'(for including single quote within a single-quoted string),\"(for including a double quote within a double-quoted string). This example uses\\and\n:
outputsprint('\\n - newline\n\\t - tab')
This next example shows two different ways to get single quotes and double quotes within a quoted string:\n - newline \t - tab
Output:print("I'm telling you, a \"python\" is a snake!") print('I\'m telling you, a "python" is a snake!')I'm telling you, a "python" is a snake! I'm telling you, a "python" is a snake!
This section contains some new information about using python strings.
"Arithmetic" on strings
You've seen the + concatenation operator, which naturally can be extended to the += shorthand operator.
name = "Iron"
# Concatenate "Man" to end of "Iron", reassigning to name:
name += "Man" #name now stores "IronMan"
# Convert int 3 to string "3", concatenate to end of "IronMan", reassigning to name:
name += str(3)
print(name) # outputs IronMan3
An uncommonly-used but cute feature of python is multiplying a string by an integer. This results in the string being repeated multiple times.
print("Hello!"*5)
outputs
Hello!Hello!Hello!Hello!Hello!
Accessing individual elements of strings
Many of the operations you've learned on lists also work on strings (and some do not).
The len() function returns the number of characters in a string.
greeting = "Welcome to the wonderful world of strings."
print(len(greeting)) # outputs 42, the number of characters in greeting
Just like lists, strings are ordered. So we can use an index to access individual characters in a string. Similarly, they can be sliced.
greeting = "Welcome to the wonderful world of strings."
print(greeting[0]) # outputs the first character, "W"
print(greeting[-1]) # outputs the last character, "."
print(greeting[:10]) # outputs first 10 characters, "Welcome to"
print(greeting[-5:]) # outputs from 5th to last up to last, "ings."
Iterating over the characters in a string (for-loops)
You can use a for loop to traverse the characters in a string, either by iterating over the index values, or iterating over the characters themselves.
Here's an index-based loop that counts the number of "o"s in the string:
count = 0 # initial value, zero o's
# iterate over all index values. i ranges from 0 to 41
for i in range(len(greeting)):
# greetings[i] is the next character in the string
if greeting[i] == "o":
# if the current character is an "o", count it
count += 1
# output the formatted result
print(f"Number of o's in the greeting is {count}.")
The code below is the content-based version of the same code. This time the variable character iterates over each character in the greeting, starting from W and ending with ., the last character. The variable character takes the value of each character in turn, so we don't need worry about the length of the string, nor keep track of the value of the index.
count = 0 # initial value, zero o's
# iterate over all characters, from "W" to "."
for character in greeting:
# character is the next character in the string
if character == "o":
# if the current character is an "o", count it
count += 1
# output the formatted result
print(f"Number of o's in the greeting is {count}.")
Strings are immutable
Unlike lists, strings are immutable. This means their contents cannot be changed. While I can access an individual character in a string with an index in square brackets, attempting to modify an individual character fails with a TypeError
greeting = "Welcome to the wonderful world of strings."
greeting[0] = 'V'
outputs
TypeError: 'str' object does not support item assignment
This doesn't mean that the value stored in a variable can't be changed. But because of the immutability of strings, we must re-assign a new string to the variable, rather than changing the contents of the string itself. Here's one possible way to do this:
greeting = "Welcome to the wonderful world of strings."
# Build an entirely new string, starting with "V", then concatenating all but the first character of the original
greeting = "V" + greeting[1:]
print(greeting)
outputs
Velcome to the wonderful world of strings.
String methods
In python, strings come with many built-in methods that allow us to examine and compute results about text. A string method is a special kind of function that is executed on a specific string.
Execute a string method with the syntax your_string.method_name(). We will learn just a few of the many available string methods.
Documentation
The full details of the entire list of string methods is not something people typically memorize. Instead you are encouraged to look up the details when you need them. The full list can be found at Python string documentation by w3schools or Offical python documentation on string methods. While there are many options for free on-line tutorials and helpful documentation, note that often in the interest of brevity they contain small inaccuracies. See the official documentation for the final accurate word on all details.
Summary of a few string methods
Here is the list methods you'll learn:
- boolean informational methods:
islower(),isupper(), andendswith() - methods for creating a modified copy:
lower(),upper(),replace()andrstrip()(each return a new modified string, leaving the original string unchanged) - informational methods for searching within strings:
index(),find(),count(), and theinkeyword - break the string into parts:
split()
Here is how to use these methods.
-
islower()->boolandisupper()->boolThe call
your_string.islower()returnsTrueif the letters inyour_stringare only lower-case,Falseotherwise. Similarly,your_string.isupper()returnsTrueif the letters inyour_stringare only upper case,Falseotherwise.quote = 'These are not the droids you are looking for.' if quote.islower(): print("The quote is all lower case") else: print("The quote is not all lower case") # this gets output movie_name = "ET" if movie_name.isupper(): print("The movie name is all upper case") # this gets output else: print("The movie name is not all upper case") -
lower()->strandupper()->strThe call
your_string.lower()returns a new string in which all letters are converted to lower case. The original string is not modified. Similarly,your_string.upper()returns a new string in which all letters are converted to upper case, leaving the original string unchanged. Note that non-letters are unaffected (digits, spaces, punctuation, and special characters are uncased, they do not have two versions, and are unchanged by these methods).names = "R2D2 and C3PO" print(names.upper()) # outputs "R2D2 AND C3PO" print(names.lower()) # outputs "r2d2 and c3po" print(names) # outputs "R2D2 and C3PO", the original unchanged stringIf you want the value stored in the variable to be converted, then you must re-assign it to the value returned by the method. For example
names = "R2D2 and C3PO" names = names.upper() print(names) # outputs "R2D2 AND C3PO" because the value of names was changed by the reassignment -
endswith()->boolA call to
your_string.endswith(pattern)checks to see if the end ofyour_stringmatches the stringpattern, returningTrueif so, andFalseotherwise.filename = input("Enter the filename of your program: ") if not filename.endswith(".py"): print(f"Error: {filename} is not a python program.")Sample output:
Enter the filename of your program: pacman.java Error: pacman.java is not a python program. -
index(sub: str)->intThis method is analogous to the
index()method for lists. The callyour_string.index(sub)finds and returns the index of the first location where the stringsubappears as a substring ofyour_string. If the stringsubdoes not appear at all in the string, then the program crashes with aValueErrorpoem = 'Roses are red, violets are blue' print(poem.index('red')) # outputs 10, since 'red' appears at index 10 print(poem.index('green')) # crashes with a ValueError: substring not foundThe
index()method also allows you to specify an optionalintas a second parameter. This parameter represents the index in the string where you want to start the search:text = "XXXXXHello, Xiomara!" print(text.index('X')) # output 0, first 'X' as at index 0 print(text.index('X', 4)) # outputs 4, starting at index 4, first 'X' is at index 4 print(text.index('X', 5)) # outputs 12, starting at index 5, first 'X' is at index 12 -
find(sub: str)->intSimilar to
index(),your_string.find(sub)finds and returns the index of the first location where the stringsubis found inyour_string. But forfind(), ifsubdoes not appear at all in the string then-1is returned, rather than throwing aValueError. It also accepts an optional second parameter to use as the start index. For example:poem = 'Roses are red, violets are blue' print(poem.find('are')) # outputs 6, since 'are' appears at index 6 print(poem.find('are', 10)) # outputs 23, the first location of 'are' after index 10 print(poem.find('green')) # outputs -1, since 'green' does not appear in poemThe
find()is method is specific to strings - there is nofind()method for lists. -
The membership operators
inandnot inLike in lists, you can use the
inandnot inkeywords to determine if a string appears as a substring in another string. For example:- the boolean expression
'them' in 'Chrysanthemum'evalutes toTrue - the boolean expression
'i' not in 'team'evalutes toTrue
Note that
inandnot inare not methods, so you do not call them with the familiaryour_string.method()syntax. - the boolean expression
-
string.count(sub: str)->intThis method is analogous to the
count()method for lists. The callyour_string.count(sub)returns the number of times that the substringsubappears inyour_string. An optionalintparameter gives a start index to begin the search.poem = 'Roses are red, violets are blue' print(poem.count('night')) # outputs 0, since 'night' does not appear in the string print(poem.count('are')) # outputs 2, since 'are' appears twice in poem print(poem.count('are', 10)) # outputs 1, since starting at index 10, 'are' appears once -
replace(old: str, new: str)->strThe call
your_string.replace(old, new)produces a new string with every occurence of the substringoldreplaced withnew. The new string is returned, andyour_stringis unchanged. An optional 3rdintparameter gives the number of replacements to make.poem = 'Roses are red, violets are blue' print(poem.replace('are', 'shine')) # outputs 'Roses shine red, violets shine blue' print(poem.replace('are', 'shine', 1)) # outputs 'Roses shine red, violets are blue' print(poem) # outputs 'Roses are red, violets are blue', since poem is unchanged -
rstrip()->strThe call
your_string.rstrip()returns a new string with all whitespace at the end of the string removed. Think of it as right strip. (technical detail: whitespace in python includes spaces, tabs, newlines, vertical tabs, line feeds and carriage returns). Note thatyour_stringis not modified. You can optionally pass astrparameter torstrip()to specify a different list of characters to strip from the right end ofyour_string. Also, there are analogous methodslstrip()andstrip(). See the documentation for additional details.This method will be very important when we read from files, since we will often want to remove newlines from the end of each line we read.
movie_quote = "What is the airspeed velocity of an unladen swallow? \n" print(len(movie_quote)) # outputs 55, the number of characters in the string # The next line makes a copy of the quote, with the ' \n' stripped off, # then reassigns movie_quote to refer to the new string movie_quote = movie_quote.rstrip() # On the next line, you will be able to see that the newline is gone, # (though you won't be able to tell on the console that the spaces are missing) print(movie_quote) # The next line outputs 52, proving that the last three characters are gone print(len(movie_quote)) -
split()->list[str]The call
your_string.split()returns a list of substrings. By default, the list is split at whitespace characters (and the whitespace is removed). So you can think of this method as a way to split a sentence into words. Note that the return value is not a string, but it is a list of strings!movie_quote = "What is the airspeed velocity\nof an unladen swallow?" words = movie_quote.split() print(words) print(len(words)) # Number of elements in returned list = number of words in original stringOutput:
['What', 'is', 'the', 'airspeed', 'velocity', 'of', 'an', 'unladen', 'swallow?'] 9You can optionally give a parameter to the
split()method which is a string containing the character(s) you want to use as the delimeter instead of the default whitespace.# Split text into substrings, assuming they are separated by commas states = "Alabama,Alaska,Arizona,Arkansas" state_list = states.split(",") # Use a comma delimeter print(state_list) # outputs ['Alabama', 'Alaska', 'Arizona', 'Arkansas'] # Split text into a list of lines text = 'Line 1\nLine2\nLine3' lines = text.split('\n') # Use a newline delimeter print(lines) # outputs ['Line 1', 'Line2', 'Line3']
Programs can interact with files on your file system
Up to this point, in all programs we have written, data is either hard-coded into the program or is input from the user. As a similar limitation, we have always output results to the console. These limitations have the following disadvantages:
- Hard-coded data can't be changed without modifying the program itself.
- It's inconvenient to hard-code large sets of data within a program.
- Output written to the console is not saved permanently.
File input/output (reading from a file and writing to a file) allows us to input data into a program from a file and store output from a program into a file. This way, we can modify the data by modifying the file rather than the actual program. This is especially important when the amount of data is large, since it's better practice to have large files rather than large programs. Finally, if our programs write data to files stored on the file system, then they can be used even after the program terminates. For example, another program could use that output as its input.
When we talk about input and output, we are taking a perspective from inside a running program. So input refers to getting information into the program from a file, and output refers to information coming from the program and being stored in a file.
Opening files
Before reading from a file (input) or writing to a file(output), the program must open the file.
The open() function returns a file object, which can then be used for reading, writing or appending to a file.
some_file = open('<path/file_name>', mode = <'string'>')
If the file we're trying to open is in the same directory (folder) as the program we're running, then file_name.extension is sufficient. If the file is stored somewhere else in the file system, then we specify a full path to the file. If the file we are trying to open does not exist, the program will crash with a FileNotFound exception.
Modes:
| Mode | Name | Details |
|---|---|---|
'r' | Read | Fails if the file doesn't exist ('r' is the default if the mode is unspecified') |
'w' | Write | File is created if it doesn't exist. Overwrites existing content if the file already exists. |
'a' | Append | File is created if it doesn't exist. Adds to the end of existing file. |
'r+' | Read/write | Open file for reading and writing. Fails if the file doesn't exist. |
'w+' | Write/read | Writing and reading. Overwrites existing content if the file already exists. |
'a+' | Append/read | Open file for reading and appending, create file if it doesn't exist. |
Reading from a text file
There are multiple ways to read text data from a file. These examples assume that the file object some_file has already been opened.
-
Read the entire contents of the file into one string:
giant_string = some_file.read() -
Read the file into a
listof lines. The contents are broken at each\nin the file, andlines_listis a list of strings:lines_list = some_file.readlines() -
Read the lines with a loop:
for line in some_file: # The variable line (type str) contains the next line in the file # Code to process each line goes here # You might need to strip the terminating '\n' from each line # There might be final empty lines of just '\n' -
Use a context manager, which combines opening/reading/closing within one organized block. This makes for more readable and organized code and is the preferred technique.
with open(...) as some_file: # All code involving the file 'some_file' goes here # No need to close file, it is closed automatically at end of indented block
Closing files
When done reading a file, unless you are using a context manager, always close the file object by calling its close() method:
some_file.close()
If you don't make a practice of this, you are tying up memory resources. This problem typically doesn't show up until you write larger programs. If you leave too many files unclosed, then your program could slow down or even crash.
Once you call some_file.close(), you can no longer read from that file.
Reading from files without context manager versus with context manager
| No context manager: | Using context manager: |
|
|
Putting it all together
The code snippets below open a file called names.txt that is stored in a directory (folder) called data_files. It contains a comma-separated list of names.
In this example, the entire contents of the file are stored in one string.
# open the file names.txt, which is stored in a directory called
# data_files within this working directory. This is a relative path.
a_file = open("data_files/names.txt")
# Read the entire contents of the file into one string
giant_string = a_file.read()
# output the entire contents of the file
print(giant_string)
a_file.close()
The output is the entire content of the file names.txt, which for the purpose of this example is:
Janis Joplin,Aretha Franklin,Pat Benatar,Deborah Harry,Tina Turner,Joan Jett,Stevie Nicks,Melissa Etheridge,Grace Slick,Courtney Love
In the following code snippet, the contents of the file are split into a list of separate strings.
a_file = open("data_files/names.txt")
# Read the entire contents of the file into one string, then process that
# list by stripping whitespace from the beginning and end of the string.
# The names are separated by commas, so split them at each comma
# into separate strings
name_list = a_file.read().strip().split(",")
# output the list of names
print(name_list)
# or output the names one at a time:
for name in name_list:
print(name)
a_file.close()
The output for print(name_list) is:
['Janis Joplin', 'Aretha Franklin', 'Pat Benatar', 'Deborah Harry', 'Tina Turner', 'Joan Jett', 'Stevie Nicks', 'Melissa Etheridge', 'Grace Slick', 'Courtney Love']
The output for the for loop is:
Janis Joplin
Aretha Franklin
Pat Benatar
Deborah Harry
Tina Turner
Joan Jett
Stevie Nicks
Melissa Etheridge
Grace Slick
Courtney Love
The following code snippet shows how to use a context manager to open and read the same file.
# Use a context manager to open and read the file
with open("data_files/names.txt") as a_file:
# Read the entire contents of the file into one string,
# then strip white space and split at the commas:
names_list = a_file.read().strip().split(",")
# Use loop to output names:
for name in names_list:
print(name)
Processing multi-line files
The following shows the contents of a file OH_prefs.csv. This file contains the data for each student of which office hours they are available for.
Student name,8AM,9AM,10AM,11AM,12PM,1PM,2PM,3PM,4PM,5PM
Janis Joplin,Y,Y,Y,Y,Y,N,Y,N,Y,Y
Aretha Franklin,Y,Y,Y,Y,Y,N,N,Y,N,Y,Y
Pat Benatar,Y,Y,Y,Y,N,N,Y,N,Y,Y
Deborah Harry,Y,N,Y,Y,N,Y,Y,Y,Y,N
Tina Turner,Y,Y,Y,Y,N,Y,Y,Y,Y,Y
Joan Jett,Y,Y,Y,N,Y,Y,N,Y,N,N
Stevie Nicks,N,Y,Y,Y,Y,Y,N,Y,N,N
Melissa Etheridge,N,N,Y,Y,N,N,Y,N,N,N
Grace Slick,N,N,N,N,N,Y,Y,N,Y,Y
Courtney Love,N,Y,N,N,N,N,Y,N,Y,N
Our goal is to read this file and transform it into a list of counts for how many students are available at each office hour. Please use this exercise to practice reading from a file, using lists, as well as algorithmic thinking.
def get_oh_prefs(file_name: str)->list[int]:
"""
read contents of file file_name and returns a list that contains
the number of students available at each hour of the day
parameters:
filename: file to read (type: str)
return:
count of number of students available at each hour (type: list[int])
"""
# Create a list, initialized with 10 0's
hours_prefs = []
for i in range(10):
hours_prefs.append(0)
# read the file
with open(file_name, 'r') as a_file:
# Each line in the file corresponds to one student
for line in a_file:
# student_prefs will contain 'Y's and 'N's
student_prefs = line.strip().split(",")
# ignore the first entry in the line, which is the name
for i in range(1,len(student_prefs)):
# If they said 'Y', then count them for this time of day
if student_prefs[i] == 'Y':
# Remember that i=0 is the name
hours_prefs[i-1] += 1
return hours_prefs
def main():
hours_list = get_oh_prefs('data_files/OH_prefs.csv')
print(hours_list)
# Run the program:
if __name__ == '__main__':
main()
Writing to text files
Text file objects have a method write(text: str)->int which writes text to a file and returns the number of characters written.
a_file.open("foo.txt", "w")
a_file.write('some inspiring words \n')
a_file.write('and more inspiring sentences.\n)
Unlike python's print() function, a newline is not automatically included in a call to write(). So the newline must be part of the text you are writing to the file.
Writing to a computer's disk is expensive in run-time, so most languages by default buffer their output (in a temporary list), saving it to write in larger chunks. This means that after a call to write(), the data is not yet actually stored in the file. You can request that the program send the buffered data immediately to the disk by calling the flush() method.
a_file.flush()
When you call a_file.close(), the buffer is automatically flushed. So if the text you are writing to a file isn't showing up, check for either a missing call to flush() or to close().
Example
The previous section ended with a program that reads from a file and processes the data, producing a list of the number of students available for office hours at each hour of the day. We will now extend that program to write the computed results to a file.
def get_oh_prefs(file_name: str)->list[int]:
"""
read contents of file file_name and returns a list that contains
the number of students available at each hour of the day
parameters:
filename: file to read (type: str)
return:
count of number of students available at each hour (type: list[int])
"""
# Create a list, initialized with 10 0's
hours_prefs = []
for i in range(10):
hours_prefs.append(0)
# read the file
with open(file_name, 'r') as a_file:
# Each line in the file corresponds to one student
for line in a_file:
# student_prefs will contain 'Y's and 'N's
student_prefs = line.strip().split(",")
# ignore the first entry in the line, which is the name
for i in range(1,len(student_prefs)):
# If they said 'Y', then count them for this time of day
if student_prefs[i] == 'Y':
# Remember to ignore i=0, so shift the index by 1
hours_prefs[i-1] += 1
return hours_prefs
def write_results_to_file(file_name: str, results: list[str])->None:
hours = ['8AM','9AM','10AM','11AM','12PM','1PM','2PM','3PM','4PM','5PM']
# open the file for writing
with open(file_name, "w") as a_file:
# for each hour of the day, output the time and its student count
for i in range(len(hours)):
a_file.write(f"{hours[i]} : {results[i]}\n")
def main():
hours_list = get_oh_prefs('data_files/OH_prefs.csv')
write_results_to_file('data_files/OH_results.txt', hours_list)
# Run the program:
if __name__ == '__main__':
main()
Contents of data_files/OH_prefs.csv before the program runs:
Student name,8AM,9AM,10AM,11AM,12PM,1PM,2PM,3PM,4PM,5PM
Janis Joplin,Y,Y,Y,Y,Y,N,Y,N,Y,Y
Aretha Franklin,Y,Y,Y,Y,Y,N,N,Y,N,Y,Y
Pat Benatar,Y,Y,Y,Y,N,N,Y,N,Y,Y
Deborah Harry,Y,N,Y,Y,N,Y,Y,Y,Y,N
Tina Turner,Y,Y,Y,Y,N,Y,Y,Y,Y,Y
Joan Jett,Y,Y,Y,N,Y,Y,N,Y,N,N
Stevie Nicks,N,Y,Y,Y,Y,Y,N,Y,N,N
Melissa Etheridge,N,N,Y,Y,N,N,Y,N,N,N
Grace Slick,N,N,N,N,N,Y,Y,N,Y,Y
Courtney Love,N,Y,N,N,N,N,Y,N,Y,N
Contents of data_files/OH_results.txt after the program has run:
8AM : 6
9AM : 7
10AM : 8
11AM : 7
12PM : 4
1PM : 5
2PM : 7
3PM : 5
4PM : 6
5PM : 5
Exceptions and errors
Exceptions and errors are unexpected events in a program. Here are some errors you are already familiar with:
| Exception | Cause | Example |
|
Parsing error, program doesn't run |
Invalid code |
|
|
Parsing error, program doesn't run |
Invalid indentation |
|
|
Run-time exception |
Variable not initialized before use |
|
|
Run-time exception |
Data types used incorrectly |
|
|
Run-time exception |
Wrong value passed to a function |
|
|
Run-time exception |
Invalid index used |
|
|
Run-time exception |
A file of given name doesn't exist |
|
Run-time errors can be detected and processed as part of the program. This means that you can write code to address the error and recover from it gracefully, rather than the program just crashing. This is done with a try-except code block. Place the code that has the chance of producing a runtime exception within the try part of a try-except block, then process the potential exception in the except block. The except block is only executed in case of the runtime exception named. Here's an example of how to process a user input error:
try:
age = int(input("Input your age: "))
except ValueError:
print('Error: Age must be a whole number')
Here's a sample output showing with the user sees:
Input your age: Sue
Error: Age must be a whole number
In the above code, instead of the program crashing with the ValueError, the error is caught by the try block and handled by the except block. It is common to put a try-except block within a loop, giving the opportunity for the code to repeat execution until no error occurs.
age = None # initialize age to an invalid value
# Keep trying to get valid input until finally
# age is a valid integer
while age is None:
try:
age = int(input("Input your age: "))
except ValueError:
print('Error: Age must be a whole number.')
print(f'Your age is {age}'
Sample output:
Input your age: Sue
Error: Age must be a whole number.
Input your age: 27.5
Error: Age must be a whole number.
Input your age: 27
Your age is 27
It is very common practice to put opening of a file within a try-except block.
file_name = input("What is the name of the file? ")
try:
with open(file_name) as a_file:
# code to process contents of file
except FileNotFoundError:
print(f'Error: could not open "{file_name}"')
Best practices for when to handle exceptions
Catching errors during standard running of a progam is good programming practice, since unhandled exceptions cause the program to crash.
From now on, you should be using try-except blocks to handle errors that legitimately occur during the running of programs, in particular to respond to invalid input entered by the user. However, do not use try-except blocks to mask errors in your own code. For example, if your program has a bug in which you traverse a list past its end and crash with an IndexError, never stop your program from crashing by wrapping the incorrect lines of code within a try-except block. Instead always fix the underlying bug.
Python dictionaries
Dictionaries are a very important data structure in programming. The idea is to store large amounts of data in an efficient way. Data items are accessed with a lookup key, which is stored together with the associated data for that key.
What is a dictionary?
A dictionary in python is much like the familiar idea of a dictionary: each word is paired with its meanings. You look up the meanings based on the word, but you cannot search for the word based on a meaning. We think of the word as the key and the list of meanings as the associated value. Each key is unique (it appears only once in the dictionary). Associated values, however, are allowed to be duplicated. We say a dictionary maps or associates a key with a value. That's why in Computer Science dictionaries are also called maps.
Examples of applications of python dictionaries
-
A University system stores students records. Each student record is identified with their unique student ID. Two students might have the same name, but never the same ID. The student ID is the key, and the associated value is the entire student record, including personal information and transcript. The system allows searching, adding new students, modifying the contents of their record, or removing former students. In all cases, the student record is accessed using the key (the student ID).
-
The Social Security Administration keeps records for all taxpayers. The unique social security numbers for each person are used as the keys to access their associated tax records. No two people can ever have the same Social Security Number. Typical actions are to add new people, and to access and modify their records. All actions use the SSN as the key to find the associated tax records for the person holding that SSN.
-
An airline stores reservations records. Each reservation is stored under a unique confirmation code (typically they look something like
PQ56SRV). The data is all stored with these unique confirmation code as the keys, with the information about the reservation as the associated value. We must be able to access, add, remove and modify reseration records.
Key features of dictionaries
-
An item in a dictionary consists of a pair: a unique key (student ID, SSN, airline confirmation code) and its associated value (transcript, tax records, reservation information).
-
The dictionary itself is a collection of items.
-
We must be able to search for, add, remove, and modify items. These operations need to be done quickly and efficiently.
Creating dictionaries in python
A dictionary is a collection of key/value pairs. The keys must be unique, and must be of an immutable type (such as int, str, float, tuple, but not list). The dictionary itself is mutable.
One way to define a dictionary in python is to use a dictionary literal. We list the items separated by commas, and surround the list with curly brackets {}. Each item is defined as key:value. For example, here's a dictionary that stores phone numbers associated with each unique name:
phonebook = {'Jane': '213-665-1234',
'Milagros': '720-933-5418',
'Kebede': '847-439-4312',
'Desta': '847-439-4312' }
Each name is the key, and the phone numbers are the associated values. The key type is str, which is immutable as required. Here, the value is also a str, but note that the value is allowed to be mutable. For example, the value could be a list of associated phone numbers. Duplicate names are not allowed, but duplicate values are allowed (in this example, two people could share the same phone number).
Another way to create a dictionary is with the dict() function. Pass a list of tuples representing the key/value pairs. The phonebook above could equally have been created with this line:
phonebook = dict([('Jane', '213-665-1234'),
('Milagros', '720-933-5418'),
('Kebede', '847-431-1729'),
('Desta', '847-439-4312')])
Read the above definition of phonebook carefully: it has a pair of outermost parentesis () for the funtion call to dict(), it has a pair of square brackets [] for the beginning and end of the list of tuples, and each tuple in the list is defined with a pair of parentheses (), and consists of a key/value pair.
You can create a new empty dictionary in either of these two ways:
empty_dictionary1 = {}
empty_dictionary2 = dict()
Accessing, modifying and adding items to a dictionary
We can access individual elements of a dictionary using the same square-bracket syntax we use for an index in lists and strings. Put the key in the square brackets.
print(phonebook['Desta']) # outputs 847-439-4312
milagros_number = phonebook['Milagros'] # look up Milagro's number, then store in a variable
Think of this as a lookup. The expression phonebook['Desta'] searches in the dictionary for an item with key Desta, producing the value associated with the key Desta.
That same syntax can be used to add a new item to the dictionary or to modify an existing element
phonebook['HuanHuan'] = '602-654-3210' # adds a new item to the dictionary with key 'HuanHuan'
phonebook['Jane'] = '808-647-1234' # changes phone number for key 'Jane'
If you try to access a key that does not exist in the dictionary, a KeyError is produced.
# The program crashes on this line with a KeyError
# since there is no item in phonebook with key "Kai"
print(f"Kai's number: {phonebook['Kai']}")
Deleting items from a dictionary
To remove an item from a dictionary, we can use the del operator:
print(phonebook['Kebede']) # outputs '847-431-1729'
del phonebook['Kebede'] # removes item with key `Kebede`
print(phonebook['Kebede']) # crashes with a KeyError
Checking for membership in a dictionary
To check if a key exists in a dictionary, use the in operator.
The expression
<key> in <dictionary> is a boolean expression that evaluates to True if the key matches an item in the dictionary, False otherwise.
This gives us a way to avoid accessing a non-existent element, thus avoiding a KeyError.
if `Kebede` in phonebook:
print(f"Kebede's number is {phonebook['Kebede']}")
else:
print("No known phone number for Kebede.")
Note: you could alternately handle key errors by accessing the dictionary within a try block and handling KeyErrors with the except block.
Practice exercises
# Exercise 1: create an empty phonebook and print it:
phonebook = dict()
print(f"empty: {phonebook}")
# Exercise 2: Reinitialize the phonebook with two number in 2 different ways
#first way:
phonebook = {"Alice": "123-145-2541", "Bob": "145-145-7514"}
print(f"Phonebook with 2 items: {phonebook}")
# second way:
phonebook = dict([("Alice", "123-145-2541"), ("Bob", "145-145-7514")])
print(f"Same phonebook with 2 items: {phonebook}")
# Exercise 3: Add two more names to phonebook and output it
phonebook["Hong"] = "145-134-5614"
phonebook["Emily"] = "145-146-7316"
print(f"Phonebook after adding two more items: {phonebook}")
# Exercise 4: Print a phone number from the phonebook, then modify it, then print it again
print(f"Before: {phonebook['Alice']}")
phonebook["Alice"] = "111-111-1111"
print(f"After: {phonebook['Alice']}")
# Exercise 5: Try printing a phone number for a key that doesn't exist (producing a KeyError)
print(phonebook["Marcelo"]) # crashes with a KeyError
# Exercise 6: Fix the code above to check for membership before accessing a nonexistent key
if "Marcelo" in phonebook:
print(phonebook["Marcelo"]) # output Marcelo's number if found
else:
print("Marcelo is not in the phonebook")
# Exercise 7: Delete an item and print the dictionary
del phonebook["Alice"]
print(phonebook)
Iterating over dictionaries
Dictionaries are primarily used for their fast implementation of searching for an item, removing an item, adding an item and modifying an item. In python dictionaries, each of these actions are made to execute fast by performing them without having to traverse through the entire dictionary. You'll learn about how this is accomplished in the first Data Structures and Algorithms class.
Occasionally, we are forced to traverse through all items in a dictionary. This operation runs slowly, so we avoid traversing dictionaries whenever possible. When it is unavoidable, there are three methods we use to iterate over dictionary keys, dictionary values, and dictionary items:
your_dictionary.keys() # returns a view object of all keys
your_dictionary.values() # returns a view object of all values
your_dictionary.items() # returns a view object of tuples with key/value pairs for each item
Example 1
The following example demonstrates creating a dictionary, then traversing its keys, its values, and its items. The dictionary stores names and corresponding phone numbers. It is created by starting with a list of names, and assigning a random phone number to each name in the list. While this is not a realistic way to create a phonebook, it practices a few techniques we've learned in previous sections.
from random import randint
# list of names that were randomly generated:
names_list = [
"Kelly Mathis", "Alisha Duran", "Marcella Robison", "Adyson Felton",
"Magnus Jewell", "Luciano Leal", "Krew Temple", "Chance Chamberlain",
"Romina Xiong", "Adina Looney", "Ayush Beal", "Finnley Broussard",
"Robbie Donahue", "Titan Connelly", "Faris Kenney", "Kimber Murphy"]
# Create an empty dictionary to store a phonebook
phonebook = {}
# Add each name to the phonebook, giving them a randomly-generated phone number
for name in names_list:
phonebook[name] = str(f"{randint(200, 999)}-{randint(100, 999)}-{randint(0, 9999)}")
# Iterate over all keys (names) in the phonebook:
for name in phonebook.keys():
print(name) # outputs all the keys (names) in the phonebook
# Iterate over all values (phone numbers) in the phonebook:
for phone_number in phonebook.values():
print(phone_number) # outputs all the values (phone numbers) in phonebook
# Iterate over all items (name/phone number tuples) in phonebook:
for item in phonebook.items():
print(item) # outputs all tuples (name/phone number pair) in phonebook
# Iterate over all keys in phonebook, outputting info for all names that start with 'A'
for name in phonebook.keys():
if name.lower().startswith('a'):
print(f"{name}: {phonebook[name]}")
# Another strategy for previous exercise:
# Iterate over all items in phonebook, outputting info for all names that start with 'A'
for item in phonebook.items():
if item[0].lower().startswith('A'):
print(f"{item[0]}: {item[1]}")
Example 2
In this example, we create a dictionary whose keys are the name of a state, and the corresponding value is a list of that state's largest cities. The value is not a single city, but an entire list. Note that the key of the dictionary is a string, which is immutable as required. But the value can be mutable, in this case a list. We can change the value associated with a state by changing it to an entirely new list. Or, we can modify the list itself associated with a particular state.
# Create a dictionary of the largest few cities in several state/territories
largest_cities = {"Alabama": ["Huntsville", "Montgomery", "Birmingham", "Mobile", "Tuscaloosa"],
"Alaska": ["Anchorage", "Fairbanks", "Juneau", "Wasilla", "Sitka"],
"American Samoa": ["Tafuna", "Nu'uuli", "Pago Pago", "Ili'ili", "Pava'ia'i"],
"Arizona": ["Phoenix", "Tucson", "Mesa", "Chandler", "Scottsdale"],
"California": ["Los Angeles", "San Diego", "San Jose", "San Francisco", "Fresno"]
}
# Change the dictionary entry for American Samoa to refer to an entirely new list:
largest_cities["American Samoa"] = ["Pago Pago", "Tafuna", "Leone", "Faleniu", "Aua"]
# Add a new item to the dictionary. Key is "Colorado", and its value is a list of cities
largest_cities["Colorado"] = ["Denver", "Colorado Springs", "Aurora"]
print(largest_cities["Colorado"]) # outputs ['Denver', 'Colorado Springs', 'Aurora']
# Add a city to Colorado's list. Note that largest_cities["Colorado"] is a list.
# We are appending a new city to that list
largest_cities["Colorado"].append("Fort Collins")
print(largest_cities["Colorado"]) # outputs ['Denver', 'Colorado Springs', 'Aurora', 'Fort Collins']
Two-dimensional lists
Think of a list as a linear storage of multiple values.

In python you can also have two-dimensional (2D) lists. A 2D list is a matrix or grid of values.
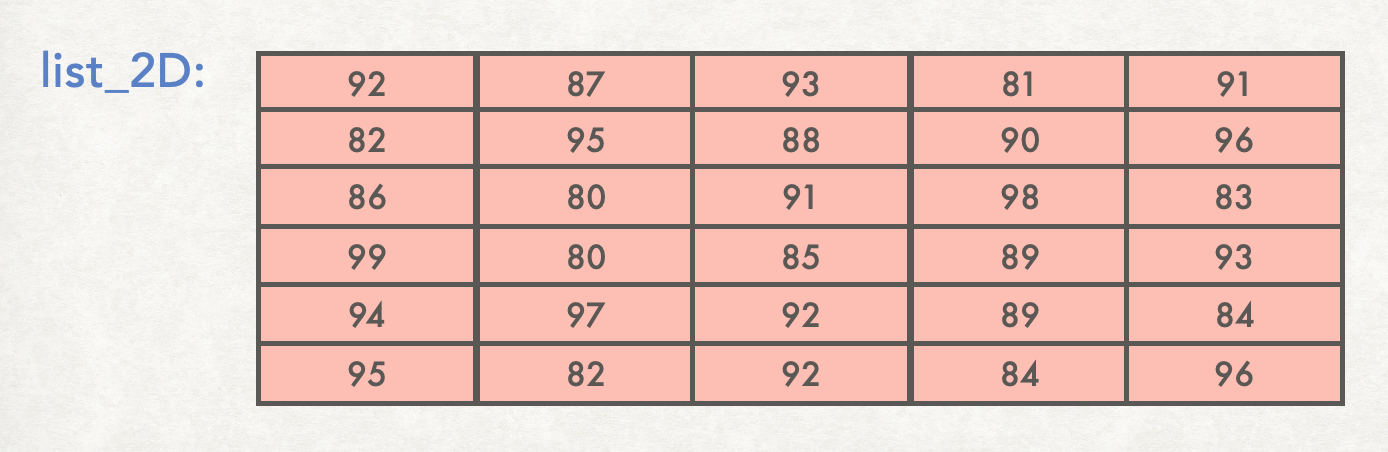
Why do we need 2D lists?
There are many uses for 2D lists in programming. For example, many games require storage of information in two dimensions. Writing a computer program in python to implement any of the following games would likely use a 2D list:

Another example is the storage of digital images, which can be stored as 2D lists. If you zoom in closely on a digital image, you will see that the image is composed of small squares of color called pixels (the word comes from “picture elements”). So the image can be stored as a 2D grid of colors. In python this is a 2D list, or a list of lists.
Third, sometimes information is best organized in a grid. In these cases, the data would be stored in a 2D list. For example, here's a table that stores the temperature recorded by several different sensors at several times of day:
And here's a table showing the average heating bill for several different apartments during each quarter of the year:
Next we will look at how 2D lists are stored in python as lists of lists.
Defining 2D lists in python
One way to create a 2D list in python is to use a 2D list literal. You've already learned how to create a 1D list literal, and the syntax here is similar. However, instead of a simple list, here we have a list of lists, or nested list.
The python code below stores the contents of this table:
heating_bill = [
[112, 32, 10, 96],
[60, 15, 0, 70],
[196, 65, 15, 180]
Notice that heating_bill is a list with 3 items. Each item is itself a list.
- The first element
heating_bill[0]is itself a list:[112, 32, 10, 96]. - The second element
heating_bill[1]is itself a list:[60, 15, 0, 70]. - The third element heating_bill[2] is itself a list:
[196, 65, 15, 180].
How to access individual elements in a 2D list
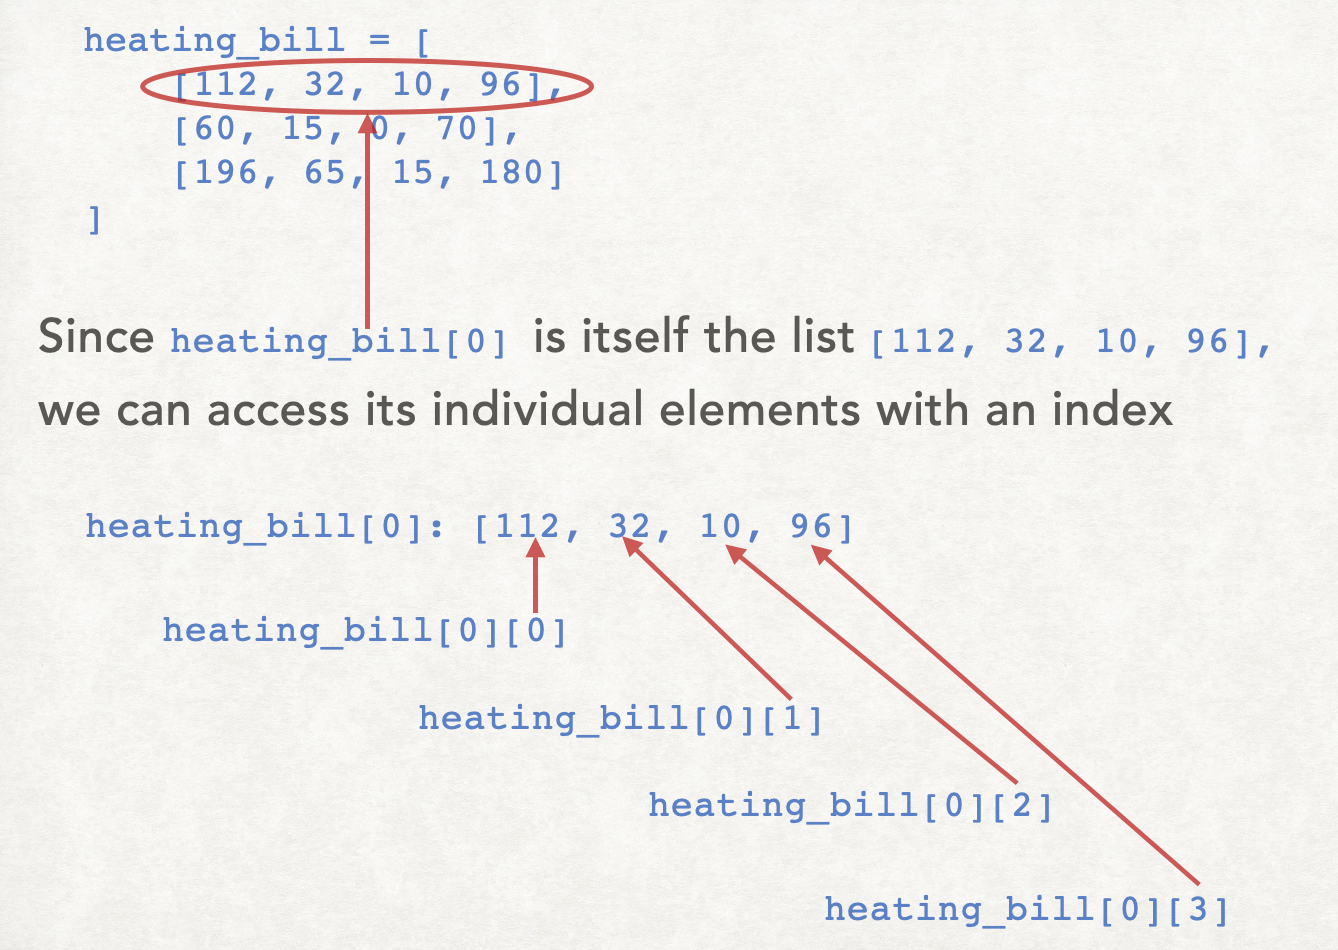
Rather than focusing on 2D lists as a list of lists, another perspective is to think of it as a rectangular grid, each position having a row position and a column position. So to indicate a specific element, you give two index values. The first index gives the row and the second index gives the column.
For example:
heating_bill[0][0]refers to row index0, column index0, whose value is112.heating_bill[2][3]refers to row index2, column index3, whose value is180.heating_bill[1][2]refers to row index1, column index2, whose value is0.
Creating 2D lists using for-loops
Consider the following 4x3 2D list, with all values initialized to 0:
temperature = [
[0, 0, 0],
[0, 0, 0],
[0, 0, 0],
[0, 0, 0]
]
This 2D list could be created more flexibly with the following code:
# Create an empty list
temperature = []
# Four rows:
for row in range(4):
# Create an empty sub-list
new_row = []
# Fill the row with three 0's
for column in range(3):
new_row.append(0)
# Put the newly-created row into the outer list:
temperature.append(new_row)
Data Science
Python is becoming an increasingly popular choice for many applications, but in particular it has become one of the standards in the field of Data Science.
Because of its popularity and applicability to this field, let's explore a few fundamental techniques for working with existing datasets and how Python can help make our lives easier!
Tabular Data
First, let's focus on a common data format known as "tabular data". This just means data that is best represented as a table. A relatable way of thinking about this kind of data might be an Excel spreadsheet that represents a collection of "items" of the same type. Each row represents one "item", and each column is an attribute of that "item":
| Name | Age | Favorite Icecream |
|---|---|---|
| Bob | 24 | Chocolate |
| Alice | 31 | Vanilla |
| John | 48 | Strawberry |
For example, this a sheet of "people", where each row is a "person", and each column is an attribute of that person.
There are many different ways of working with tabular data (storing it, reading it, modifying it, analyzing it) and we're going to focus on one that will let us explore and use the data structures we're already familiar with.
CSV (Comma-Separated Values)
The simplest way of representing a table is to just put it in a text file. Even for this, there are many ways you could choose to do it, but probably the most common way is using comma-separated-values (CSV).
Each row of text will represent one item, where the attributes of that item are separated by commas. Typically, the first row of text in the file will be the names of the columns (attributes):
name,age,fav_icecream
Bob,24,chocolate
Alice,31,vanilla
John,48,strawberry
Note: sometimes this can be hard to read visually due to the mis-alignment of columns. If you're using VSCode (or something similar) you can install add-ons that color your CSV to make the columns clearer (or add spacing to align them).
Since a .csv file is just a text file, we can read it as we would normally read any text file in Python (with the open() function). But turning that text into other data structures (lists/dictionaries) is so common that Python has a built-in CSV reader!:
import csv
with open('mydata.csv') as csvfile:
rows = csv.reader(csvfile)
for r in rows:
print(r)
# r is a list of the values
# [value1, value2, ...]
So in one go, we've turned the CSV file full of text into a list of lists, containing our data!
NOTE: You can also read files with separators other than a comma:
rows = csv.reader(csvfile, delimiter=';')
The CSV format is more general than the specific use-case we're talking about here (tabular data) - it's really just a way of storing lists of values in rows! For the specific use-case of tabular data (i.e. items in rows, with attributes in columns, and a starting row of column names) there's a specific tool that we'll use from the csv module:
with open('mydata.csv') as csvfile:
# here's the magic step:
rows = list(csv.DictReader(csvfile))
for r in rows:
print(r)
# r is now a dictionary!
# { column_name: attribute, ... }
So now, we've turned our text (CSV) representation of a table... into a list of dictionaries!!! Each dictionary represents one full "Person", with all of their attributes. It looks like this:
[
{ "name": "Bob",
"age": 24,
"fav_icecream": "chocolate" },
{ "name": "Alice",
"age": 31,
"fav_icecream": "vanilla" },
{ "name": "John",
"age": 48,
"fav_icecream": "strawberry"}
]